
How to Build a Lego Snowflake Ornament
A DIY LEGO snowflake ornament can be a creative family activity, especially during the winter season.
As winter’s frosty embrace blankets the world in a shimmering white, it’s the perfect time to embark on a creative journey with your little ones. Imagine the joy and excitement as you join forces to construct a masterpiece that captures the magic of the Christmas season – a LEGO snowflake!
In this step-by-step guide to make a DIY Snowflake Craft, we’ll explore the enchanting world of LEGO building, bringing the beauty of winter into your home one brick at a time.

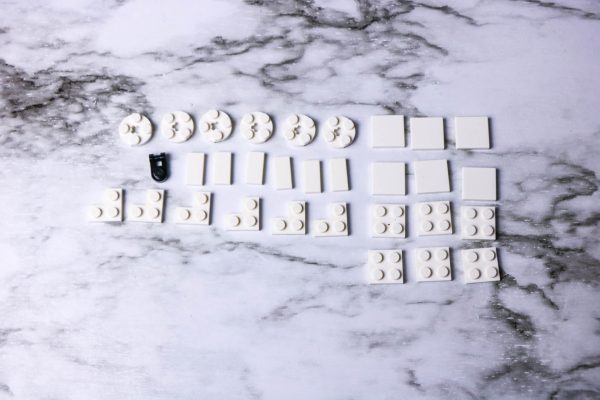
Legos Needed to Make a DIY Lego Snowflake Ornament:
DIY Lego Snowflake Ornament
6 white 2×2 round plates
6 white 2×2 plates
6 white 1×1 tiles
6 white 2×2 tiles
6 white 1x2x2 corner plates
1 black 1×1 plate with lamp holder
DIY Lego Snowflake Ornament
Gather Your LEGO Bricks:
- Collect an assortment of white LEGO bricks. The list of Lego blocks needed is listed above. Gather the Lego corner bricks and the 2 x 2 white bricks.
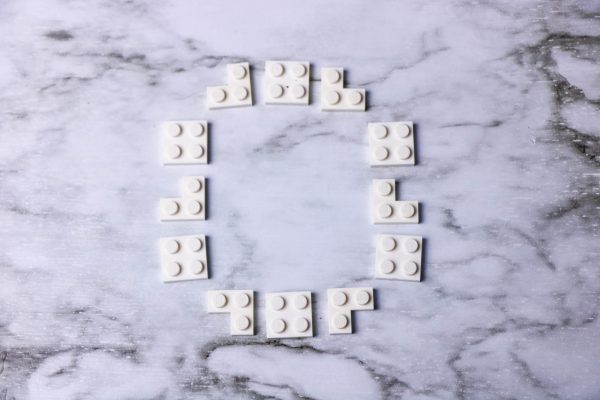
Start with a Central Point:
- Begin assembling the 2 x 2 bricks and the corner bricks to form a star-shaped circle.
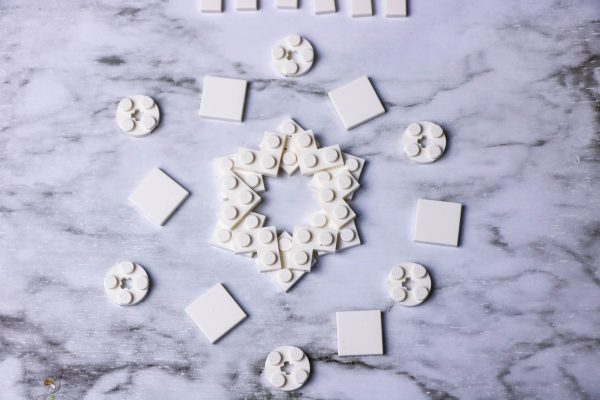
- Attach round white LEGO bricks to the ends of the core arms to create secondary arms. These additional arms will add complexity to the snowflake’s design.

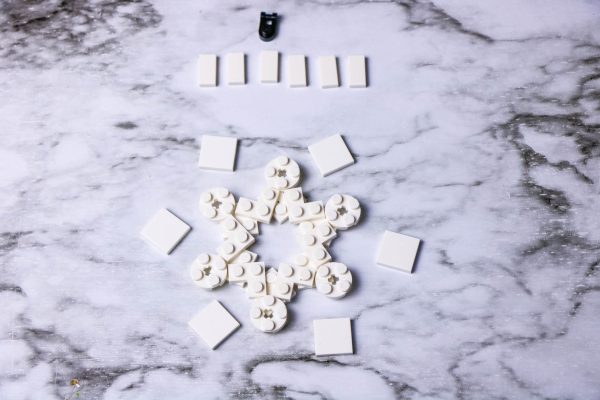
Attach the flat 1 x 1 and 2 x 2 Lego tiles to make longer points to the snowflake.
Finally, add the black 1 x 1 Lego lampholder to hang the snowflake as an ornament.
Benefits of Building with Legos
Building white snowflakes with LEGO bricks offers various benefits, ranging from cognitive development to creative expression. Here are some advantages:
- Fine Motor Skills Development:
- Assembling small LEGO pieces requires precise hand movements, helping to improve fine motor skills. This is especially beneficial for younger builders as they manipulate and connect the bricks.
- Spatial Awareness:
- Building a snowflake involves understanding spatial relationships between LEGO pieces. This helps enhance spatial awareness and visualization skills, crucial for tasks like problem-solving and understanding geometric concepts.
- Creativity and Imagination:
- Designing a white snowflake encourages creativity and imaginative thinking. Builders can experiment with different shapes, sizes, and patterns, allowing them to express their artistic ideas within the constraints of a snowflake structure.
- Problem-Solving Skills:
- LEGO building inherently involves problem-solving. Figuring out how to connect pieces, create symmetrical designs, and make the snowflake structurally sound all contribute to the development of problem-solving skills.
- Patience and Persistence:
- Constructing a detailed snowflake with LEGO bricks requires patience and persistence. The step-by-step process of assembling each component teaches builders to stay focused on a task until completion.
- Mathematical Concepts:
- Building with LEGO bricks involves basic mathematical concepts such as symmetry, patterns, and geometry. Creating a snowflake provides an opportunity to apply and reinforce these mathematical principles in a hands-on manner.
- Attention to Detail:
- The intricate nature of snowflakes encourages attention to detail. Builders must carefully select and place each LEGO piece to achieve the desired visual effect, promoting an eye for detail.
- Sense of Accomplishment:
- Completing a LEGO snowflake project provides a sense of accomplishment. The tangible result of the builder’s efforts can boost confidence and self-esteem, fostering a positive attitude toward future challenges.
- Relaxation and Stress Relief:
- Engaging in a creative and focused activity like LEGO building can have stress-relieving benefits. It provides a break from daily pressures and allows individuals to immerse themselves in a calming and enjoyable task.
- Thematic Learning:
- Building a white snowflake with LEGO bricks offers an opportunity for thematic learning. Builders can explore concepts related to winter, symmetry in nature, and the uniqueness of snowflakes while constructing their models.
- Family Bonding:
- LEGO building is often a collaborative activity, fostering family bonding and shared experiences. Working together on a snowflake project can create lasting memories and strengthen familial relationships.
- Display and Decoration:
- Once completed, a LEGO snowflake can serve as a decorative item. Displaying the finished creation provides a sense of pride and allows builders to showcase their artistic endeavors.

More DIY Lego Building Projects:
How to Build a Lego North Pole
How to Build a Lego Christmas Tree
How to Build a Lego Lighthouse
Building white snowflakes with LEGO bricks is not only a fun and engaging activity but also a valuable educational experience with a range of cognitive, emotional, and social benefits for builders of all ages.

Lego Snowflake Ornament
With this fun and festive DIY Lego Snowflake Craft, we'll bring the beauty of winter right into your home, piece by piece. Get ready to unleash your creativity and let your imagination soar as we embark on this enchanting winter adventure together!
Materials
- 6 2x2 white round plates
- 6 2x2 white plates
- 6 1x1 white tiles
- 6 2x2 white tiles
- 6 1x2x2 white corner plates
- 1 1x1 black plate and lamp holder
Tools
- White Lego Bricks, ultiple sizes
Instructions
- It's time to gather your materials for our LEGO Snowflake Craft! Start by collecting an assortment of white LEGO bricks. Check out the list above to make sure you've got everything you need to get started. Then, bring out the corner bricks and the white 2x2 bricks.
- Let's begin our LEGO Snowflake Craft by establishing a central point. Assemble the 2 x 2 bricks and the corner bricks to form a star-shaped circle. Arrange them in a way that forms the foundation of your snowflake design.
- Grab those round white LEGO bricks and stick them onto the ends of the core arms you've already put together. These extra arms are like branches reaching out from the center, making our snowflake design more intricate and eye-catching. Feel free to play around with where you put them to get the perfect look you're aiming for.
- Attach the flat 1 x 1 and 2 x 2 Lego tiles to the ends of the arms you've built. This will give your snowflake longer, more defined points, adding a touch of elegance to the design.
- Grab the black 1 x 1 Lego lamp holder to complete your LEGO snowflake ornament. Attach it to a central point on your snowflake design. Your masterpiece is now ready to be proudly displayed, bringing a touch of winter wonder to any space.
Notes
DIY snowflake ornament, lego Christmas ornament, DIY snowflake Christmas ornament