
How to Make Floam Slime | Easy Homemade Recipe
Learn how to make floam slime with glue, shaving cream, tiny foam beads, baking soda, and contact lens solution. This easy slime recipe combines the stretch of fluffy slime with the crunchy, moldable texture of small beads.
This DIY floam slime can be squeezed, stretched, folded, and shaped, making it a fun sensory play activity and a simple way to explore how slime ingredients change when mixed. Children can also customize the batch with different bead colors and carefully chosen coloring.

How to Make Floam Slime | Easy Homemade Recipe
This activity requires adult supervision. Slime is not edible, and its small pieces can be a choking hazard. It is best suited to children who can reliably keep the material away from their mouths.
Homemade Slime at a Glance
- Preparation time: About 15 minutes
- Skill level: Beginner
- Texture: Fluffy, stretchy, crunchy, and moldable
- Recommended age: Age 5 and older with adult supervision
- Storage: Airtight container at cool room temperature
- Typical usable life: About one to two weeks when handled and stored properly

What Is Floam?
Floam is a textured modeling material made with a stretchy slime base and small styrofoam beads. The tiny beads add a light, crunchy texture and help the mixture hold simple shapes better than regular slime.
Commercial versions are sold ready to use. Most DIY slime mixtures start by pairing school glue with a suitable activator. An airy ingredient gives this version a lighter texture and extra volume.
What Does Shaving Cream Do When Combined With Glue?
Shaving cream introduces air bubbles into the glue and creates a lighter, softer base. It does not activate the mixture by itself. You still need baking soda and an appropriate activator to make slime with the right consistency.
Because foaming formulas vary, one brand may produce a different texture from another. Barbasol is a common option, but another plain foaming product may work. Avoid shaving gel because it may not produce the same volume.
Slime Ingredients
- 1 cup Elmer’s white glue or clear school adhesive
- 3 cups plain foaming cream, such as Barbasol
- 1/2 teaspoon baking soda
- 1 to 2 cups small styrofoam beads
- About 1 tablespoon contact lens solution containing boric acid and sodium borate
- Optional food coloring or washable, non-toxic acrylic craft paint
Important activator note
Read the lens solution label before beginning. Not every saline solution or contact product contains the borate ingredients needed to activate slime, and product formulas can change. Opti-Free and ReNu products are sometimes used in slime recipes, but the label matters more than the brand name.
Do not substitute plain saline, eye drops, or hydrogen peroxide contact-care systems.
Supplies
- Large mixing bowl
- Measuring cups and spoons
- Silicone spatula or sturdy spoon
- Airtight storage container
- Washable mat or covered work surface

How to Make Floam Slime
Step 1: Add the glue
Pour one cup of white glue or clear school adhesive into a large bowl. Elmer’s white creates an opaque result, while the clear variety produces a more translucent base.
Step 2: Blend in the airy ingredient
Measure three cups of foaming cream into the bowl. Slowly work it through the base until everything has a soft, fluffy consistency. Use light mixing motions to help preserve the air incorporated into the mixture.
Step 3: Incorporate the baking soda
Add 1/2 teaspoon of baking soda and blend until no unmixed areas remain.

Step 4: Add color and beads
Mix in a small amount of food coloring or washable acrylic paint if desired. Fold in one cup of small beads. Add a little more gradually if you want a denser, crunchier texture.

Step 5: Activate the slime
Add the contact lens solution a little bit at a time, stirring after each addition. Begin with less than the full tablespoon. Stop when the slime forms a soft mass and begins pulling away from the sides of the bowl.
Different adhesives and activators may require slightly different amounts. If you add too much activator at once, the slime may become stiff and tear easily.

Step 6: Knead
Apply a little solution to your hands, then knead the mixture for several minutes. The slime will be very sticky at first, so continue folding and stretching before deciding whether it needs more activator.
The slime is ready when it feels soft and stretchy but is no longer sticky enough to leave a heavy coating on your hands.

How to Color Your Slime
Food coloring
Food coloring blends easily and preserves the slime’s light consistency. It produces bright or pastel shades depending on the amount used. However, concentrated color can stain hands, clothing, and porous surfaces.
Add one or two drops before activating the slime. Mix completely before adding more.
Washable acrylic paint
Washable, non-toxic acrylic craft paint creates a more opaque color and may be easier to see in a white base. Too much can slightly thicken the slime. Acrylic paint is not edible, even when it is labeled non-toxic.
Start with about 1/2 teaspoon, then add more if you want more color. Confirm that the product is washable and intended for children’s craft use.
Colored beads
Rainbow or single-color beads can provide plenty of color without tinting the slime base. This is useful when you want to reduce the chance of dye transferring to hands.
Troubleshooting Common Slime Problems
What should I do if my slime feels too sticky?
Work it with your hands for two or three minutes first. If it still coats your fingers, add a few drops of activator at a time and mix after every addition. Too much can make the slime firm and rubbery.
What causes slime to become stiff or rubbery?
It probably contains too much activator. Work in a small amount of plain glue or a little foaming cream. Add only a teaspoon at a time because too much may make it sticky again.
Why did my slime lose its fluffy texture?
The airy ingredient may have deflated, or you may have used shaving gel. Gently fold more plain foaming cream into the mixture. Remember that fluffy slime naturally loses some volume over time as trapped air escapes.
Why do the beads fall out?
The slime may be overactivated or may contain more beads than the base can hold. Mix in a small amount of glue, then add the loose beads gradually.
Why will the mixture not turn into slime?
Check the contact solution label for boric acid and sodium borate. Plain saline will not activate this floam slime recipe. Also confirm that you used washable PVA school glue rather than an unrelated craft adhesive.
Why does the slime tear instead of stretch?
It may have too much activator, too many beads, or not enough moisture. Work it slowly and add a small amount of adhesive or foaming cream if needed.
What causes slime to have a runny consistency?
The ingredients may not be fully mixed, or the batch may need a little more activator. Stir and work the slime together before adding a few more drops of solution.
Will extra activator fix slime that has dried out?
Extra activator cannot bring a dried-out batch back to its original texture. Activator firms slime and can make a dry batch worse. A slightly dry batch may improve with a small amount of adhesive or foaming cream, but discard slime that has become hard, dirty, or old.
Are There Other Activators I Can Use?
You can change the activator, but it also changes the slime recipe and requires separate measurements.
Using Liquid Starch
Many slime recipes made with PVA glue can also be activated with liquid starch. Pour in about one teaspoon at a time, mixing between additions until the batch begins to hold together. The amount needed depends on the specific starch and glue you use.
Preparing a Diluted Borax Activator
To prepare this activator, dissolve 1 teaspoon of borax powder in 1 cup of warm water. An adult should dissolve it completely and add only small spoonfuls of the solution to the mixture while stirring.
An adult should handle both the borax powder and the prepared activator. Avoid inhaling the powder, wash hands after play, and keep the solution away from eyes and mouths.
Do not combine several activators in one batch. Choose one tested method and add it slowly.
Slime Safety and Age Recommendations
This homemade floam is not appropriate for children who may taste it or put beads in their mouths. The mixture contains craft and personal-care ingredients, along with a borate activator and small pieces.
Follow these precautions when making and handling slime:
- An adult should supervise children throughout the activity.
- Keep the ingredients and finished mixture away from the mouth and eyes.
- Avoid applying it to irritated, damaged, or especially sensitive skin.
- Clean hands thoroughly after making or handling the mixture.
- Stop using it if itching, redness, burning, or another reaction develops.
- Clearly mark the storage container and keep it separate from food.
- Store loose beads out of reach of pets and young children.
- Dispose of leftover slime and beads in the trash rather than rinsing them into a drain.
Children with eczema, skin sensitivity, or known reactions to an ingredient should avoid the activity unless their healthcare professional says it is appropriate.
Is this slime safe for toddlers under three?
No standard glue-and-activator slime should be presented as safe for toddlers under three. Even washable, non-toxic craft ingredients are not edible, and the beads are a choking hazard.
For toddlers, choose a taste-safe sensory material made specifically for their age and supervise closely. Do not add styrofoam beads or call a standard slime recipe toddler-safe.
Sensory Play Considerations
This textured slime offers tactile resistance, squeezing, stretching, sound, and repeated hand movements. Some children may find those sensations engaging or calming. Others may dislike the stickiness, sound, scent, or feel.
For an autistic child or a child experiencing anxiety, the activity should be offered as an optional play material, not described as a treatment. Follow the child’s sensory preferences and never require them to touch it. Tools, gloves, or a sealed sensory bag may make the activity more comfortable.
If a child receives occupational therapy, ask the therapist how a sensory material could fit that child’s individual plan.
Homemade Versus Commercial Floam
DIY version
Making your own slime with foam balls allows children to choose the color, bead quantity, and texture. One batch can be large enough for several children, especially when you already own the necessary supplies. It requires preparation, supervision, cleanup, and storage.
Commercial version
Ready-made products are convenient and have a predictable texture. A small container may cost less than buying five separate ingredients for one project. They provide fewer opportunities to experiment with ratios and material changes.
Cost comparison
Prices vary by brand, retailer, and package size, so calculate cost based on the amount used rather than the full purchase price.
Use this formula for each ingredient:
Package price ÷ package quantity × recipe quantity = ingredient cost
Add the adhesive, foaming ingredient, baking soda, activator, beads, and coloring costs to find the homemade batch total. Then divide by the finished number of cups to compare the homemade cost per cup with a commercial container’s price per cup.
A DIY batch generally offers better value when supplies are already available, or several children will share a large amount. A ready-made product may be the more economical choice for one child trying the texture once.
How Long Does Homemade Slime Last?
This slime often remains usable for about one to two weeks when played with using clean hands and stored immediately in an airtight container. The actual usable time may vary from one batch to another.
Store the slime in a cool indoor location, protected from direct sunlight and heat sources. Refrigeration is not usually necessary. If you refrigerate it, seal the container, keep it separate from food, and let it warm slightly before play. Cold storage does not make contaminated slime safe.
Discard the slime if it develops:
- Mold or unusual spots
- A sour, rancid, or otherwise unpleasant odor
- Unexpected discoloration
- Excessive liquid separation
- Dirt, hair, crumbs, or other contamination
- A hard texture that no longer improves with gentle handling
Never share stored slime between households or groups after handling.
How to Clean Up Slime
Hard surfaces
Pick up loose foam balls by pressing a larger piece of slime onto them. Wipe remaining residue with warm, soapy water, following the surface manufacturer’s instructions.
Clothing
Remove excess slime without rubbing it deeper into the fabric. Rinse the area with cool water, pretreat with laundry detergent, and wash according to the care label. Do not place the item in the dryer until the stain is gone because heat may set it.
Carpet and upholstery
Lift away as much slime as possible with a spoon or dull edge. Test any cleaning solution in a hidden area. Blot instead of scrubbing, and follow the carpet or furniture manufacturer’s care directions. For delicate or valuable materials, contact a professional cleaner.
Dried residue
Allowing dried slime to soak briefly with a damp cloth may soften it. Avoid flooding fabric, carpet, unfinished wood, or electronics.
The STEM Lesson Behind This Slime
School glue contains long polymer molecules. When you add a suitable activator, a chemical reaction creates connections between polymer chains, turning the flowing adhesive into a stretchy material. Trapped air makes the mixture lighter, while the beads change its texture and molding properties.
Invite children to make observations:
- How does the texture change after each ingredient?
- What happens when you add more beads?
- Does clear adhesive behave differently from white?
- How does the slime change after one day?
- Which mixture stretches farther while still holding the beads?
Change only one variable at a time if you want to treat this kids activity as a simple science experiment.
More Slime and STEM Activities
- Slime recipes and activities
- STEM activities for kids
- LEGO activities and printables
- Mentos explosion experiment
- How to grow borax crystals

Make Your Own Crunchy Slime
This crunchy slime recipe combines an airy base with colorful beads for a texture children can squeeze, stretch, and shape. The key is to check the activator label, add the contact solution gradually, and work the mixture before making adjustments.
Protect the work surface, supervise children, and store the finished slime in a labeled airtight container. With the troubleshooting guide nearby, you can adjust a sticky or stiff batch without adding too much activator.
How do you make floam slime?
Mix one cup of school glue with three cups of foaming cream and 1/2 teaspoon baking soda. Add coloring and one to two cups of small beads. Stir in contact lens solution gradually, then work the mixture until it is soft and no longer excessively sticky.
What is floam made from?
This textured slime contains PVA school glue, a foaming ingredient, baking soda, small foam balls, and lens solution containing borate ingredients.
How do you make fluffy floam?
Use a plain foaming product and fold it gently into the base. Do not use shaving gel, and avoid overmixing and knocking out the air if you want fluffy slime.
Why is my slime sticky?
It may need more handling or a few additional drops of activator. Use contact lens solution very slowly because too much will make the mixture stiff.
Can I make slime without the beads?
Yes. You can make basic slime without them, but it will have a smooth, airy texture rather than the characteristic crunch. The beads create the distinctive texture.
Can I make this without shaving cream?
Yes. Add small beads to a basic slime recipe for a denser texture. It will not be as airy as this version.
Does this slime need to be refrigerated?
No. Store it in an airtight container at cool room temperature. Refrigeration is optional and does not replace clean handling or proper disposal.
How long does this slime last?
It commonly lasts about one to two weeks, depending on the ingredients, handling, and storage. Discard it sooner if it smells unusual, shows mold, separates excessively, or becomes contaminated.
Is this slime edible?
No. The slime is made with craft and personal-care ingredients and should never be tasted or eaten.
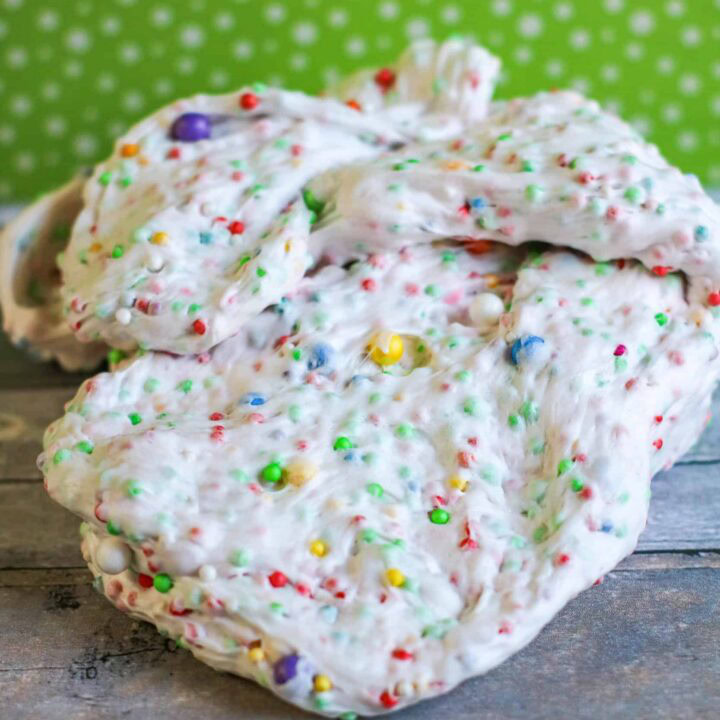
Homemade Floam Slime
Make fluffy, crunchy floam with school glue, shaving cream, foam beads, baking soda, and contact lens solution.
Materials
- 1 cup clear or white school glue
- 3 cups plain foaming shaving cream
- 1/2 teaspoon baking soda
- 1 to 2 cups small foam beads
- About 1 tablespoon contact lens solution containing boric acid and sodium borate
- Optional food coloring or washable, non-toxic acrylic craft paint
Instructions
- Pour the glue into a large bowl.
- Fold in the shaving cream until evenly combined.
- Stir in the baking soda.
- Add coloring if desired, then fold in one cup of foam beads.
- Add contact solution gradually while stirring. Stop when the mixture forms a soft mass.
- Knead for several minutes until the floam is soft and no longer excessively sticky.
- Add more beads if desired.
- Store in a labeled airtight container at cool room temperature.
Notes
Adult supervision is required. Floam is not edible. Keep it away from eyes and mouths, wash hands after play, and keep foam beads away from children under three, pets, and anyone who mouths objects.

Just learned something new – Floam
Thanks so much for participating and sharing at SSPS 316. See you again next week at https://esmesalon.com/tag/seniorsalonpitstop/