
Solar System Diorama Printable
Create your own miniature space scene with this printable solar system diorama. Children can cut out the planets, assemble an outer space backdrop, and arrange everything into a colorful 3D solar system model.
This engaging and hands-on solar system activity works well as an elementary science project, a homeschool lesson, or a craft for kids who love astronomy.

Solar System Diorama Printable
This printable craft gives children a creative way to explore the universe while learning about the Sun and planets, their order, and other celestial bodies.
Using simple supplies, children build a freestanding display that combines art with basic science concepts, creating an out-of-this-world project for home or classroom use.
Printable Model of the Solar System
This printable template gives children a hands-on way to explore the planets and other objects found throughout the cosmos.
The printable set includes:
- A colorful outer-space background
- Printable planet pieces
- The moon
- A space rocket
- Folding pieces for constructing the model
- Black-and-white elements children can color
The finished project is a freestanding paper display. Children can place it on a desk, a bookshelf, a science table, or a classroom bulletin board.
The planets printable PDF is available at the bottom of this post.
Supplies for the Solar System Craft
You will need:
- Printable template
- White cardstock or thick printer paper
- Color printer
- Crayons, colored pencils, markers, or watercolor
- Child-safe scissors
- Glue or double-sided tape
- Ruler for making straight folds
Cardstock will produce a sturdier handmade model, but regular printer paper can also work. If you use standard paper, attach the finished pieces to cardstock before cutting them out.
Adult supervision may be needed when younger children use scissors or assemble smaller pieces. Cutting, coloring, folding, and positioning the pieces can also provide practice with fine motor skills.
How to Make a DIY Solar System
Print the Template
Print all the pages included in the set. Select your printer’s best-quality color setting for the background pages.
Make sure the page-scaling option is set to “actual size” or 100 percent unless the printable instructions say otherwise. This easy-to-follow project can be prepared in advance for a simple printable STEM activity.
Color the Planets and Other Space Elements
Add your own creative touch to the black-and-white pieces using crayons, markers, colored pencils, or watercolor.
Children can use pictures of the eight planets as a reference or choose their own colors to create a unique space scene. The colors do not have to be exact for preschool or younger learners, but older students can use this part of the craft to study each planet’s appearance.
Cut Out the Pieces
Carefully follow the outlines around the planets, moon, rocket, and other elements.
Do not remove the folding tabs. These tabs help the pieces stand upright or attach securely to the background. This solar system cut-and-assembly process provides additional fine motor skills practice.
Fold the Background
Fold the background and base along the marked lines. Running the edge of a ruler over each fold can help produce a clean crease.
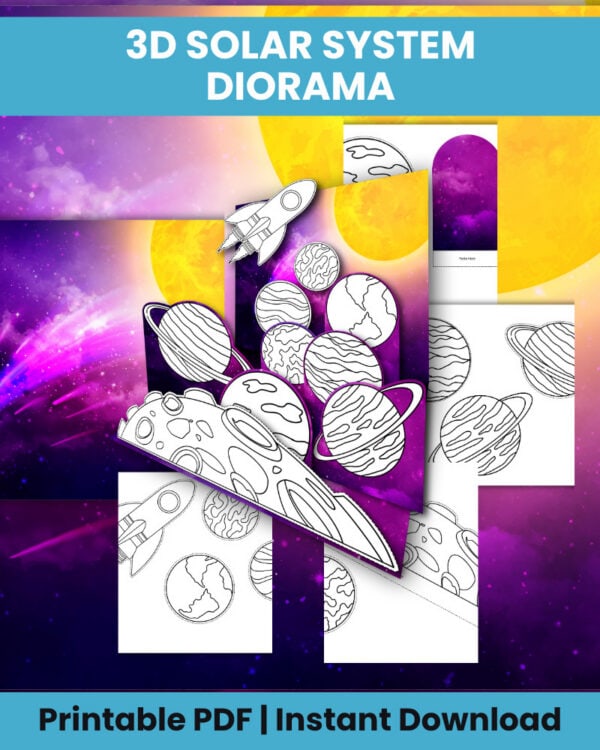
Arrange the background pieces before adding adhesive so you can see how they fit together.
Assemble the Background
Apply glue or double-sided tape to the marked tabs. Attach the backdrop to the base and hold each section in place until it is secure.
The completed background creates the main structure for your spacecraft.
Add the Planets
Arrange the pieces inside the display before attaching them. Children can place each planet in order or position the pieces at different heights to create a layered effect.
Once you like the arrangement, secure each piece in place. Older learners can also discuss the orbit of each world around the Sun as they work.
Complete the Space Scene
Finish the cosmic setup by attaching the moon, rocket, and the remaining included elements.
Once everything is firmly in place, personalize the scene with additional details and prepare it for viewing.

Which Planets Come First to Last From the Sun?
The eight planets follow this sequence based on their distance from the Sun:
- Mercury
- Venus
- Earth
- Mars
- Jupiter
- Saturn
- Uranus
- Neptune
A simple phrase can help children recall the correct order:
My Very Educated Mother Just Served Us Noodles.
The first letter of every word matches the initial of a planet in order.
Pluto was once recognized as the ninth planet. It is now classified as a dwarf planet, so it is not included among the eight major worlds.
Fascinating Facts About Our Eight Planets
Mercury
Mercury is the smallest world in the solar system and sits closest to the Sun. Its rocky terrain is covered with many craters.
Venus
Dense clouds surround Venus, making it the warmest planet. It is nearly the same size as Earth, but the two have very different atmospheric conditions.
Earth
Earth is where we live. It has liquid water and an atmosphere that supports many different forms of life.
Mars
Mars is often known as the Red Planet due to the iron-rich material that gives its surface a reddish, rusty appearance.
Jupiter
Jupiter is larger than every other planet in our planetary system. It is a gas giant known for its cloud bands and the Great Red Spot, an enormous storm.
Saturn
Saturn is best known for its spectacular rings. Those rings contain countless pieces of ice and rock.
Uranus
Uranus is an ice giant that appears to rotate on its side. It has a pale blue-green appearance because of methane in its atmosphere.
Neptune
Neptune orbits farther from the Sun than any of the other major planets. It is a cold, blue ice giant with extremely powerful winds.
Science note: The proportions in this project do not reflect their actual measurements. The actual celestial bodies vary greatly in size, and the distances between them are far greater than a paper model can demonstrate. Discussing these relative sizes can help children understand the vastness of space.
Turn It Into a Shoebox Solar System Diorama
Although this craft creates a freestanding model, it can also be adapted into a shoebox display.
To make the shoebox version:
- Remove the lid from a shoebox.
- Turn the box so the opening faces outward.
- Cover or paint the inside dark blue or black.
- Add white stars using paint, stickers, or a white marker.
- Attach the space background to the back of the box.
- Cut out the planets and suspend them with yarn or attach them at different depths.
- Add labels beneath each one.
A box adds depth to the project and protects the paper pieces. This option works especially well as a school project, STEM activity, or classroom display.
Another variation is to use yarn to suspend the pieces and create a solar system mobile. Children can arrange the Sun and planets at different heights, although a mobile cannot accurately represent their real distances or orbit paths.
Educational Ways to Use This Solar System Model
This hands-on activity can be more than a cutting-and-pasting craft. Use the finished project to reinforce science vocabulary and encourage children to explain what they have learned.
Children can:
- Identify the eight major planets
- Put them in order from the Sun
- Compare rocky worlds with gas and ice giants
- Discuss why models are not always drawn to scale
- Compare their different sizes
- Write one fact about each world
- Label the solar system: Sun, moon, rocket, and other objects
- Give a short presentation about the completed project
- Write an imaginary story about traveling through the galaxy
- Add an astronaut or spaceship to create a more imaginative scene
- Use the project alongside a worksheet or coloring sheet
- Discuss celestial bodies and basic astronomy vocabulary
For a group project, assign one world to each child. Students can research it, color its paper piece, and share one interesting fact before assembling the class model.
This idea can also complement Montessori science lessons or a middle school review of introductory astronomy. Teachers can use the finished project as a visual aid before visiting a planetarium or beginning a larger unit about the cosmos.
More Ways to Customize the Project
Children can turn the basic model into a galaxy craft by adding stars, comets, constellations, and other cosmic details. Small felted stars, stickers, metallic paper, or handmade decorations can add extra texture to the background.
For another variation, create a rotating solar system by attaching selected pieces with paper fasteners so children can gently rotate them. While this does not accurately reproduce real orbital motion, it provides a fun way to introduce the way objects travel through space.
You can also prepare the supplies together as a simple craft kit for a classroom center, rainy-day project, or science station.
More Printable Diorama Projects
Continue learning with these hands-on printable projects:
- Shoe Box Diorama Printables
- Mountain Animals Printable Diorama
- Tundra Biome Printable Diorama
- Ocean Diorama Printable
- Rainforest Diorama Printable
- Polar Habitat Printable Diorama
Get the Solar System Diorama Printable
Ready to build your own model of the planets? Purchase the printable solar system set and print it at home for your next science lesson, classroom project, or out-of-this-world activity.
Is this a free printable solar system?
This particular set is available for purchase at the bottom of the post rather than as a free printable solar system. If you are looking for a free printable, check the other space-themed resources available on the site.
Who Can Enjoy This Project?
This project works well for elementary-age children, while preschool learners can participate with adult assistance. Middle school students can expand the activity by researching astronomy, relative sizes, orbit patterns, and additional facts about the galaxy.
Can children make the project without cardstock?
Of course. Regular printer paper can be used, although cardstock creates a sturdier result. Paper pieces can also be mounted onto thicker material before cutting.
Can this be used as a science project?
Absolutely. The finished model can support lessons about planet order, celestial bodies, dwarf planets, space vocabulary, and other basic science concepts. Children can also present their completed work and explain what they learned.
Can I turn it into a hanging project?
Of course. Instead of creating the freestanding version, attach the pieces to yarn to make a hanging display. This variation works especially well when you want a mobile-style project.
Do the planets reflect their actual sizes?
The planets are not shown according to their true relative sizes or distances. A classroom paper model needs to fit within a small space, while the real solar system covers an enormous area.
Can children decorate the background?
Absolutely. Children can add stars, constellations, comets, an astronaut, a spaceship, or other details. They can also use crayons, markers, stickers, or watercolor to make the scene unique.
Where Can This Project Be Used?
Of course. The project can be completed during homeschool lessons, science units, classroom centers, or as a creative space activity at home. It combines an engaging and hands-on craft with opportunities to reinforce basic STEM concepts.
Can I save this idea on Pinterest?
Absolutely. Save the project to Pinterest so you can easily return to the instructions when planning a future science lesson, classroom activity, or craft session.

Solar System Diorama Printable
Make a colorful 3D solar system diorama using a printable space background, planets, moon, and rocket.
Materials
- Printable template
- White cardstock or printer paper
- Crayons, colored pencils, markers, or watercolor
- Scissors
- Glue or double-sided tape
- Ruler
Tools
- Printer
Instructions
1. Print the Template
Print all of the pages included with the template on white cardstock or printer paper. Use the best-quality setting for the colored background pages and set the page size to 100 percent or actual size so the pieces fit together correctly.
2. Color the Space Pieces
Use crayons, colored pencils, markers, or watercolor to decorate the black-and-white planets and other elements. Children can look at pictures of the solar system for inspiration or choose their own colors to make the scene unique.
3. Cut Out Each Piece
Carefully cut around the outlines of the planets, moon, rocket, and remaining elements. Leave all of the folding tabs attached because they will be used to secure the pieces and help some of them stand inside the finished display.
4. Prepare the Background
Fold the background and base along the marked lines. Use the edge of a ruler to press along each crease so the folds are straight and the structure holds its shape more easily.
5. Build the Diorama
Apply glue or double-sided tape to the indicated tabs and connect the background to the base. Press each attached area gently for a few moments to make sure the sections stay securely together.
6. Arrange the Planets
Place the planets inside the diorama before gluing them down so you can decide where each one looks best. Arrange them in order or position them at different heights and depths to give the scene a layered, three-dimensional appearance.
7. Add the Remaining Space Elements
Attach the moon, rocket, and any other included pieces to complete the scene. Check that everything is firmly secured, then allow the adhesive to dry completely before moving or displaying the finished solar system diorama.
