
Easy Snowman Oreo Cookies | No-Bake Christmas Treat
These easy snowman Oreo cookies turn chocolate sandwich rounds into an adorable no-bake Christmas treat. Cover each one in a smooth white shell, then add a hat, eyes, and carrot nose while the surface is still wet.
The recipe is simple enough for beginning decorators and makes a fun edible Christmas activity for families. Serve the snowmen at a holiday party, add them to a cookie-exchange tray, or package them as a homemade gift.
Check out more appetizers and dessert recipes here.

Easy Snowman Oreo Cookies Without Baking
You only need three main supplies, and you don’t have to bake anything. The most important part is heating the wafers slowly and organizing the face pieces before covering the first sandwich round.
Snowman Oreo Cookies at a Glance
- Preparation time: About 20 minutes
- Setting time: About 20 to 30 minutes
- Estimated yield: 10 to 12 pieces
- Skill level: Beginner
- Cooking required: Microwave heating only; no baking required
- Best for: Christmas parties, cookie exchanges, classroom snacks, and edible crafts
Why You’ll Love These Oreo Snowmen
These decorated cookies offer the look of a detailed holiday cookie without traditional baking.
- They begin with store-bought sandwich rounds.
- You can assemble the face with a decorating kit or individual candies.
- Every character can have a different expression.
- Children can help place the edible details.
- You can prepare the finished pieces before a party.
- They are easy to package individually for gifts.
This recipe also works well when you need one festive treat to fill an empty space on a Christmas dessert tray.
Ingredients
- Oreo cookies
- White chocolate/vanilla-flavored wafers, candy melts, or white confectionery covering
- A Snowman decorating kit containing edible hats, eyes, noses, and sprinkles
Optional Alternatives
If you do not have a decorating kit, try:
- Candy eyes
- Orange jimmies or small pieces of orange fondant for noses
- Mini peanut butter cups or chocolate pieces for hats
- Black decorating icing for mouths
- Snowflake sprinkles
- Mini chocolate chips
- M&M candies for extra color
- Crushed peppermint for a wintery topping
Check every ingredient package for allergens and confirm that anything placed directly on the food is edible.

Equipment
- Microwave-safe bowl
- Fork or dipping tool
- Spoon
- Parchment or wax paper
- Baking sheet or flat pan
- Microwave
Optional supplies include lollipop sticks, bags, ribbon, and a foam block for holding an Oreo pop upright.


Prepare Your Supplies
The white shell begins setting soon after you cover each piece. Getting everything ready first makes the process easier.
- Cover a flat baking sheet or tray with parchment paper.
- Open the kit and separate the hats, eyes, noses, and sprinkles.
- Remove broken sandwich rounds from the package and set aside 10 to 12 intact pieces.
- Place the edible details within easy reach.
- Make room on the counter for the finished pieces to set without being moved.
If children are helping, give each child a small cup of decorations instead of having everyone reach into the same bag.
How to Make Snowman Oreo Cookies
Step 1: Melt the White Wafers
Place the wafers in a clean, completely dry microwave-safe bowl. Heat the wafers as directed on the package.
If the package does not specify a method, microwave at 50 percent power for 30 seconds. Stir thoroughly, then continue heating in 15-second intervals until almost smooth. Let the remaining pieces soften completely as you stir.
Do not heat for a full minute without checking. White chocolate or confectionery wafers can scorch even when they still hold their original shape.

Step 2: Cover the Sandwich Rounds
Place one piece in the melted chocolate mixture. Use a fork to gently turn the piece so the white mixture covers both sides.
Raise the piece with your fork and let any extra mixture fall back into the bowl. Gently tap the fork against the side to create a thinner, more even shell.
Slide the dipped piece onto the prepared paper using a second fork or spoon.

Step 3: Add the Face
While the surface is still wet, add two eyes, one carrot nose, and a hat. Add a dotted mouth, small candies, or sprinkles if desired.

Decorate each piece immediately after covering it. If you wait until the entire batch is finished, the first ones may become too firm for the face pieces to stick.

Step 4: Let Them Set
Leave everything undisturbed at cool room temperature until firm, usually 20 to 30 minutes.
If your kitchen is warm, briefly place the tray in the fridge. Avoid leaving the tray in a humid refrigerator longer than necessary because condensation can affect the finish and edible details.

Common Problems With White Wafers
What causes the mixture to turn thick or lumpy?
Too much heat or accidental moisture may have caused the problem. Even a small amount of moisture can cause real chocolate to seize, and moisture can also make some confectionery products difficult to use.
Use a dry bowl and utensils. Heat gently, stir frequently, and stop microwaving before every wafer has completely disappeared.
Can seized chocolate be fixed?
It depends on the product and how you’ll use it. For this recipe, badly seized or scorched chocolate is usually easier to replace than repair. Adding water may make it smooth enough for another use, but it generally will not restore the thin, firm-setting consistency needed here.
Always follow the instructions on your specific wafers or almond bark package.
Why is the outer layer uneven?
The mixture may be too cool or too thick, or you may not have removed the excess. Warm it for another 10 to 15 seconds, stir, and try again. Tap the fork gently against the bowl’s side after lifting each piece.
Why can I see the dark center through the white shell?
The first layer may be too thin. Let it set, then dip the piece again. You can also spoon a little extra white chocolate over a thin spot while the surface is still wet.
Why did the shell crack?
Large temperature changes can contribute to cracking. Use room-temperature sandwich rounds, avoid freezing them beforehand, and let the finished pieces set gradually.
Why did the surface develop streaks or dull spots?
Overheating, humidity, condensation, or uneven setting may affect the finish. Heat the wafers gently and let everything harden in a cool, dry area.
Why will the face pieces not stick?
The surface hardened before you assembled the face. Attach the pieces immediately after covering each cookie. If needed, use a dot of freshly softened wafer mixture as edible glue.
Why are there crumbs in the bowl?
Cracked sandwich rounds can release crumbs when submerged. Use intact pieces and handle them gently. If crumbs collect in the bowl, remove them with a spoon before continuing.
Oreo Snowman Cookies Compared With Other No-Bake Holiday Treats
Dipped Oreo Snowmen
These provide a crisp center, smooth white shell, and large surface for adding details. They look polished but require careful handling and quick placement of the face pieces.
Best for: Cookie exchanges, party platters, gifts, and older children helping with the finishing touches.
Melted Snowman Cookies
These usually begin with a plain biscuit covered with white icing or a smooth topping, then finished with a marshmallow head. The intentionally messy puddle design makes uneven icing part of the look.
Best for: Younger children and families who want a forgiving design.
Oreo Snowman Pops
These use the same method with a lollipop stick inserted into the filling. They are easy to hold and package but may separate if you push the stick in too forcefully.
Ideal for: Individual party bags or take-home favors.
Oreo Cookie Ball Snowmen
This cookie-ball variation uses a different preparation method. These Oreo cookie balls combine crushed sandwich biscuits with cream cheese, then roll them into balls and cover them in a white shell. They have a soft center and require additional preparation and refrigeration.
Best for: Bakers who want a richer candy-style dessert.
Marshmallow Snowmen
Stacked or skewered marshmallows need no dipping if you attach the facial features with icing. They are fast and inexpensive but do not have the chocolate-cookie flavor of the version featured here.
Best for: Hot-chocolate bars and very quick party snacks.
Choose this version when you want a sturdy base with a smooth, bright-white surface and room for a detailed face.
Creative Variations
Melted Winter Style
Spoon a small puddle of the white mixture around each finished piece. Place the hat at an angle and scatter a few edible details to create a melting effect.
Oreo Pops
Carefully separate each sandwich round, dip the end of a lollipop stick in the softened wafer mixture, and press it into the filling. Replace the top half and allow the mixture around the stick to set before covering the entire piece.
Mini Oreo Snowmen
Use Mini Oreos and tiny facial pieces. These require less white mixture, but attaching the small features takes more precision.
Winter Family
Use regular and mini sandwich rounds to create characters in different sizes. Give each one a different hat or facial expression.
Snowflake Version
Skip the face and add blue sugar, white pearls, and snowflake sprinkles while the surface is wet.
Chocolate Variation
For a different flavor, use milk chocolate instead of white wafers and add contrasting details once the surface is set enough to hold them.
Making Snowman Cookies With Kids
An adult should handle the hot bowl and warm mixture. Children can arrange the supplies, count the pieces, select facial expressions, and add the edible details.
For a super easy family activity:
- Work with one piece at a time.
- Give each child an individual work area.
- Use larger pieces that are easier to handle.
- Keep small candies away from children who may choke on them.
- Expect each character to look different.
- Wash hands before beginning and after handling shared supplies.
These are easy to make, with plenty of simple jobs for kids to help with once an adult has handled the warm mixture.
Make-Ahead and Storage Instructions
Make ahead one or two days before serving. Once everything has set completely, place in a single layer in an airtight container at cool room temperature.
When adding another row, place a sheet of parchment or waxed paper between the layers. Keep the covered container in a dry area protected from heat and direct light.
Refrigeration is usually unnecessary when using shelf-stable sandwich biscuits, wafers, and edible details. Follow the storage directions on your exact ingredient list. Refrigerating can create condensation that leaves spots or sticky areas on the surface.
You can freeze the finished pieces, but condensation may affect their appearance after thawing. For the best finish, prepare them fresh instead.
Estimated Calories Per Cookie
One finished piece contains about 180 to 210 calories, based on a 10-ounce package of white wafers covering 10 to 12 regular sandwich rounds. The edible details may add additional calories.
This is an estimate, not a laboratory-tested nutrition calculation. The exact amount depends on:
- The type of sandwich biscuit used
- How much chocolate mixture remains on each piece
- The brand of wafers
- The number and size of edible details
- The final recipe yield
For the most accurate calorie count, add the calories from every package used and divide the total by the number of finished pieces. Readers managing allergies, diabetes, or another medical condition should rely on current package labels rather than this estimate.
How to Package Them for Gifts
Allow the outer shell to harden completely before packaging. Place each piece in a food-safe bag and close it with ribbon or a twist tie.
Add a gift tag with the treat name and an allergen note. Standard sandwich biscuits and many wafers may contain or be exposed to wheat, soy, or milk, so keep the original packaging available when sharing.
For a gift box, arrange them in a single layer or separate layers with parchment paper. Avoid stacking heavy pieces directly on the fondant or edible hats.
Step-by-Step Photo and Video Guide
The existing process photos can make the instructions much easier to follow. Use this placement order:
- Supplies photo: Place after the list. Show the sandwich biscuits, white wafers, and opened kit.
- Smooth wafer mixture photo: Place after Step 1. Show the consistency readers should expect.
- Covering photo: Place after Step 2. Show one piece on a fork with excess mixture dripping into the bowl.
- Plain covered piece: Place before Step 3 to show when to add the face.
- Finished character close-up: Place after Step 4.
- Group serving photo: Place near the storage or gifting section.
Use a short vertical video showing the entire process:
- Organize the supplies.
- Heat and stir the wafers.
- Cover one sandwich round.
- Tap off the excess.
- Add the hat, eyes, and nose.
- Show the surface before and after setting.
Embed the video immediately before the written instructions or after Step 4. Include captions and keep the written directions on the page so readers do not have to watch the video to follow the recipe.
More Christmas Treats and Activities
- Gnome Christmas cookies
- Mickey Mouse peppermint cookies
- Nightmare Before Christmas cookies
- Christmas crafts and printables

A Simple No-Bake Christmas Cookie
These holiday creations are customizable and much faster than baking and adding details from scratch. Set up the faces before heating the wafers, work with one piece at a time, and add the facial features before the white shell begins to harden.
Once you understand how to heat the wafers slowly and keep moisture out of the bowl, the process becomes simple to repeat. Make a small batch for family movie night or prepare a full tray for a Christmas party, cookie exchange, or holiday gift.
Do I have to use Ghirardelli wafers?
No. You can use another white confectionery product or almond bark intended for heating and covering desserts. Follow the directions on the product you select.
Can I use white chocolate chips?
White chocolate chips are designed to hold their shape during baking and may become thicker than wafers intended for covering sweets. A product made specifically for this purpose is usually easier for this recipe.
How many sandwich rounds will 10 ounces of wafers cover?
Expect approximately 10 to 12 fully covered regular pieces. The yield depends on shell thickness, bowl shape, and how much excess is allowed to drip off.
How do I thin the mixture?
First, warm and stir it gently because it thickens as it cools. If the package recommends a thinning agent, add only the stated amount. Do not add water.
How long do they take to set?
They generally firm at cool room temperature in about 20 to 30 minutes. Temperature, humidity, shell thickness, and product choice can change the setting time.
Can I make these ahead of time?
Yes. Prepare them 1 or 2 days ahead, let them set completely, and store them in a covered container in a cool, dry place.
Can I freeze decorated Oreos?
Yes, but condensation may affect the outer shell and edible details as they thaw. Making them fresh provides the best appearance.
Are these no-bake cookies?
Yes. The sandwich biscuits are already baked, so the only heating required is softening the white wafers.
Can children make these?
Children can add the facial features with adult supervision. An adult should manage the microwave, hot bowl, and warm mixture.
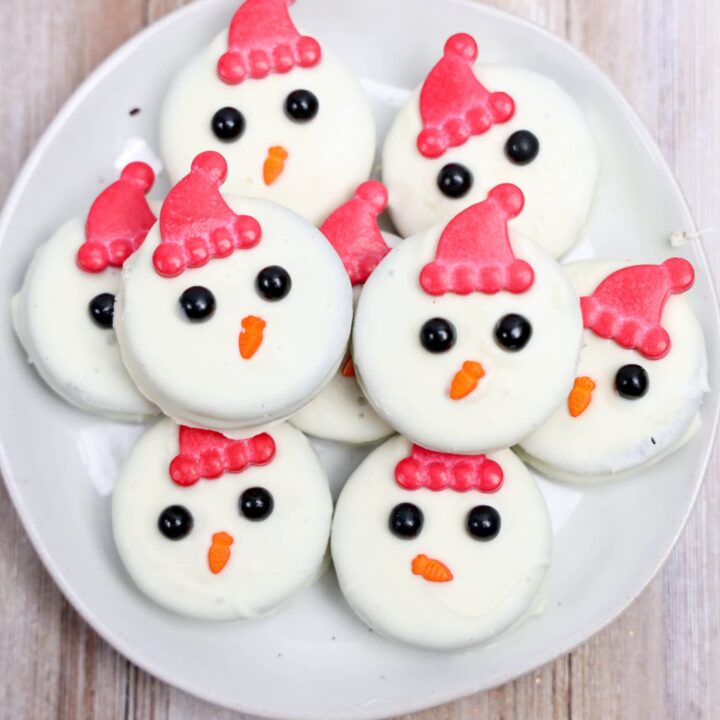
Easy Snowman Oreo Cookies
No-bake snowman cookies made by dipping Oreos in white candy coating and adding an edible hat, eyes, and carrot nose.
Ingredients
- 10 to 12 Oreo cookies
- 10 ounces white vanilla-flavored melting wafers or white candy coating
- 1 edible snowman decorating kit
Instructions
- Line a baking sheet with parchment paper and arrange the decorating pieces within reach.
- Place the melting wafers in a clean, dry microwave-safe bowl.
- Melt according to the package directions, stirring frequently and avoiding overheating.
- Dip one Oreo into the melted coating and turn it until completely covered.
- Lift it with a fork, allow the excess coating to drip away, and place it on the parchment.
- Immediately add the snowman hat, eyes, nose, and any other decorations.
- Repeat with the remaining Oreos.
- Let the cookies stand at cool room temperature for 20 to 30 minutes or until firm.
Notes
- Keep water and steam away from the melted coating.
- Decorate every cookie immediately after dipping.
- The yield and calorie estimate depend on coating thickness and decoration size.
- Store the finished cookies in an airtight container in a cool, dry place.
Nutrition Information:
Yield: 12 Serving Size: 1Amount Per Serving: Calories: 115Total Fat: 2gSaturated Fat: 1gUnsaturated Fat: 1gCholesterol: 4mgSodium: 41mgCarbohydrates: 10gFiber: 0gSugar: 7gProtein: 1g
