
Grinch Paper Plate Craft for Kids (Free Printable Template)
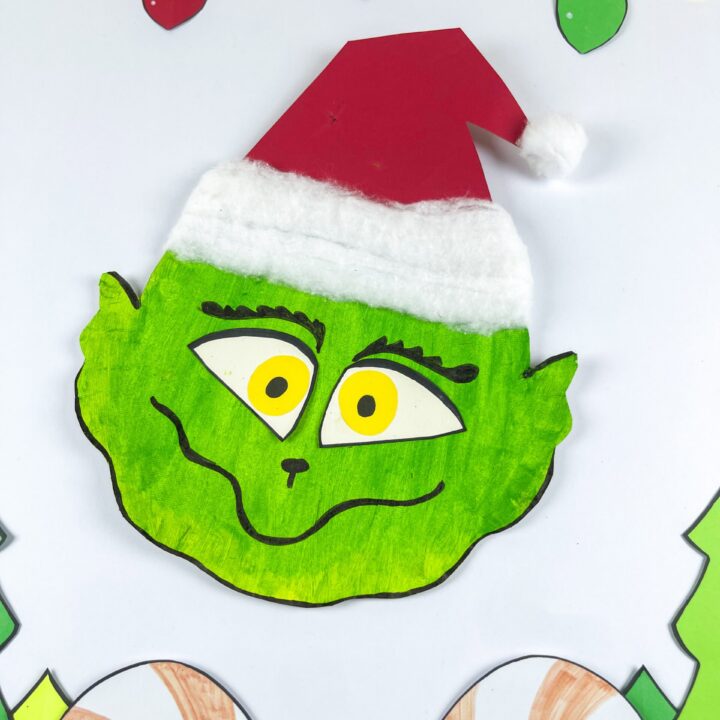
Make this adorable paper plate Grinch craft with a downloadable face pattern, green paint, and a few basic supplies! Kids will love adding his mischievous expression, bright eyes, and festive red Santa hat.
This easy Christmas craft is perfect for preschoolers, kindergarteners, and elementary-aged children. It’s also a fun idea for Grinchmas parties, classroom celebrations, homeschool lessons, or a family movie night.
Keep the holiday creativity going with our collection of Christmas paper plate crafts for kids and free Christmas crafts and printables, featuring festive activities, printable games, and hands-on projects for the whole family.

Grinch Paper Plate Craft for Kids (Free Printable Template)
Our face outline helps children create the right shape, while construction paper, cotton balls, and a black marker bring the character to life.
The finished face makes a cute decoration you can display on a wall, classroom bulletin board, or refrigerator.
An Easy Christmas Craft for Kids
The Grinch is a classic Christmas character, thanks to his bright green face, grouchy expression, and familiar Santa hat.
Inspired by Dr. Seuss’s How the Grinch Stole Christmas!, this hands-on idea lets children recreate the character using familiar art items.
Kids start by coloring the plate. Once it dries, they add paper eyes, outline his expression, and attach a red Santa hat with fluffy white trim.
You don’t need expensive supplies or complicated tools.
Most items are already in a classroom art cabinet or a basic craft bin.

Why Kids Will Love This Craft
- Uses everyday materials such as paper plates, brushes, and construction paper.
- Includes a face pattern to print.
- Lets children use their imagination to give each face its own personality.
- Provides opportunities to practice cutting, coloring, and gluing.
- Can be adapted for preschoolers and older children.
- Makes a charming decoration, classroom display, or little gift for mom.
This creation also pairs well with reading the story or watching a festive movie together.
A Free Template for the Face
The included face pattern makes this easy paper plate craft quicker to prepare.
Rather than sketching the character’s entire face freehand, children can follow the outline as a guide for creating his distinctive head shape.
The guide is especially helpful when making several pieces for a classroom or party.
How to Use the Face Outline
- Download the face outline using the form near the bottom of this post.
- Print it on white printer paper.
- Trim around the head outline.
- Place the paper guide on a plate and trace around the shape.
- Trim the plate along the traced outline.
- Follow the directions below to color and decorate the face.
You can shape the eyes and Santa hat from construction paper using the photos as a guide. For best results, print the outline at its original size, as long as it fits your plate.
If you’re using smaller dessert plates, you may need to scale it down.
Materials and Tools You’ll Need
Gather your supplies before starting.

Materials
- Paper plate
- Printed face outline
- Green acrylic paint
- Paintbrush or sponge brush
- Black marker or Sharpie
- Red construction paper or cardstock
- Yellow construction paper or cardstock
- Black construction paper or cardstock
- White construction paper, optional
- Cotton balls or cotton padding
- Glue stick or craft glue
- Child-safe scissors
- Pencil
Optional Supplies
- Googly eyes
- White pom-poms
- Green tempera paint
- Ribbon or string for hanging
- Wooden stick for making a puppet
- Red heart stickers
- Small hole punch
For preschoolers, washable tempera is often easier to clean up than acrylics.
Acrylics give good coverage but may stain clothing or surfaces. Always choose age-appropriate, nontoxic products.
How to Make a Paper Plate Grinch Craft
Follow these steps to create your own mischievous character. The finished face has bright eyes, black details, and a fluffy red Santa hat.
Step 1: Trace and Trim the Face
Download and print the head outline. Trim around the pattern and place it on your plate.
Use a pencil to trace the shape onto the plate. Carefully follow the pencil lines with scissors to create the face shape.
The guide gives the base a more recognizable outline instead of leaving it as a plain circle. For younger children, an adult can complete this step before the lesson begins.

Step 2: Paint the Base Green
Use a paintbrush or sponge brush to cover the paper plate with an even coat of green. Spread the color across the entire face.
You can use bright acrylics or washable tempera. Set the coated plate on a protected surface and allow it to dry completely.
A thin coat of tempera may become touch-dry in approximately 15 to 30 minutes. Acrylics may take around 20 to 30 minutes or longer, depending on thickness, temperature, and humidity.
If the surface still feels tacky, let it dry longer before continuing.
Step 3: Draw the Facial Features
Once the surface is dry, use a black marker to outline the face and add a mischievous expression. Give the character his signature brows first.
Draw two curved or angled lines toward the upper part of the face.

Next, add his familiar crooked smile. Add a small nose and a few curved lines around the cheeks to give the face extra personality.
For younger children, draw the features lightly with a pencil first so they can trace over them with a marker.
Step 4: Make the Yellow Eyes
Use scissors to make two oval or slightly pointed eye shapes from construction paper. Angle them upward toward the outside edges to give the character his distinctive look.
Use black construction paper for small pupils, or mark them directly onto each eye. Attach the pupils to the eye pieces with a dab of adhesive.
Then fasten both eyes to the colored face. Position them close together for a mischievous look or farther apart for a sillier expression.

Step 5: Cut Out the Santa Hat
Sketch a Santa hat shape onto red cardstock or construction paper. Trim out the hat with scissors.
You can make a tall pointed hat or a floppy hat that bends to one side. If you don’t have a printed hat pattern, a simple red triangle with a slightly curved top works well.
Make sure the bottom is wide enough to fit across the top of the face.

Step 6: Add Fluffy White Hat Trim
Attach cotton balls or cotton padding along the bottom edge of the hat. This creates the fluffy white brim.
Add another cotton ball to the pointed end of the hat to make a pom-pom.

If you prefer not to use cotton, trim a strip of white construction paper for the brim and a white circle for the pom-pom.
Small white pom-poms are another option for older children.

Step 7: Attach the Santa Hat
Spread adhesive on the back of the completed Santa hat. Position it along the top of the head and press it into place.

Make sure the cotton trim overlaps the colored face slightly. For heavier cardstock, liquid school glue may hold the hat more securely than a glue stick.
Let the adhesive dry before lifting or displaying your creation.

Step 8: Add Finishing Touches
Look over the finished character and add any final details. You can use a black marker to emphasize the eyebrows, nose, and smile.
Children may also add a small red heart shape near the bottom of the artwork. This represents the moment his heart grows three sizes in the story.
Once everything is dry, your finished piece is ready to display!

How to Make It Without a Printer
You can still make this design without downloading or printing the outline. All you need is a paper plate, a few craft essentials, and a pencil.
No-Printer Instructions
- Place a plate on your work surface.
- Sketch his distinctive head shape directly onto the surface with a pencil.
- Make the sides slightly curved and add a pointed or rounded chin.
- Trim around the outline.
- Color the plate and allow it to dry.
- Make two paper eyes.
- Add the eyebrows, nose, and smile with a black marker.
- Add a red paper Santa hat and white cotton trim.
If shaping the head feels difficult, leave the plate round. The colored base, angled eyes, black eyebrows, and Santa hat will still make the character recognizable.
This is a practical option for families without access to a printer.
Easy Paper Plate Art for Toddlers and Preschoolers
Younger children can join in with a few adjustments. The most important change is preparing the pieces before starting.
Simple Toddler Version
For toddlers, have an adult trim the face shape, eyes, and Santa hat in advance. Instead of acrylics, provide washable tempera or a large green paper shape.
Let children color the base using a wide sponge brush. Once it dries, help them attach the pre-cut eyes and hat.
An adult can add eyebrows, a nose, and a smile with a black marker. You can also replace small loose decorations with larger paper shapes.
Supervise young children closely and avoid small pom-poms or googly eyes if they present a choking hazard.
Preschool Version
Preschoolers can participate in more of the process. Let them color the plate, position the eyes, and attach the Santa hat.
Children learning to handle scissors can practice trimming basic paper shapes with adult supervision.
You can draw the facial features lightly in pencil and let children trace them with a marker.
Kindergarten and Elementary Version
Older children can handle more steps independently. They can trace the outline, trim the plate, add facial features, and design their own Santa hats.
Let them change the eyes, eyebrows, and smile to show different moods. Some Grinches might look grumpy, while others can have silly or surprised faces.

Tempera vs. Acrylic Colors
Both types of coloring medium work on the plate, but they differ in a few ways.
Washable Tempera
Washable tempera is often a good choice for preschool and kindergarten projects. It is generally easier to clean from brushes and many washable surfaces.
Depending on the brand and thickness, a thin coat may become touch-dry in about 15 to 30 minutes.
Acrylics
Acrylics can provide good color coverage. They may also give a slightly different finish than tempera.
However, acrylics can stain clothing and work surfaces, so they’re better suited to closely supervised crafting. Let the surface dry completely before adding marker details.
Can You Skip Using a Brush?
Yes! Use a pre-colored plate or cover a plain one with green construction paper.
This eliminates drying time and makes preparation easier for classroom groups. You can also color the base with crayons or markers.
What Can You Use Instead of a Santa Hat?
The red Santa hat is a recognizable part of this design, but you can easily make a different version.
No Red Construction Paper
Color a white paper hat with red crayons or markers. You can also use red wrapping paper or a scrap of red cardstock.
No Cotton Balls
Trim a strip of white paper for the brim. Add a white paper circle at the tip instead of a cotton pom-pom.
A Version Without a Hat
Leave off the Santa hat and focus on the face, pointed eyes, eyebrows, and mischievous grin.
This option works for a quick classroom art session or a character-themed design outside the festive season.
Make a Winter Hat
Create a colorful winter beanie from construction paper. Add stripes, snowflakes, or other decorations.
Kids can choose their own colors and personalize their creations.
Turn the Finished Face Into a Decoration
After finishing, children can use their artwork to decorate their home or classroom.
Hanging Decoration
Punch a small hole near the top of the plate or hat, avoiding glued areas. Thread a piece of ribbon or string through the hole and tie a loop.
Hang it on a wall hook, door, or classroom display. Make sure the adhesive and coloring are dry before hanging.
Character Puppet
Attach a large wooden craft stick to the back with a suitable adhesive or tape.
Allow it to dry completely. Children can hold the stick and use the face as a puppet while retelling the story.
Mini Ornament
Use a small dessert plate to create a miniature version. Reduce the print size if necessary.
Decorate the smaller surface using lightweight paper pieces rather than bulky cotton.
Add a ribbon loop to hang the ornament on a suitable branch or decorative display.
Classroom Bulletin Board
Create a festive display featuring everyone’s completed faces. Use a heading such as “Our Hearts Grew Bigger!”
Arrange the creations around a large red heart or seasonal tree. Each child can write their name on the back of the plate or add a small name label.
Creative Classroom Ideas
This paper plate craft can be part of a literacy lesson, a classroom party, or an art activity after storytime.
Read the Original Story
Begin by reading How the Grinch Stole Christmas! by Dr. Seuss. Talk about the main character’s personality at the beginning and how his feelings change.
After reading, let children make their own expressive faces using the provided outline.
Ask them to choose an expression for their character.
Talk About Kindness
The story gives children a chance to talk about generosity, kindness, and the meaning of the season.
Ask children:
- What made the main character unhappy?
- Why did he change his mind?
- What does it mean to show kindness?
- How can we help someone feel included?
- What kind thing can we do for someone today?
Children can write or illustrate one act of kindness on a red paper heart and attach it to their finished work.
Practice Fine Motor Skills
This hands-on lesson helps children practice several early learning skills. Using a brush supports hand control.
Trimming paper shapes provides scissor practice. Applying adhesive and positioning the eyes and hat encourages coordination and planning.
Making the eyebrows and smile also gives children practice controlling a marker.
Facial Expressions Exercise
Let children experiment with different expressions. Ask them to sketch their character looking happy, surprised, grumpy, or excited.
Talk about how changing the eyebrows, eyes, and mouth can change a character’s expression. This makes an engaging art lesson for preschoolers and early elementary students.
More Grinch Crafts for Kids
If your children enjoyed this design, there are several related ideas to try.
Handprint Paper Design
Our Grinch handprint paper craft turns a child’s handprint into a festive character.
It includes a downloadable pattern and makes a fun keepsake for younger children.
Handprint Art Idea
Try our Grinch handprint art printable for another seasonal handprint art idea. This version works well for toddlers and preschoolers with adult assistance.
Silly Name Game
After finishing, let children discover their silly seasonal names with our What’s Your Grinch Name game and interactive generator. It’s a playful addition to a themed classroom celebration.
Grinchmas Party Games
Planning a themed party? Our Grinchmas party games printables include additional activities for families, classrooms, and holiday gatherings.
Tips for Crafting With a Group
If you’re preparing this hands-on session for a preschool class, kindergarten group, or seasonal party, a little preparation makes things easier.
Prepare the Templates Ahead of Time
Print the face outline and trim the pieces before starting. For younger children, trace and prepare the shapes in advance.
Set Up a Brush Station
Cover the tables with washable mats or paper. Provide a few small containers of green tempera and sponge brushes.
You can also use pre-colored plates if time is limited.
Organize the Paper Accessories
Place the yellow eyes, red Santa hats, and cotton pieces into separate containers. This makes it easier for children to find the materials they need.
Make a Sample
Complete one example before the classroom session. Display it where children can see it, while encouraging them to add their own creative details.
Allow Plenty of Drying Time
If your class is on a tight schedule, color the bases during one session and finish the decorations later. This avoids rushing the drying process.
More Festive Projects to Try
Keep the holiday spirit going with these other projects from 24 Hour Family.
- Christmas Paper Plate Crafts for Kids — Browse a collection of festive paper plate projects.
- Christmas Penguin Paper Plate Craft — Make a cute penguin with a festive hat.
- Grinch Handprint Paper Craft — Create a festive keepsake using a child’s handprint.
- What’s Your Grinch Name Game — Discover funny nicknames using the game or interactive generator.
- Grinchmas Party Games — Party games for kids and families.
- Free Christmas Crafts and Printables — Explore more seasonal crafts, games, and creative ideas.

Download Your Free Printable Grinch Craft Template
Ready to create your own version? Download the face pattern and gather a few essentials to get started.
With a plate, a brush, yellow construction paper, a black marker, and a red Santa hat, children can create a festive character to display at home or in the classroom.
The guide makes the face shape easier to prepare, especially when working with a group.
Once your creation is finished, hang it on the refrigerator, add it to your decorations, or display it with other themed artwork.
This design is easy to make and combines hands-on learning, a little holiday mischief, and crafty fun!
How do you make a Grinch paper plate craft?
Trace a head shape onto a plate and trim it out.
Color the base and allow it to dry.
Add paper eyes with black pupils, sketch the eyebrows and mischievous smile, and attach a red Santa hat with fluffy white trim.
Is there a pattern to download?
Yes! This post includes a downloadable face pattern that children can use to make the head outline.
Find the download section near the bottom of this article.
Can preschoolers try this craft?
Yes. Preschoolers can help color the plate, attach the eyes, and position the Santa hat.
Adults can prepare smaller pieces and handle detailed trimming.
Can toddlers make this version?
Toddlers can join in using pre-cut paper pieces and washable coloring tools.
An adult should handle scissors and small decorations.
What size paper plate should I use?
A standard dinner plate works well for the main design.
A smaller dessert plate works for a miniature version, although you may need to scale down the printed outline.
Can I make it without a printer?
Yes. Sketch a face outline directly onto the plate or leave it round.
Color the base, add paper eyes, make facial features, and attach the hat.
What kind of paint works best?
Washable tempera is convenient for young children and classrooms.
Acrylics can also be used with appropriate supervision.
Choose a nontoxic product suitable for paper crafts.
How long does the paint take to dry?
A thin coat of washable tempera may become touch-dry in approximately 15 to 30 minutes.
Acrylics may take around 20 to 30 minutes or longer.
Actual drying time depends on coating thickness, room conditions, and the product used.
What can I use instead of cotton balls?
White paper, cotton padding, or white pom-poms work for decorating the Santa hat.
For toddlers, larger paper pieces are preferable to small loose embellishments.
Can I use googly eyes?
Yes. Googly eyes are an optional alternative to paper pupils.
For younger children, use paper eyes to avoid small parts that could present a choking hazard.
Can I use hot glue?
Hot glue can help attach heavier decorations, but it isn’t necessary here.
A glue stick or suitable liquid adhesive works for most paper pieces.
If hot glue is used, an adult should operate the glue gun and handle the hot adhesive.
Can I turn the finished piece into an ornament?
Yes. Use a smaller plate and lightweight decorations.
Punch a hole near the top and add a ribbon loop for hanging.
What activities pair well with this design?
Reading the original story, discussing kindness, playing themed games, and creating a classroom display are all enjoyable companion ideas.
Grinch Paper Plate Craft With Free Template
Make an adorable Grinch face using a paper plate, green paint, construction paper, and cotton balls. This easy Christmas craft includes a free printable face template and works well for preschool, kindergarten, and elementary-aged children.
Materials
- 1 paper plate
- Free printable Grinch face template
- Green acrylic or washable tempera paint
- Red, yellow, and black construction paper or cardstock
- Cotton balls or cotton padding
- Glue stick or craft glue
- Black marker
- Pencil
Tools
- Paintbrush or sponge brush
- Child-safe scissors
- Printer, if using the template
Instructions
- Download and print the Grinch face template.
- Cut out the face outline, trace it onto the paper plate, and cut the plate to shape.
- Paint the paper plate green and allow it to dry completely.
- Use a black marker to draw the Grinch's eyebrows, nose, and crooked smile.
- Cut two yellow eye shapes from construction paper. Add black pupils with paper or marker.
- Glue the eyes onto the painted Grinch face.
- Cut a Santa hat from red construction paper.
- Glue cotton balls or cotton padding along the hat's bottom edge and add a cotton pom-pom to the tip.
- Attach the Santa hat to the top of the Grinch's head.
- Allow the glue to dry before displaying the finished craft.
Notes
- For toddlers, pre-cut the paper pieces and use washable paint.
- Use white paper instead of cotton balls for an easier, less bulky hat.
- For a no-printer version, draw the face shape directly onto the paper plate.
- Add a ribbon loop or craft stick to turn the finished face into a hanging decoration or puppet.
- Paint and glue drying times vary with the materials and room conditions.
