
Melted Snowman Paper Plate Craft (Free Template)
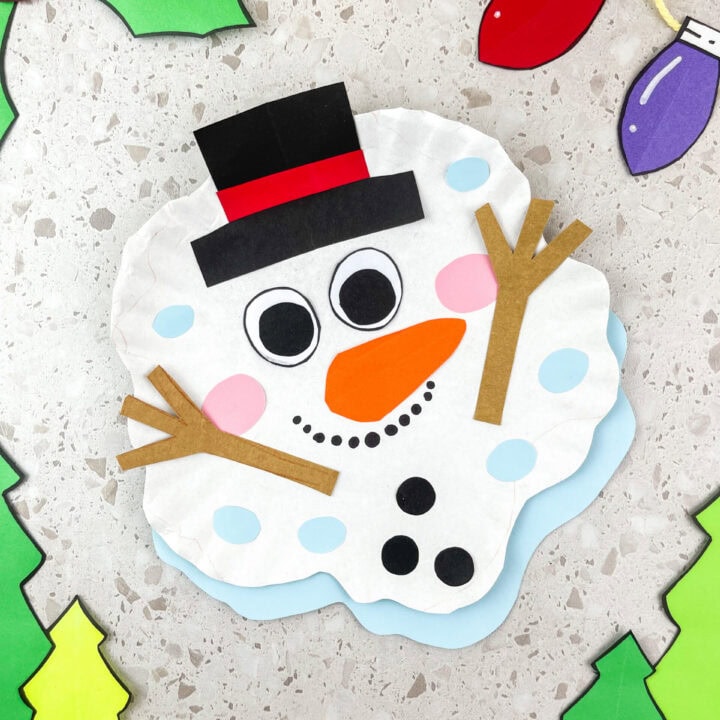
This melted snowman paper plate craft is so much fun for little ones who enjoy hands-on winter art! With a basic plate, colorful construction paper, and a few simple materials, you can make an adorable figure resting in a puddle.
This post includes a cutout guide to help young makers prepare the hat, carrot nose, buttons, and other pieces. It works well for preschool, kindergarten, and elementary grades, whether you’re working at home or planning a classroom project.
If your family enjoys seasonal activities, visit our paper plate crafts for kids collection or our Christmas crafts page for more inspiration using household materials.

Easy Kids Craft: Melted Paper Plate Snowman
Most traditional designs feature three round sections stacked on top of each other. This idea is a little different! Instead of standing tall, the character has collapsed into a funny puddle, complete with a carrot nose, top hat, buttons, and twig-like branches.
The plate becomes the body, while a light blue paper puddle adds a playful touch.
Young artists can customize their designs with different facial expressions, colorful scarves, or extra decorations. Each finished design can have its own personality through different expressions and decorations.
This design is especially fun for:
- Preschool and kindergarten art lessons
- Elementary school art time
- January and February classroom sessions
- Homeschool seasonal unit studies
- Storytime with favorite books about the season
- Indoor fun on cold or rainy days
- Christmas crafting afternoons
It’s also a great alternative to building one outdoors, especially when there’s no snow on the ground!
What You Need for This Seasonal Design
You only need a few inexpensive craft supplies to get started.
Materials
- 1 white paper plate
- Black construction paper for the hat, eyes, and buttons
- Orange paper for the carrot nose
- Brown paper for twig-shaped pieces
- Pink paper for the cheeks
- Light blue paper for the puddle
- White paper, if needed for extra details
- Cutout guide
- Child-safe scissors
- Glue stick or white glue
- Black marker
Optional Decorations
- Googly eyes
- Cotton balls
- Glitter glue
- Colorful paper for a scarf
- Brown pipe cleaners for optional branches
- Snowflake stickers
A regular plate works well here. If you’re preparing several for a group, inexpensive paper plates are a budget-friendly choice.

How to Make a Melted Snowman
Follow this tutorial to put together your own puddle-shaped character. Younger makers may need help cutting the plate and smaller pieces, while older ones can complete much of the work independently.
Step 1: Shape the Plate
Start with a plain plate.
Using scissors, carefully trim around the outside edge to form an uneven, wavy shape. Instead of leaving it perfectly round, make the edges resemble a little puddle.
You can trim a few shallow curves around the plate for a more irregular appearance.
The shape doesn’t have to be perfect. Uneven edges give the character a floppy, puddle-like look.
For preschoolers, an adult can prepare this step in advance.

Step 2: Prepare the Printable Pieces
Print the included guide and cut out the different shapes.
You’ll need:
- A black top hat
- Two eyes
- An orange carrot nose
- Pink cheeks
- Black buttons
- Two brown twig-shaped pieces
- An optional scarf
Trace the shapes onto paper in the corresponding colors.
Carefully trim each piece and place everything on the table before assembling the design.
Young makers can also draw their own details if they prefer a unique look.

Step 3: Make the Face
Now it’s time to give the face some personality!
Start by positioning the black hat near the top of the plate. Secure it in place, allowing part of the hat to extend beyond the edge if desired.
Next, attach the eyes and orange carrot nose.
Attach the pink cheeks on either side of the face, then use a black marker to draw a cheerful smile.
For a silly expression, tilt the hat or position the nose slightly off-center.
This is a fun opportunity to try different facial expressions.
Step 4: Add the Branches and Buttons
Trim two twig-shaped pieces from brown paper.
Attach one arm to each side of the body, letting the tips extend beyond the plate.
Next, add the black paper buttons.
Since the figure is lying in a puddle, the buttons don’t have to be arranged in a straight line. Scatter them across the surface so they look as though they’ve fallen out of place.
If you prefer, use brown pipe cleaners instead of paper cutouts for a slightly raised effect.

Step 5: Make the Paper Puddle
Trim a large, irregular puddle shape from light blue paper.
The cutout should be slightly larger than the bottom of the body so it stays visible under the plate.
Attach the decorated plate onto the colored puddle.
Let the colored paper extend around the edges so it looks as though the character has flattened into the puddle.
For extra decoration, add small white paper circles or snowflake stickers around the puddle.

Step 6: Add the Finishing Touches
You’re almost finished!
Add a colorful paper strip as a scarf, cotton balls, or a little glitter glue for a sparkling effect.

Let the glue dry completely before displaying the finished piece.
Now you have a cute paper plate snowman craft that’s ready to hang on the refrigerator, decorate a school bulletin board, or display with other seasonal artwork.

Free Melted Snowman Craft Template
This cutout guide makes preparation easier, especially when working with preschoolers or a larger group.
Instead of drawing every shape by hand, use the cutouts as a guide for the snowman’s hat, nose, eyes, buttons, and branches.
How to Use the Paper Cutouts
- Download the cutout guide.
- Print it on regular letter-sized paper.
- Cut out the individual pieces.
- Trace the shapes onto paper in the appropriate colors.
- Trim the colored pieces and attach them to the base.
- Add a colored paper puddle to complete the design.
For younger groups, we recommend preparing the smaller pieces ahead of time so everyone can concentrate on arranging and gluing them.
Older students may enjoy tracing and cutting the shapes themselves.
You can also print the guide on cardstock if you plan to reuse it for several sessions.

A Winter Craft for Preschoolers and Kindergarten
You can easily adapt the steps for different ages.
Preschool Version
For ages 3–4, simplify the process by preparing the pieces before starting.
Give each child a pre-trimmed plate, a hat, a nose, two eyes, and a few buttons.
Let everyone decide where to place the shapes before attaching them.
Focus on identifying colors, naming shapes, and practicing gluing rather than making every design look the same.
For preschoolers who are still developing scissor skills, use larger paper pieces that are easier to handle.
Kindergarten Version
Kindergarten students can take a more active role in assembling their work.
Encourage them to trace the provided shapes, cut along simple lines, and arrange the facial features before gluing.
You can also introduce counting by asking students to count the buttons, eyes, and twig pieces on their figures.
Elementary School Version
Older students can add more personality to their finished pieces.
They might design patterned scarves, add paper flakes to match the seasonal theme, or write a short story explaining why their character ended up in a puddle.
For extra writing practice, ask students to finish this sentence:
“My snowman melted because…”
Their answers can be funny, imaginative, or based on what they’ve learned about weather.
Fun Ways to Customize the Design
One of the best things about this craft idea is how easy it is to customize.
Cotton Ball Version
Glue a few cotton balls onto the plate to add fluffy texture.
Pull the cotton apart slightly before attaching it for a soft, fluffy appearance.
Painted Version
Instead of using a plain plate, paint it white.
Once the paint dries, add the paper facial features and accessories.
For the puddle, try painting a light-colored background rather than cutting one from paper.
Silly Expression
Give the character a particularly surprised expression!
Tilt the top hat, make the carrot nose point sideways, and scatter the buttons around the body.
You can even add a speech bubble that says, “I’m melting!”
No-Paint Version
For a group version without drying time, use plain plates and colored cutouts.
Glue sticks and paper decorations keep this option simple and cleanup manageable.
This super-easy approach is especially useful for larger groups.
Turn This Into a Hands-On Learning Opportunity
This hands-on design can be more than a decoration. It also offers a teaching opportunity.
Learn About Melting Snow
Before beginning, ask what happens to a snowman on a hot day.
Explain that snow is made of ice crystals, which turn into liquid water as they warm.
For a quick demonstration, place an ice cube in a shallow dish and watch it gradually turn to water.
Ask questions such as:
- What does the ice look like at first?
- What happens when the ice becomes warmer?
- Does the ice change shape?
- What is left after the ice warms?
Explain that melting is a change from a solid to a liquid.
Then make a paper character to show what happens when the ice warms up.
Practice Counting and Shapes
Use the paper pieces to practice early math skills.
Ask students to count the eyes, buttons, and twig pieces.
They can also identify circles, triangles, and rectangles among the cutouts.
Encourage Creative Storytelling
After finishing, invite participants to name their characters.
Ask them to describe where their characters lived, what the weather was like, and why the figures fell into puddles.
Share stories aloud or write them on a small card beside the finished artwork.

Tips for Making This With a Group
If you’re preparing a session for a preschool class, homeschool group, or seasonal party, a little planning can make the session easier.
- Prepare a sample so everyone can see what the finished design looks like.
- Prepare smaller pieces in advance for preschoolers.
- Organize prepared shapes into containers or trays.
- Set up every crafting station with a plate and an adhesive stick.
- Let everyone experiment with placement before securing their cutouts.
- Label the underside of each plate with the maker’s name to keep the artwork organized.
- Allow enough drying time before sending the artwork home.
You can also prepare individual kits containing a plate and prepared shapes.
This makes setup easier to organize when working with a larger group.
How to Display Your Finished Crafts
Once the pieces are finished, use them to create a cheerful seasonal display.
For a classroom bulletin board, arrange the finished figures across a colored background and add paper flakes.
A fun bulletin board title would be:
“Some Snowmen Are Worth Melting For!”
You can also attach the finished work to a hallway wall, the art room door, or the refrigerator.
For a writing display, have each student write a short sentence explaining why the figure ended up in a puddle. Place the sentences underneath the artwork for a personalized exhibit.
More Winter Ideas to Explore
Keep the creativity going with these easy ideas from 24 Hour Family.
Snow Globe Paper Plate Craft
Make a snow globe using paper plates, colored paper, and a guide. Kids can design a scene with trees, a snowman, and other seasonal decorations.
Christmas Penguin Paper Plate Craft
This penguin design uses a round base, colored paper, and a cutout guide. It’s a fun companion activity for an animal unit study.
Christmas Paper Plate Crafts
Explore a collection of festive ideas, including seasonal characters, holiday decorations, and easy ideas for young artists.
Paper Plate Crafts for Kids
Discover more imaginative ways to turn inexpensive plates into animals, seasonal decorations, and playful designs.
Christmas Crafts and Printables for Kids
Find even more holiday ideas, printable activities, and inspiration for family time.

Make Your Own Melted Snowman Paper Plate Craft
This paper activity is a fun way to enjoy a seasonal afternoon without bundling up to go outside.
With basic materials, a reusable cutout guide, and plenty of room for imagination, kids can make their own silly characters while practicing cutting, gluing, and early art skills.
Whether you’re planning a school art session or spending a cozy afternoon crafting at home, these little figures are sure to bring plenty of smiles!
How do you assemble the finished figure?
Trim the plate into an uneven puddle shape. Add paper eyes, a carrot nose, a hat, buttons, and twig-like pieces. Glue the decorated base onto a larger paper puddle to suggest a winter figure that has lost its shape.
Is there a cutout guide?
Yes! The included guide provides shapes for the facial features, hat, branches, and buttons. It helps beginners assemble their designs without drawing each piece from scratch.
What ages is this paper plate snowman craft suitable for?
It’s suitable for preschoolers, kindergarten students, and elementary grades. Younger makers may need help cutting the plate and small pieces, while older students can complete most of the steps independently.
Can you make this without a plate?
Yes. If you don’t have one, trim a large irregular oval from white cardstock or colored paper. Decorate it with facial features and attach it to a paper puddle.
Can this be made in a classroom?
Absolutely! This seasonal idea works well for January and February art centers, themed lessons, and homeschool lessons. Teachers can prepare the cutouts ahead of time to simplify the steps for younger students.
How long does this take?
Plan about 20–30 minutes, depending on the age group and how much preparation is already done. Allow additional time for glue or paint to dry if needed.
Melted Snowman Paper Plate Craft
Make a cute melted snowman paper plate craft with kids! Follow easy step-by-step instructions and use our free snowman craft template.
Materials
- 1 white paper plate
- Free melted snowman template
- Black, orange, brown, pink, and light blue construction paper
- Glue stick
- Optional cotton balls, stickers, or glitter glue
Tools
- Black marker
- Child-safe scissors
Instructions
- Trim the edges of a white paper plate into an uneven, wavy shape to resemble melting snow.
- Print the melted snowman craft template and cut out the pieces.
- Trace the hat, eyes, nose, cheeks, buttons, and arms onto colored construction paper.
- Glue the hat, eyes, carrot nose, and cheeks onto the paper plate. Draw a smile with a black marker.
- Attach the brown paper arms and black buttons.
- Cut a large puddle shape from light blue construction paper.
- Glue the snowman onto the blue puddle so the blue paper extends around the edges.
- Add optional decorations and allow the craft to dry before displaying.
Notes
- Pre-cut smaller pieces for preschoolers.
- Use cardstock for sturdier accessories.
- Replace small decorations with paper pieces for younger children.
- Let children personalize their snowmen with colorful scarves and funny expressions.
- Use washable supplies and supervise scissor use.
