
Merry Grinchmas Handprint Art (Free Printable Keepsake)
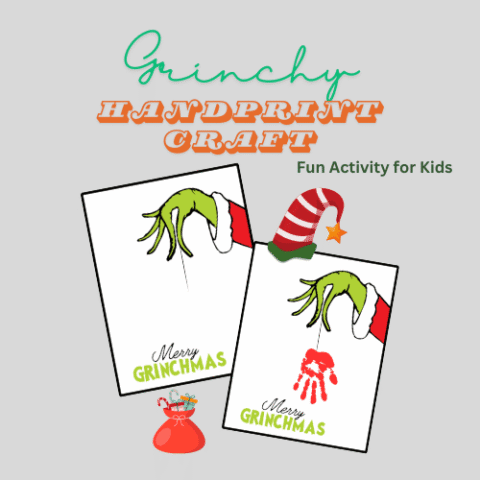
Create an adorable Christmas memory with this free Grinch-themed handprint art printable page! This easy project features the Grinch’s green hand holding an ornament decorated with your child’s red handprint.
It’s a sweet way to capture those little hands during the holiday season, and it makes a thoughtful gift for parents, grandparents, and other family members.
Start with the Christmas handprint template, washable red paint, and a helping hand from your child. Once the paint dries, you’ll have one-of-a-kind Christmas artwork you can frame, display, or save as a treasured memory.
For more creative holiday ideas, explore our collections of Christmas art projects for kids and Grinch foods and craft ideas.

Merry Grinchmas Handprint Art (Free Printable Keepsake)
This Grinch-inspired art for kids is especially fun for toddlers, preschoolers, and kindergarteners. It’s also easy to prepare for a preschool activity, homeschool time, or a family crafting afternoon.
Free Grinchmas Art Printable
Our free holiday page combines a festive Grinch illustration with your child’s own painted impression.
The design features a green Grinch hand reaching down to hold a Christmas ornament. The ornament area is where your child’s red painted palm and fingers become part of the artwork.
The words “Merry Grinchmas” appear underneath, completing the playful design.
Unlike a cut-and-paste activity, this project doesn’t require children to assemble a face, trace complicated shapes, or cut out multiple pieces.
The ready-made page provides the illustration, and your child’s painted hand completes it.
Why You’ll Love This Christmas Handprint Craft
- Uses only a few basic supplies.
- Includes a free Grinch-themed design.
- Works for toddlers, preschoolers, and older children.
- Creates a personalized Christmas keepsake.
- Makes a thoughtful handmade gift for family members.
- Can be framed or displayed with Christmas decorations.
- Requires no scissors for the basic project.
The finished artwork captures your child’s hand size at a particular moment, making it a meaningful memory to revisit as they grow.

Supplies for This Festive Grinch Project
You don’t need many materials to complete this project.
Materials
- Free Grinch-themed PDF
- White cardstock or printer paper
- Red washable, non-toxic children’s paint
- Foam brush or soft paintbrush
- Paper plate or shallow paint tray
- Paper towels or damp washcloth
- Protected work surface
Optional Supplies
- Ribbon
- Small pom-poms
- Decorative bow
- Frame
- Markers for adding a name and date
- Laminating pouch or protective sleeve
- Acid-free mounting supplies
For younger children, choose paint intended for their age group and follow the manufacturer’s safety instructions.
A washable paint designed for children’s finger-paint activities is a convenient option.
This post may contain affiliate links. As an Amazon Associate and a participant in other affiliate programs, I earn a commission on qualifying purchases. Read our disclosure policy here.



How to Make This Christmas Grinch Handprint
This simple Christmas craft takes just a few minutes of hands-on time, plus paint drying time. The goal is to place a clear red palm-and-finger impression within the ornament on the page.
Step 1: Download and Prepare the Page
Download the free PDF file using the form near the bottom of this post. Print the PDF on thick white paper or regular printer paper.
If you plan to frame the finished piece, I recommend smooth, heavyweight paper that works with your printer. It provides a sturdier surface for the wet paint.
Check your print preview before printing to make sure the entire Grinch illustration and “Grinchmas” lettering fit on the page.
Step 2: Prepare Your Work Area
Cover your table with washable craft mats, newspaper, or another protective material. Lay the printed page across a clean, level tabletop.
Have a damp cloth or paper towels within reach to wipe away paint as soon as you finish the impression. Set out the supplies first, especially when crafting with younger children.
Step 3: Brush Red Paint Onto the Palm and Fingers
Squeeze a little washable red paint onto a spare plate or low-sided tray. With a foam or soft-bristled brush, spread the paint lightly over the palm and fingers until they are evenly covered.
You want enough paint to transfer your child’s palm and finger shapes clearly, but not so much that it forms puddles.
Too much paint can blur the finished design. If your child is hesitant about having paint applied to their hand, demonstrate the process on your own hand first.
Step 4: Align the Painted Hand With the Ornament
Gently guide the fingers into a relaxed, slightly spread position. Position their painted hand over the ornament area beneath the Grinch’s green hand.
Slowly bring the painted palm down until it meets the page. Try to fit the palm and fingers within the intended ornament area as closely as possible.
A smaller hand may fit more easily than an older child’s hand. It’s fine if the painted fingers extend slightly beyond the ornament space.
Step 5: Press Gently and Lift Straight Up
Once the hand is positioned, gently press across the palm and each finger to transfer the paint. Keep the hand in place while pressing so the painted details do not smear.
Sliding can create smudges and make the fingers look wider than they are. When you’re ready, help your child lift their hand straight up from the page.
The red imprint should now appear as part of the Christmas ornament held by the Grinch.
Step 6: Let the Paint Dry
Place the finished page on a flat surface and allow it to dry completely. A thin layer of washable tempera paint may become touch-dry in approximately 15 to 30 minutes, but drying times vary.
Thicker paint or humid conditions can require longer. Avoid stacking the pages or placing them in a frame until the paint is completely dry.
Step 7: Personalize Your Christmas Artwork
Once the paint has dried, add your child’s name, age, and the year.
You can write the information on the front if there’s enough space or on the back for a cleaner appearance.
For example:
Made with love at Christmas 2026
You can also add a small ribbon bow near the top of the printed ornament for a decorative touch. The finished artwork is ready to frame, display, or give as a handmade Christmas gift.

Tips for Clear Painted Details Without Smudging
One of the most common challenges with children’s Christmas art is getting a clean impression. Young children naturally move their hands, and too much paint can blur the details.
A few small adjustments can help you get a cleaner result.
Use a Thin Layer of Paint
A light, even coat usually produces a clearer result than a thick layer. If your child’s palm is dripping with paint, remove some with the brush before pressing.
Keep the Paper Flat
Place the page on a firm, stable surface. Avoid holding the paper in the air while making the impression.
Position the Hand Before Pressing
Take a moment to line up your child’s hand with the ornament area. Once the hand touches the paper, avoid repositioning it.
Press Each Finger Gently
Some children naturally lift their fingertips when placing their hands onto paper. Gently press each finger to help transfer the paint.
Lift Straight Up
Help your child lift their hand vertically rather than dragging it across the page. This is especially important for keeping the fingers distinct.
Make an Extra Copy
If you’re making this project with a young child, print two or three copies. That way, you can try again if the first attempt doesn’t turn out as expected.
Don’t worry if the finished impression isn’t perfect. Slightly uneven results are part of what makes this artwork personal.
This Christmas Project for Toddlers and Preschoolers
The same design can be used with different age groups, but the amount of adult assistance will vary.
Baby and Young Child Keepsakes
Some babies and very young children may not enjoy having paint on their hands.
If you choose to try the project, use a product specifically labeled as suitable for your child’s age and for skin contact. An adult should control the positioning and keep the session brief.
If your child pulls away or seems uneasy, stop instead of trying to spread their fingers. For babies who frequently put their fingers in their mouths, a no-contact printing method may be easier.
Older Toddlers
Older toddlers may enjoy choosing the paint, placing their hands onto the page, and seeing the finished art. An adult can guide the placement and help press the fingers.
Keep a washcloth ready for immediate cleanup.
Preschoolers
Preschoolers can participate in more of the activity. With supervision, they may be able to brush a little paint onto their own hands.
After the paint dries, let them choose where to write their names or add a small holiday drawing.
Kindergarten and Older Children
Older children can often make their own prints with minimal assistance. They can also write their names, dates, or short Christmas messages.
Larger hands may extend outside the printed ornament area, so use the template as a decorative background rather than forcing the painted design into a smaller space.
Choosing Safe Paint or Ink for Children’s Art
When creating Christmas artwork, choose art materials intended for children and the way you plan to use them.
Washable Tempera Paint
Washable tempera paint is a convenient option for many young learners and elementary art projects. It comes in bright colors, is easy to apply with a brush, and is generally easier to clean up than permanent paints.
Choose a nontoxic product with an age recommendation appropriate for your child.
Washable Finger Paint
Finger paint is another option, especially for younger children. Look for finger paint that the manufacturer identifies as suitable for direct hand use and for your child’s age.
Finger paint can have a thicker texture, so use a thin coat to help prevent smudging.
Washable Ink Pads for Children
Large washable ink pads designed for children’s skin-contact art can provide an alternative to brush-applied paint.
Check that the pad is intended for direct skin contact and appropriate for your child’s age. A regular office stamp pad may not be suitable.
Clean-Touch Ink Pads
Some baby art kits use a clean-touch system in which the child’s hand presses against a film without contacting the ink.
These are useful for families who prefer to avoid applying paint directly to skin.
However, confirm that the kit accommodates your child’s hand size and can transfer the image onto a separate sheet or compatible paper.
What About Acrylic Paint?
Acrylic paint is not my first choice for young children’s art projects. It can be harder to wash off skin and may stain clothing.
For direct hand application, choose a washable product specifically intended for children’s skin-contact activities.
If your child has known skin sensitivities, avoid applying a new product without checking its ingredients and suitability first.
How to Make a No-Paint Grinch Craft
If your child dislikes messy activities or you prefer not to use paint, you can create a similar Christmas memento using paper.
This is an alternative to the original painted project.
No-Paint Paper Hand Version
You’ll need:
- Grinch-themed page
- Red construction paper
- Pencil
- Scissors
- Glue stick
Instructions
- Print the Grinch-themed template.
- Rest your child’s palm and fingers gently against a sheet of red construction paper.
- Gently trace around the fingers and palm with a pencil.
- Cut out the traced hand shape.
- Position it over the ornament area of the page.
- Glue the cutout onto the page.
- Label the finished page with your child’s name and the current year.
This version eliminates wet paint and drying time. For young children, an adult should handle the cutting.
It also works well for children who prefer tactile activities that don’t involve paint touching their skin.
Should You Use Cardstock for This Project?
You can use either thick paper or ordinary printer paper.
Cardstock
Sturdy white paper is my preferred choice for this Christmas art. It provides a firmer surface, handles light paint application better, and is easier to mount or frame.
Check your printer’s specifications before selecting thicker paper.
For best results, choose a smooth finish to help create an even paint impression.
Regular Printer Paper
Standard printer paper works for a quick project or classroom activity.
However, it may wrinkle if too much paint is applied. Use a thin layer of paint and allow the page to dry completely on a flat surface.
For a gift you plan to keep for years, consider printing on archival-quality paper.
How to Turn the Artwork Into a Grinch Ornament
The original design is a full-page piece of artwork, but you can adapt it into a hanging Christmas decoration.
Hanging Paper Ornament
Once the painted page has dried:
- Mount the finished artwork onto a sturdy paper backing.
- Trim around the artwork if your design has enough space.
- Punch a hole near the top, away from the painted design.
- Thread a piece of ribbon through the hole.
- Tie the ribbon into a hanging loop.
If you’re using the full-size page, it’s better suited to hanging on a wall or door than on a small Christmas tree.
For a smaller ornament, try reducing the printed design and use a smaller painted impression or paper hand shape.
Wooden Ornament Variation
For a sturdier version, make a separate ornament using an unfinished wooden blank.
Apply a suitable base coat, create a painted hand impression with paint intended for that surface, and allow it to dry. You can add the child’s name and year with a paint pen.
Follow the paint and sealer manufacturers’ directions before finishing. This is a separate project inspired by the original design, not included in the PDF.
Clay Ornament Variation
Air-dry clay can also be used to make a dimensional Christmas memento. Roll out the clay according to the manufacturer’s directions and gently press the child’s hand into the surface.
An adult can cut the ornament shape and create a hole for hanging. Let the clay dry completely, following the product instructions, before decorating.
Choose age-appropriate materials and supervise the project closely.
How to Preserve and Frame Your Grinchmas Artwork
This kind of artwork is especially meaningful because it records how small a child’s hand was during a particular Christmas.
With careful handling, you can keep the artwork as part of your family’s holiday memories.
Let the Paint Dry Completely
Never frame or laminate the page while the paint is still damp. Trapped moisture can cause smudging, sticking, or damage to the paper.
Add the Name and Year
Write your child’s name, age, and the date on the back of the artwork. This helps you remember when the artwork was made.
Use Acid-Free Materials
If you plan to preserve the artwork for many years, use acid-free mounting paper and archival-quality framing materials where practical.
Avoid placing adhesive directly over the painted design.
Keep the Artwork Away From Direct Sunlight
Red paint and printed colors may fade when exposed to prolonged sunlight. Display the finished artwork away from sunny windows.
For additional protection, consider a frame with UV-filtering glazing.
Consider a Protective Sleeve
A clear archival sleeve can protect the finished artwork from dust and handling.
Laminating is another option for everyday classroom displays, but heat and adhesive aren’t ideal for every type of original artwork.
If long-term preservation is important, framing or archival storage is generally preferable.
Save a Digital Copy
Photograph or scan the completely dry artwork. This creates a digital copy that you can reprint if the original becomes damaged.
Grinchmas Art for Classrooms
This free page is a fun project for kids during preschool and kindergarten Christmas celebrations.
It requires very little assembly and can be completed in small groups.
Prepare a Class Set
Print one page for each student, plus a few extras. Lightly write each child’s name on the back before beginning.
Set up a painting station with washable red paint, a foam brush, and a protected work surface.
Work in Small Groups
Rather than having the entire class paint their hands at once, invite two or three children to the crafting station.
This makes it easier to supervise placement and help everyone wash their hands promptly.
Set Up a Cleanup Station
Keep damp washcloths, paper towels, and access to soap and water nearby. Children should wash their hands thoroughly after the project.
Avoid sharing a paintbrush directly between children if it has been contaminated or used on irritated skin.
Create a Classroom Grinchmas Display
Once the artwork has dried, display everyone’s finished pieces together. You can add a heading such as “Our Hearts Grew Three Sizes!”
Each painted impression becomes a unique addition to the holiday display.
Pair the Activity With Storytime
Read How the Grinch Stole Christmas! by Dr. Seuss and talk about how the Grinch changes throughout the story.
Ask children what kindness means and how they can help someone feel included during the Christmas season.
The project can become part of a larger classroom discussion about generosity and friendship.
Christmas Gift Ideas Featuring Your Artwork
The finished artwork can be used in several thoughtful ways.
Christmas Gift for Grandparents
Place the artwork in a frame and add your child’s name and year. It’s a personal gift they can display during the holidays.
Christmas Cards
Print the design at a suitable size or mount the artwork onto a folded card. Write a personal message inside for a family member.
Family Christmas Memory
Make another painted impression every year. Store the pages together in a Christmas memory binder to see how your child’s hands grow over time.
Handmade Classroom Gift
Children can prepare this thoughtful gift for parents or caregivers. Once dry, slip the artwork into a clear protective sleeve or mount it onto decorative backing paper.
More Grinch Crafts and Christmas Art Activities
If you enjoyed this Grinch-themed project, try these additional activities from 24 Hour Family.
Grinch Paper-Hand Project
Our Grinch handprint paper craft turns a traced green paper hand into a Grinch face with yellow eyes and a red Santa hat.
This is a fun alternative when you want a cutting-and-gluing project rather than painted artwork.
Make a Grinch Face With Your Child’s Hand
Try our Grinch handprint craft with a free template for a different handprint design.
This project uses green paint to turn a child’s palm and fingers into the Grinch’s face.
Grinch Paper Plate Craft
Our Grinch paper plate craft uses green paint, paper eyes, and a Santa hat to create a fun Christmas character.
It’s a good activity for younger and elementary-age children during Christmas celebrations.
More Christmas Art Projects
Browse our seasonal art and crafts collection for additional holiday projects, including elves, reindeer, nutcrackers, and other festive designs.
You can also explore our handprint art collection for seasonal projects and handmade gift ideas.
For a larger selection of holiday activities, visit our Christmas crafts and printables for kids.
Download Your Free Grinchmas Art Page
Ready to make your own Christmas memory?
Get the free design and capture a sweet holiday memory with your little one’s painted hand.
The page features the Grinch’s green hand holding a Christmas ornament, with festive “Grinchmas” lettering underneath.
Simply add a red painted impression, let the paint dry, and personalize the artwork with your child’s name and the year.
It’s an easy Christmas activity for toddlers, preschoolers, classrooms, and families.
Display the finished artwork during the holidays, frame it for a grandparent, or save it as a special Christmas memory.
Happy Grinchmas!
How do you make this Merry Grinchmas Handprint art?
Download and print the free Grinch-themed page.
Apply a thin layer of red washable paint to your child’s hand, then carefully press the hand onto the ornament area beneath the Grinch’s green hand.
Lift the hand straight up and allow the paint to dry completely.
Is the Grinch-themed design free?
Yes. This post includes a free design featuring the Grinch’s green hand holding an ornament.
Your child’s red painted palm and fingers complete the design.
What ages can enjoy this activity?
Toddlers, preschoolers, and older children can participate with age-appropriate assistance.
For babies and very young toddlers, choose a suitable skin-contact product or consider a no-contact printing method.
Can I use cardstock instead of printer paper?
Yes. Smooth, sturdy paper is a good choice for keepsakes because it provides a firmer surface for the paint.
Make sure the paper weight works with your printer.
What kind of paint should I use?
Choose washable, nontoxic paint specifically intended for children’s hand or finger-paint activities and appropriate for your child’s age.
Red washable tempera paint is a common option.
Can I use an ink pad instead of paint?
Yes, provided the ink pad is labeled for children’s skin-contact art and appropriate for your child’s age.
A clean-touch kit is another option if you want to avoid direct contact with ink.
What if my child has sensitive skin?
Use a paint-free version with a traced red paper hand shape, or select a suitable clean-touch system.
Check product ingredients and avoid materials known to irritate your child’s skin.
How do I prevent smudges?
Help your child lift their hand straight up after making the impression.
Can older children use the page?
Yes. Older children can use the page, although their hands may extend beyond the ornament area.
They can also add names, dates, and hand-drawn details to the artwork.
Can I make this into a Christmas ornament?
Yes. Mount the finished artwork onto thick paper, add a hanging hole and ribbon, and use it as a paper ornament.
For a smaller tree ornament, create a separate reduced-size version or use a wooden or clay ornament base.
How long does the paint take to dry?
A thin layer of washable tempera paint may become touch-dry within approximately 15 to 30 minutes.
Allow additional time for thicker paint, cooler rooms, or humid conditions.
Can I laminate the finished artwork?
Laminating may work for fully dried, flat artwork, but heat and adhesive can affect some paints.
For sentimental artwork you want to preserve long-term, an archival sleeve or frame is a safer starting point.
Is this suitable for classroom Christmas activities?
Yes. Teachers can prepare printed copies ahead of time and guide children through the painting process in small groups.
Use washable materials, allow space for drying, and keep a cleanup station nearby.
Merry Grinchmas Handprint Art Printable
Create a Christmas keepsake using a free Merry Grinchmas printable and your child's red handprint. The handprint becomes an ornament held by the Grinch's green hand.
Materials
- Free Merry Grinchmas printable PDF
- White cardstock or printer paper
- Red washable paint suitable for children's handprint activities
- Paper towels or damp washcloth
- Optional ribbon, frame, and markers
Tools
- Printer
- Foam brush or soft paintbrush
- Paper plate or paint tray
Instructions
- Download and print the Merry Grinchmas handprint template on white cardstock or printer paper.
- Place the printable on a flat, protected work surface.
- Apply a thin, even layer of washable red paint to your child's palm and fingers.
- Position the painted hand over the ornament area beneath the Grinch's green hand.
- Gently press the palm and fingers onto the paper without sliding.
- Carefully lift the hand straight up to reveal the red handprint.
- Wash your child's hand promptly and allow the artwork to dry completely.
- Add your child's name and the year, if desired.
- Frame the artwork, mount it onto cardstock, or display it as a Christmas keepsake.
Notes
- Cardstock works well for a keepsake you plan to frame.
- Print an extra copy in case the first handprint smudges.
- For a no-paint option, trace and cut a handprint from red construction paper.
- Always use age-appropriate, nontoxic materials intended for children's handprint activities.
- Allow paint to dry fully before framing, mounting, or storing the artwork.
