
North Pole Printable Paper Craft With Free Template
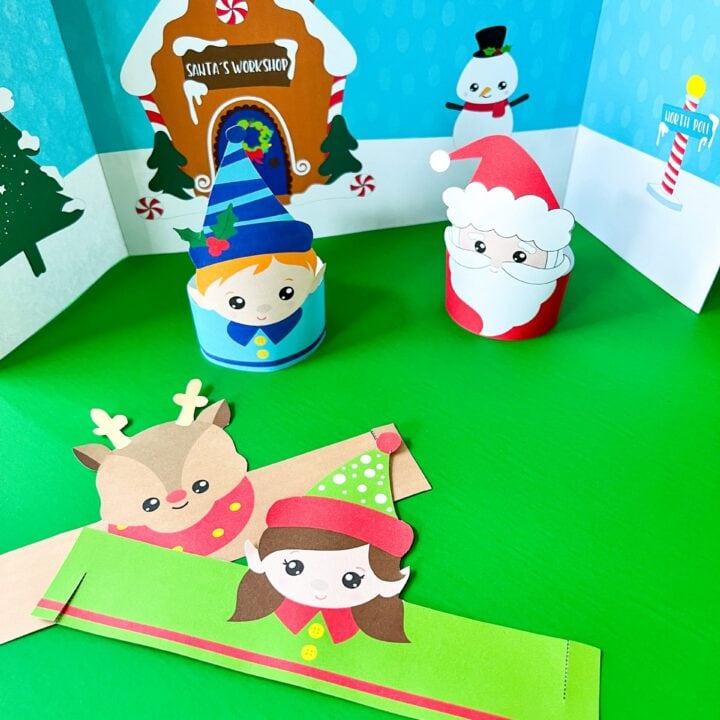
Build a magical Christmas scene with this North Pole printable craft. The free Santa template includes a festive workshop, a Christmas tree, a North Pole sign, a snowman, Santa Claus, a reindeer, and two cheerful elves.
Choose the pre-colored pages for a quicker project, or let children decorate the black-and-white versions. Then connect the backdrop panels and turn the character strips into standing loops for Christmas storytelling.
Add this project to your afternoon of Christmas crafts and printables, or set it up as a family activity during the holiday season.

What’s Inside the North Pole Printable Template?
The eight-page PDF file contains four ready-colored pages and four matching black-and-white pages:
- Two side panels: A Christmas tree and a North Pole sign, each with an attachment tab.
- One middle panel: Santa’s workshop and a snowman.
- Two elf characters: Each attached to a paper strip that forms a standing loop.
- Santa and a reindeer: Also attached to loop strips.
- Small paper extras: A candy cane, a miniature Santa letter illustration, and a Christmas card-style rectangle. Some details on the black-and-white pages are left blank for children to decorate.


You only need to print four pages for one complete scene. Choose pages 1, 3, 5, and 7 for the colored version or 2, 4, 6, and 8 for the black-and-white version.
The finished project is a standing paper scene with a connected backdrop and separate characters. The workshop is illustrated on the middle panel, so there is no separate building to fold and glue.


Supplies for the North Pole Paper Craft
- Free printable North Pole PDF
- White cardstock that works with your printer
- Printer and ink
- Child-safe scissors
- Glue stick or clear tape
- Crayons or colored pencils for the black-and-white pages
A ruler can help children make straight folds along the backdrop tabs. A shallow tray is useful for keeping cutouts together.
Cardstock gives the backdrop and character loops more support than regular printer paper. If you use standard sheets, handle the finished pieces gently and reinforce loose connections with tape.
You can assemble the printable template with ordinary craft supplies. Glue or tape is needed for the backdrop connections; the character loops join at their cut notches.


How to Make the North Pole Paper Craft
1. Print Your Chosen Pages
Open the PDF and select either the colored pages or the black-and-white pages listed above. Print all four selected sheets at the same scale.
Check the print preview to make sure the outlines and tabs fit within your printer’s margins. If you need to use “Fit,” apply that setting consistently to every page.
2. Color Before Cutting
If you chose the black-and-white version, color the backdrop and characters while they are still on the full sheets. This makes the small details easier to manage.
Children can decorate the tree, design the elves’ clothes, or add snowy details around the workshop. Crayons and colored pencils keep the paper relatively dry and ready for folding.

3. Cut Out the Backdrop Panels
Cut around the outside boundary of each of the two side panels and the middle panel.
Keep the tree and North Pole sign attached to their side panels. Leave the workshop and the snowman together on the middle panel, too. These pictures form the backdrop rather than separate character cutouts.
Leave the attachment tabs on the side panels intact. The dotted lines on those tabs are fold lines.

4. Connect the Three Backdrop Panels
Turn the panels so the pictures are upright. Place the illustrated workshop in the middle, with the tree panel on one side and the North Pole sign panel on the other.
Fold each side panel’s tab along its dotted line. Attach the tabs behind the matching edges of the middle panel with a glue stick or tape, following the printed directions.
Keep the panel bottoms aligned so the backdrop rests evenly on the table.
5. Set Up the Standing Backdrop
Gently angle the two side panels forward to create a shallow, three-sided scene. Position the panels until the display stays upright on a flat tabletop.
Wait until the adhesive has completely dried before repositioning the display. If a connection pulls apart, reinforce it from the back with a small strip of tape.
6. Trim the Character Shapes and Paper Strips
Cut around Santa Claus, the reindeer, and both elves, keeping each character attached to its long paper strip.
Make a short cut along each dotted notch line at the ends of the strips. Stop where the dotted line ends. These cuts help the strips join together, so do not cut all the way across the strip.
Adults can make these small cuts for younger children.
7. Connect the Strips to Form Standing Figures
Curve each character’s strip into a loop with the picture facing outward. Bring the two ends together and slide the notches into one another.
Stand the loop on the table and adjust it gently so it sits evenly. If the connection slips loose, add a small piece of tape inside the loop.
Place the printable Santa and other characters in front of the backdrop, then cut out any small extras you want to use.
How Long Does This Craft Take?
Allow approximately 30–45 minutes for printing, cutting, and assembling the ready-colored version with adult help. This is a planning estimate; intricate cutting may take longer.
The black-and-white version needs additional coloring time. For young children or a classroom group, split the project into two sessions: decorate first, then cut and assemble.
Tips for Easier Assembly
Keep the two kinds of dotted lines separate. The backdrop tabs fold along their dotted lines. The character strips need short cuts at their dotted notches.
Test how the pieces line up before securing them with adhesive. Arrange the backdrop panels upright and check the tabs against the middle panel before attaching them.
Use light pressure when joining loops. If the ends do not slide together, check the notch cuts instead of forcing the paper and tearing it.
Keep decorations flat. Drawn details or lightweight stickers are easier for the paper to support than heavy embellishments.
Use a level surface. A tabletop or shallow tray gives the characters a steadier place to stand than carpet or a soft blanket.
Adapt the Craft for Different Ages
Preschoolers: Have an adult cut the panels, detailed outlines, and notch cuts. Children can color, help press down the tabs, and arrange the finished characters.
Early elementary children: Let them cut the larger shapes and fold the backdrop tabs. Offer help around antlers, pointed hats, and the notch connections.
Older children: Encourage them to assemble the scene, decorate the blank extras, and write a short story about the characters.
Choose the amount of help based on each child’s cutting skills. If your child enjoys projects with fewer pieces, our Build a Santa printable offers another Christmas paper activity.
Ways to Play With Your Finished North Pole Scene
Tell a North Pole Workshop Story
Invite children to move the characters around the magical scene and explain what happens next:
- What are the elves getting ready?
- Why has the reindeer come to the workshop?
- Who brought the letter to Santa?
- What happens when everyone gathers beside the Christmas tree?
For another storytelling prop, make a Santa stick puppet to perform beside the scene.
Make a Small Christmas Display
Place the backdrop and characters on a shelf, table, or shallow tray. A sheet of white paper underneath can become the snowy ground.
Keep the characters movable if children will use the scene for play. For a fixed display, secure the loops to a paper base with small pieces of tape.
Use It for a Group Craft
Prepare the detailed cutouts before the activity if you are working with younger children. Give each group one backdrop set and let children share the coloring and character assembly.
Finish by asking each child to describe their character’s job at the workshop. For a Christmas-themed writing activity, older children can write three sentences about the beginning, middle, and end of their story.
North Pole Paper Scene or Christmas Village?
This free printable makes one North Pole scene, with a cheerful workshop backdrop and standing paper characters.
A larger paper Christmas village usually includes several separate buildings arranged together. You can expand this scene with additional handmade scenery, but the included workshop stays part of the flat middle panel.
If you want another project to make alongside it, try our gingerbread house paper bag craft. Children can give the two projects their own roles in a Christmas story.
How to Store the Finished Craft
Keep the scene somewhere dry, away from areas where the paper could get splashed or crushed.
For compact storage, carefully disconnect the character loops and lay them flat. Gently fold the backdrop at its side-panel connections if the joins allow it, or store it upright in a larger box.
Keep the small extras in an envelope. Before using the craft again, check the backdrop tabs and loop connections and reinforce any loose areas with tape.
More Christmas Crafts and Printables
Continue your Christmas craft day with a Santa paper bag puppet, or decorate an ugly Christmas sweater printable while the backdrop dries.
Browse our Christmas activities and printables for kids for more creative paper projects, coloring activities, and holiday games.
Download the Free North Pole Paper Craft Template
Get the North Pole printable PDF using the download option below. Choose the colored pages for quicker assembly or the black-and-white pages for a color-and-build activity.
Print your selected four pages, gather scissors and tape or glue, and start building your festive Christmas scene.
Is this North Pole printable paper craft free?
Yes, the North Pole template shared with this post is a free printable for personal use. You will need your own printing and craft supplies.
Does the PDF include colored and black-and-white pages?
The template includes both options. The eight-page PDF contains four pre-colored pages and four matching black-and-white pages. Print one set or mix the versions while keeping the printing scale consistent.
Is this a 3D North Pole paper model?
It creates a standing scene with angled backdrop panels and loop-based characters. The workshop itself is a flat illustration rather than a separate 3D building.
Will Ordinary Printer Paper Work for This Project?
Yes, but cardstock usually holds its shape better. Standard printing sheets are also suitable, although the finished display will be less sturdy and should be handled gently.
Which Age Groups Can Enjoy This Activity?
Preschoolers can take part with adult-prepared pieces. Elementary children can complete more of the cutting and assembly, depending on their skills. Detailed outlines and notch cuts may still need help.
Why won’t the characters stand up?
Check that each strip forms an even loop, the notches are connected, and the bottom edge rests on a level surface. Thin paper or a loose connection may need reinforcement with tape.
Can I use the character strips as headbands?
The strips are designed to form small standing loops for the scene. For a wearable headband, you would need a separate strip sized for the child’s head.
North Pole Printable Paper Craft
Build a Christmas paper scene with a three-panel backdrop, Santa, a reindeer, and two standing elves.
Materials
- North Pole printable PDF
- 4 sheets of printer-compatible white cardstock
- Glue stick or clear tape
- Crayons or colored pencils, optional
Tools
- Printer
- Child-safe scissors
- Ruler, optional
Instructions
- Print pages 1, 3, 5, and 7 for the colored version, or pages 2, 4, 6, and 8 for the black-and-white version.
- Color the black-and-white pages before cutting.
- Cut out the three backdrop panels, leaving the side-panel tabs attached.
- Fold the tabs along the dotted lines and attach them behind the matching edges of the middle panel.
- Angle the side panels forward until the backdrop stands.
- Cut out the characters with their strips attached. Cut only along the short dotted notch lines.
- Curve each strip into a loop and interlock its notches. Reinforce inside with tape if needed.
- Arrange the characters and optional paper extras in front of the backdrop.
Notes
Use the same printing scale for every page. Adults should help with detailed cutting and notch cuts. The backdrop’s dotted lines are fold lines; the character strips’ dotted lines are short cut lines.
