
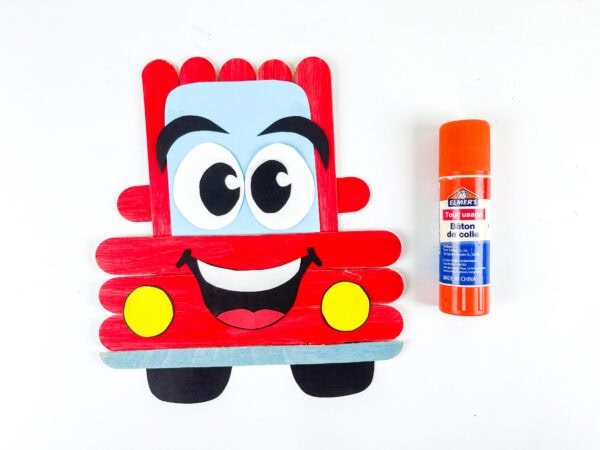
Popsicle Stick Car Craft (Free Car Template)
Simple supplies and playful details come together in this Popsicle Stick Car Craft to create a cheerful little project that instantly grabs attention. This playful craft turns ordinary popsicle stick pieces into an adorable red car complete with big eyes, bright wheels, and a happy smile.
It’s the kind of easy craft that looks impressive once finished, while still being simple enough for younger crafters to help with along the way.
Popsicle Stick Car Craft
If you love hands-on activities that mix painting, cutting, and assembling, this car craft is such a fun choice.
The finished creation works as a cute decoration, a pretend toy, or even part of a transportation-themed lesson.
Whether you’re searching for a diy activity for a rainy afternoon or a themed craft idea for a classroom setup, this colorful car with popsicle sticks is packed with playful personality.
This post may contain affiliate links. As an Amazon Associate and a participant in other affiliate programs, I earn a commission on qualifying purchases. Read our disclosure policy here.
60 Pieces Jumbo Craft Sticks, 8 Inch Natural Wooden Popsicle Sticks, Multi-Functional Ice Cream Sticks for Crafts, Tongue Depressors, Hair Removal and Waxing Sticks, Plant Labels, DIY Classroom Crafts Crayola Construction Paper, 240 CountWestcott 5750pcs Wiggle Eyes Self-Adhesive Googly Eyes, 4mm~18mmElmer’s E543 Washable School Glue Sticks, Disappearing Purple, 4/PackCrayola 587722 Non-Washable Markers, Broad Point, Classic Colors, 10/Set


Materials You’ll Need:
This DIY craft uses simple supplies that are easy to gather before you start.
- Popsicle sticks
- Red paint
- Construction paper
- Scissors
- Glue
- Marker
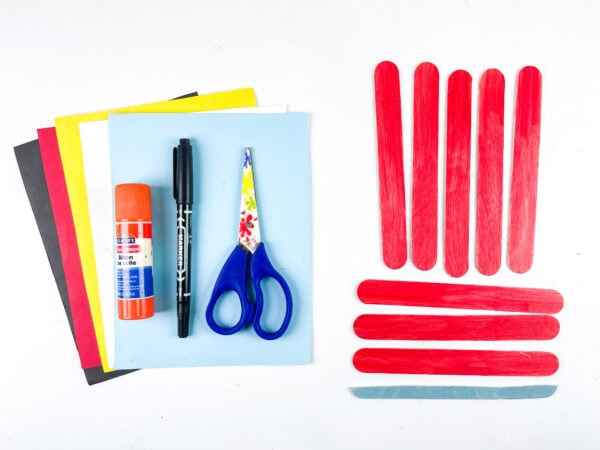
You can also place extra paper scraps nearby if kids want to get creative with additional decorations during the activity.
How to Make a Popsicle Stick Car Craft
This step-by-step tutorial keeps the process simple while still creating an adorable final result.
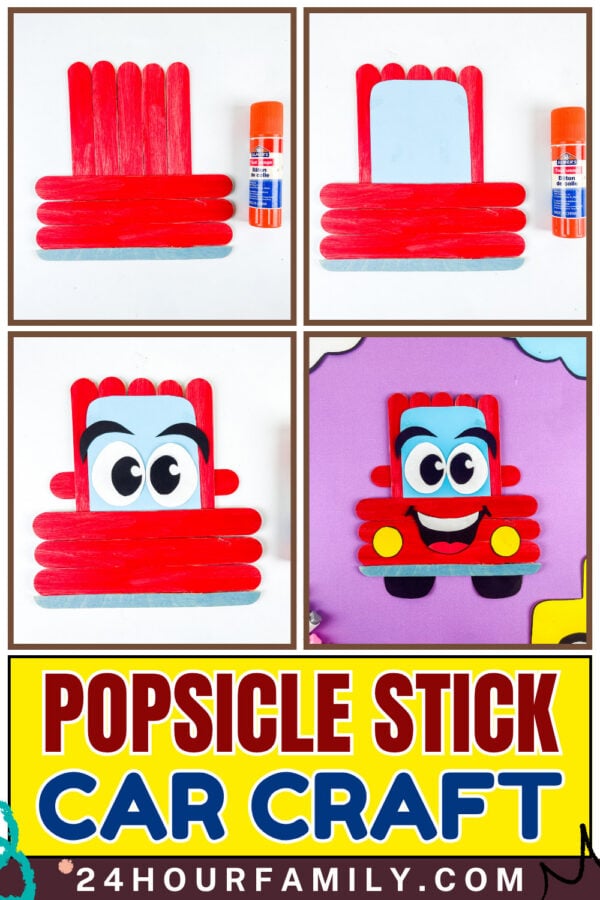
Step 1: Color the Popsicle Stick Pieces
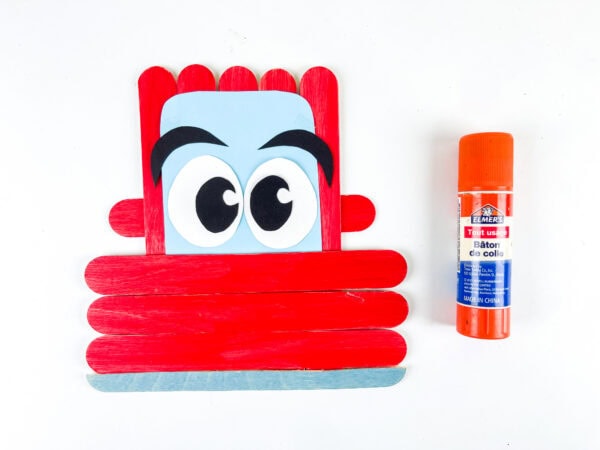
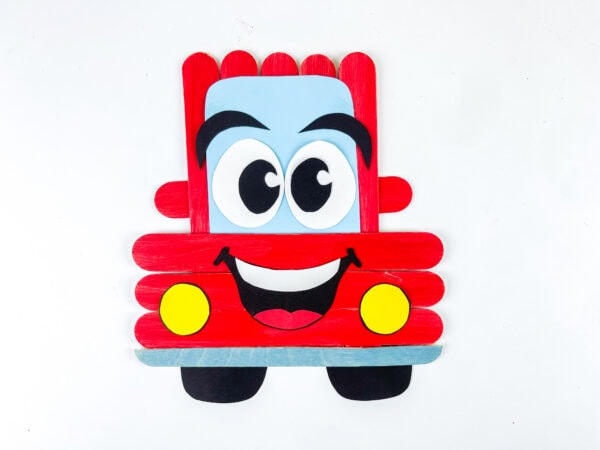
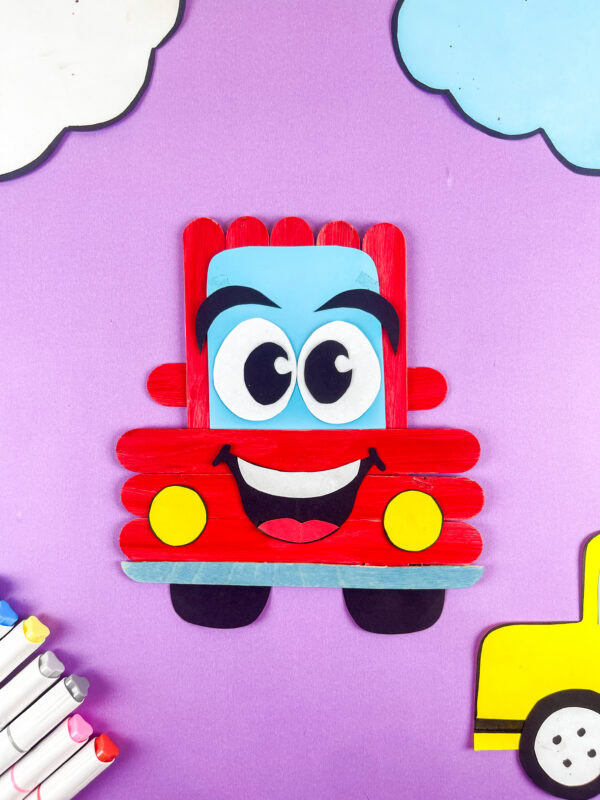
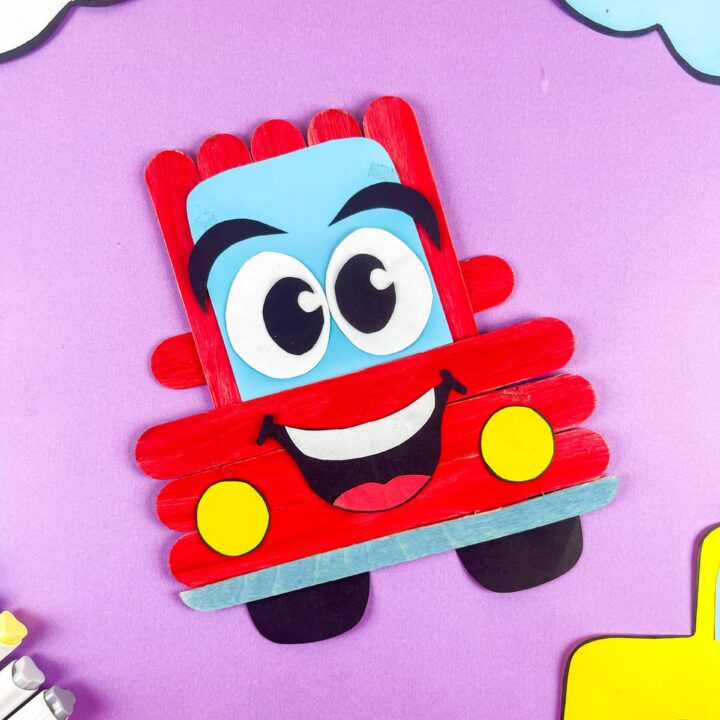
Start by coloring eight Popsicle stick pieces red. Set them aside and allow them to dry completely before assembling the base.
Five popsicle stick pieces will stand vertically, while three more will sit horizontally across the front section of the car. One extra blue popsicle stick piece will later be attached along the bottom.
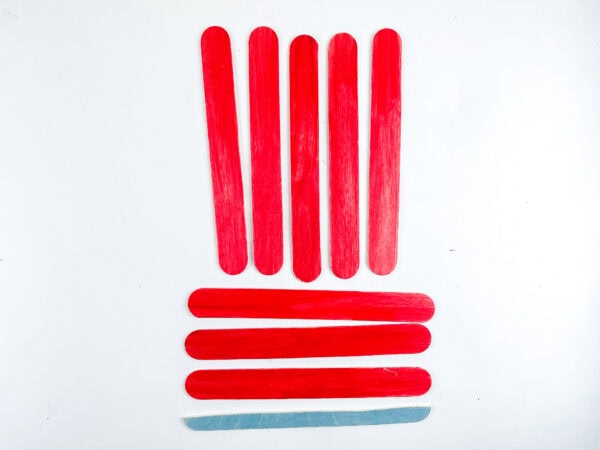
Coloring the sticks in advance makes the finished design look bright and polished.
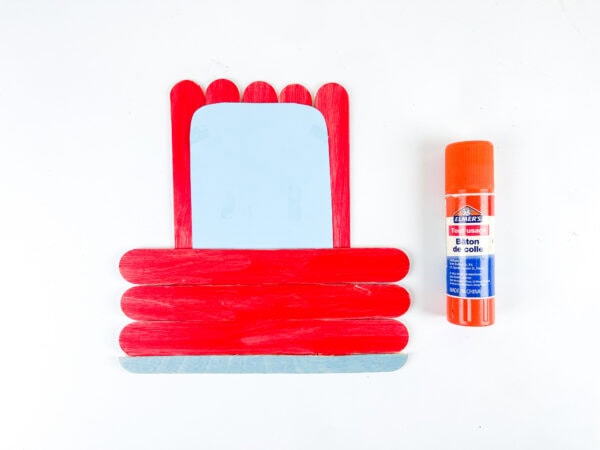
Step 2: Build the Base of the Car
Once the pieces have dried, begin attaching the popsicle stick pieces together. Place five vertically side by side, then attach three horizontally across the front section to hold everything together securely.
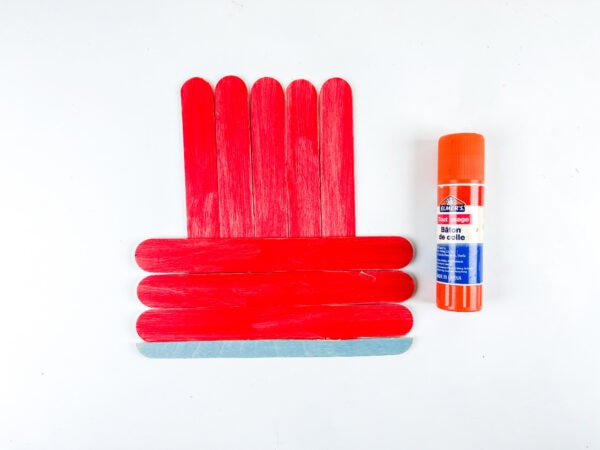
Attach the blue popsicle stick piece near the bottom edge to form a colorful trim section.
At this stage, the craft already begins to look like the body of a cheerful little car.
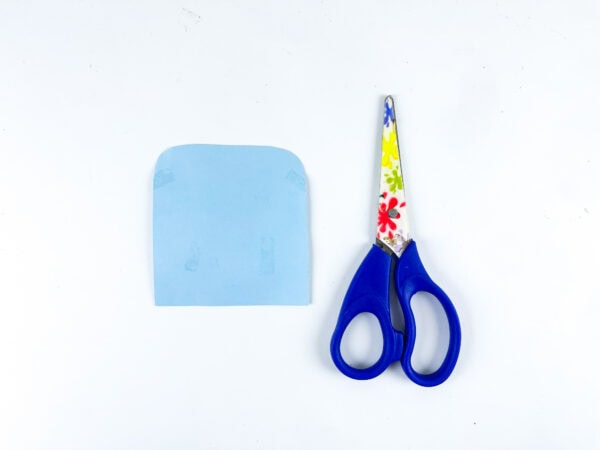
Step 3: Add the Front Window
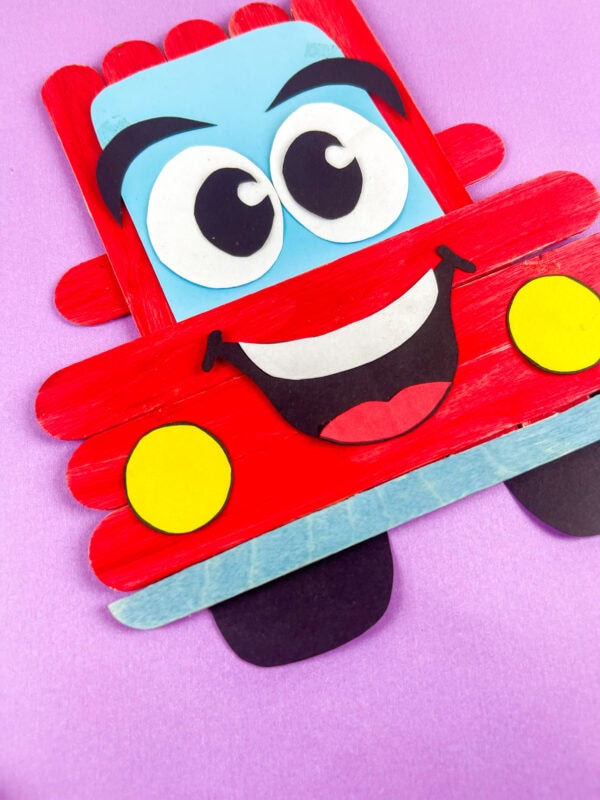
Cut a rounded rectangle from light blue paper and glue it near the upper-center section of the popsicle stick base.
This piece becomes the windshield area and helps bring the entire car craft together visually.
The rounded corners help the design look softer and more cartoon-inspired.
Step 4: Add the Face Details
Now comes one of the most fun parts of the tutorial. Cut large white circles and black circles from construction paper to form oversized cartoon eyes.
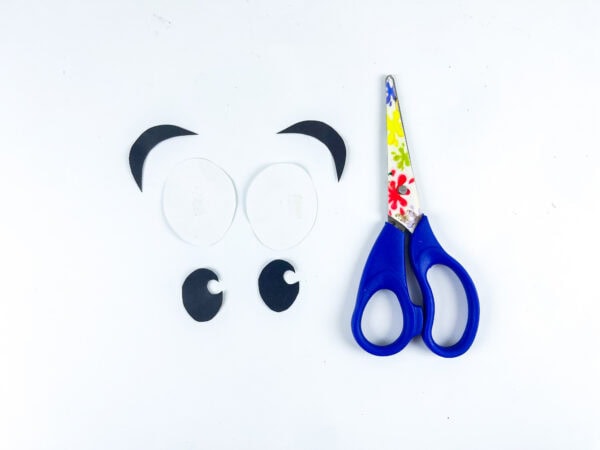
Attach thick black eyebrows above the eyes using black paper. These details instantly give the craft a playful personality.
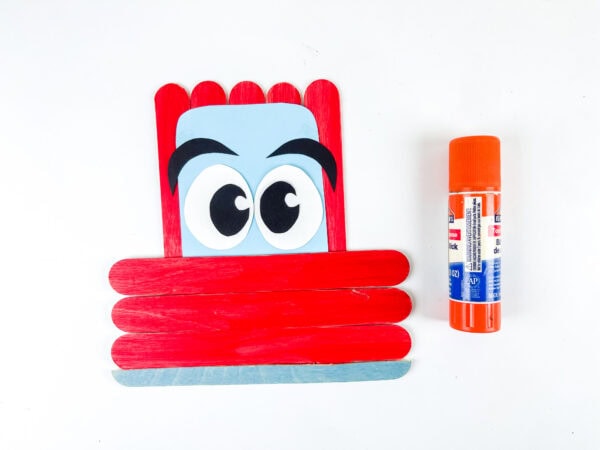
The giant eyes make the car look expressive and animated, almost like a friendly character in a cartoon.
Step 5: Attach the Side Pieces and Smile
Cut two small, rounded popsicle stick sections and glue them onto each side of the face area.
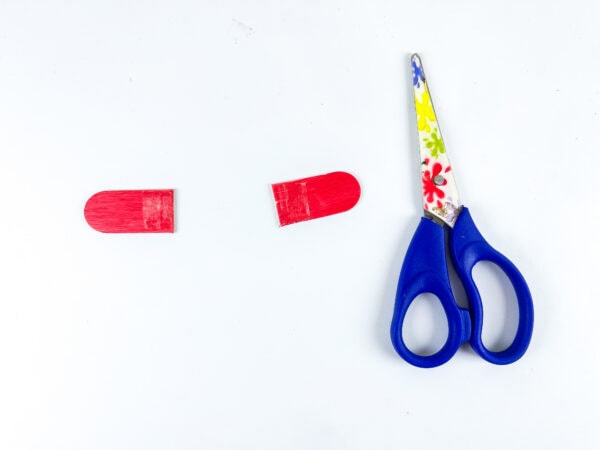
These serve as the side mirrors or small side details on the car.
Next, attach the large smiling mouth beneath the windshield area.
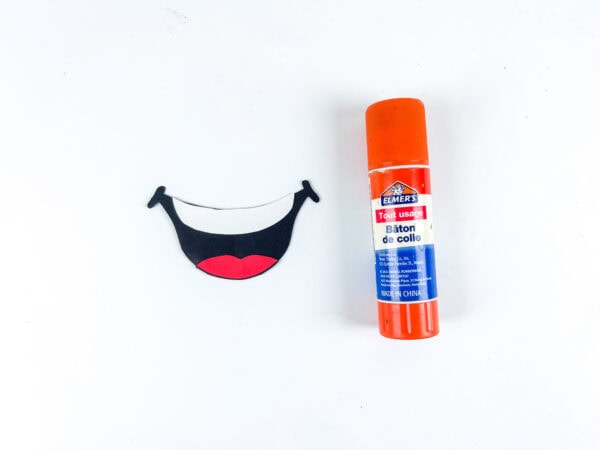
Add the tongue section inside the smile to make the expression look even more cheerful.

The smiling face lends the entire creation a bright, cartoon-inspired look.
Step 6: Add the Wheels and Final Details
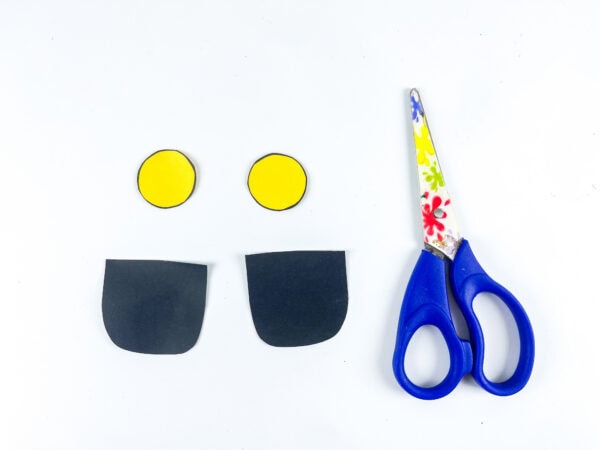
Finish the popsicle stick cars by attaching two yellow circles near the bottom front, and two black wheel shapes underneath each car.
Once everything is attached securely, allow the glue to dry fully before displaying the finished craft.
The completed design looks bold, colorful, and full of personality.
Tips for Making Popsicle Stick Cars
This popsicle stick project is wonderfully flexible, which makes it easy to adjust for different ages and skill levels.
For younger kids, adults can pre-cut the paper pieces to make assembly easier. Older children may enjoy designing their own facial expressions or decorating the popsicle stick cars with extra accessories.
You can also turn this craft into a fun learning experience by talking about transportation, colors, shapes, or basic vehicle parts as you build.
Some kids may even want to put together an entire collection of diy vehicles like buses, trucks, rockets, or race cars after finishing this one.
Creative Ways to Customize the Craft
One reason this popsicle-stick car craft idea remains so popular is that there are endless ways to personalize it.
Here are a few cheerful ideas:
- Add number stickers for a race car look
- Use glitter paper for shiny headlights
- Swap the red paint for blue, green, or yellow
- Add rubber bands to create spinning wheels
- Draw extra decorations with markers
- Turn the car into a themed holiday decoration
A child can easily turn this into their own special creation with just a few extra details.
Why Kids Love Popsicle Stick Crafts
There’s something especially satisfying about turning ordinary popsicle stick pieces into recognizable objects. Kids love seeing everyday materials transform into something exciting and colorful.
Crafting also gives children opportunities to build confidence while practicing creative thinking. Small projects like this help strengthen focus, patience, and fine motor skills in a relaxed environment.
Because the supplies are inexpensive and easy to find, popsicle stick crafts are also great for classrooms, camps, homeschool setups, or weekend crafting sessions.
Turning the Craft Into a Pretend Toy
After the craft dries, it can easily double as a small pretend toy for imaginative play.
Kids can race the cars across the floor, line them up for pretend races, or combine them with cardboard roads and paper traffic signs for extra fun.
You could even build multiple popsicle-stick cars in different colors and create an entire pretend-city setup.
Simple diy activities like this often become favorite toys long after the crafting portion is finished.
More Popsicle Stick Crafts to Explore
If you enjoyed making this Popsicle Stick Car Craft, here are a few more popsicle stick projects that are great for creative afternoons, themed activities, and hands-on fun.
- Nutcracker Popsicle Stick Ornament Craft – A festive holiday craft that turns popsicle sticks into a cheerful nutcracker ornament full of seasonal charm.
- Cornucopia Popsicle Stick Craft – A fun fall-themed activity that combines bright colors and harvest-inspired details into one creative project.
- Hedgehog Popsicle Stick Craft – An adorable animal craft that lets kids make a cute hedgehog using simple supplies and playful decorations.
- Vehicles Popsicle Stick Frame Craft – A fun vehicle-themed craft that mixes creativity and personalization into a frame kids can proudly display.

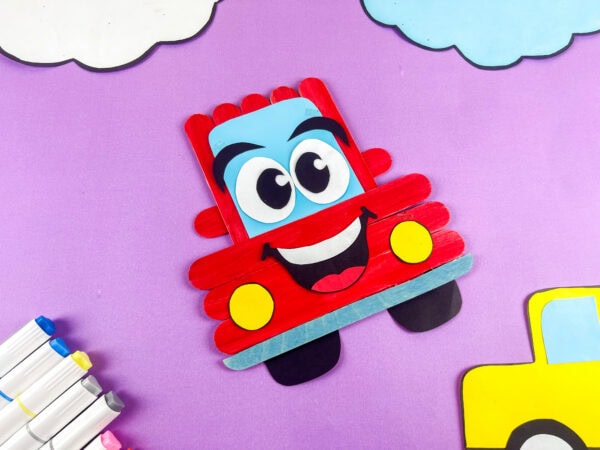
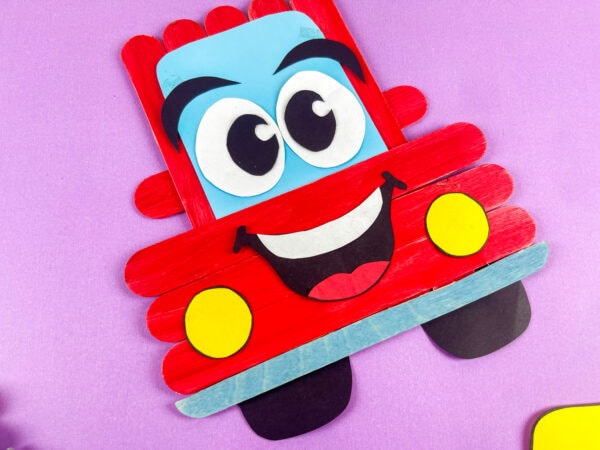
This Popsicle Stick Car Craft combines bright colors, everyday supplies, and cheerful details into one adorable project that kids truly enjoy making. From coloring the popsicle stick pieces to attaching the smiling face and wheels, every step feels exciting and approachable.
The finished car looks cheerful enough to display on a shelf, bulletin board, or craft wall once completed.
Popsicle Stick Car Craft
This Popsicle Stick Car Craft is a bright and fun activity that turns ordinary craft sticks into a cheerful cartoon car. Kids can paint, cut, and assemble colorful pieces to build their own smiling vehicle. It’s a great project for transportation themes, classroom crafts, or creative afternoons at home. The finished car is full of personality and fun little details. It also gives kids extra practice with painting, cutting, and arranging shapes.
Tools
- Popsicle sticks
- Red paint
- Construction paper
- Scissors
- Glue
- Marker
Instructions
1. Color the Popsicle Stick Pieces
Paint eight popsicle sticks red and set them aside to dry completely. You will use most of these for the main car body, while one painted stick in a different color can be used for an extra trim detail.
2. Build the Car Base
Arrange five popsicle sticks vertically beside each other to form the body of the car. Attach three sticks horizontally across the back to hold the structure together, then add the trim piece along the lower edge.
3. Add the Front Window
Cut a rounded window shape from light blue paper and attach it near the top center of the car body. This section becomes the windshield and helps define the front of the vehicle.
4. Create the Face Details
Cut large paper circles for the eyes and smaller circles for the pupils. Attach them to the front of the car, then add thick eyebrows above them to give the vehicle a playful expression.
5. Attach the Side Details and Smile
Cut small paper or stick pieces for the side accents and place them on both sides of the car. Add a large smiling mouth underneath the window area, along with extra details to make the face look cheerful.
6. Add the Wheels and Finish the Craft
Attach round wheel shapes along the lower section of the car and add any final details with a marker. Let everything dry fully before displaying your finished popsicle stick car.