
Free Grinch SVG Files for Cricut + Easy Christmas Jar Craft
Add a little mischievous Christmas fun to your crafting with these free Grinch SVG files! Featuring the Grinch’s recognizable face and Santa hat, this design is a fun choice for making Christmas decorations, vinyl decals, ornaments, and personalized holiday crafts.
Whether you use a Cricut or a compatible Silhouette cutting machine, these Grinch face cut files are a creative way to make something festive for your home.
I’m also sharing an easy Grinch Christmas jar tutorial using adhesive vinyl and recycled glass yogurt jars. The finished jars make cute holiday decorations, small gifts, or additions to a Christmas centerpiece.
Download the free Grinch SVG files below and follow the step-by-step instructions to create your own project.
For more holiday designs, visit our collection of free SVG files for Cricut and Silhouette, our ever-growing list of Grinch crafts, and Christmas Crafts and printables.


Free Grinch SVG Cut Files
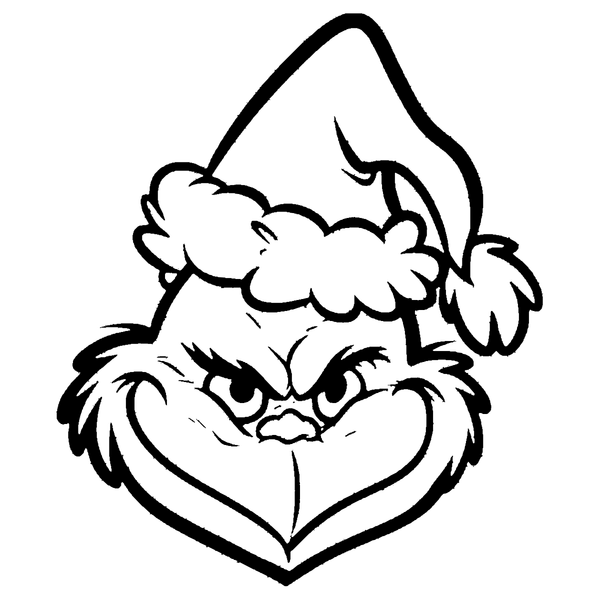
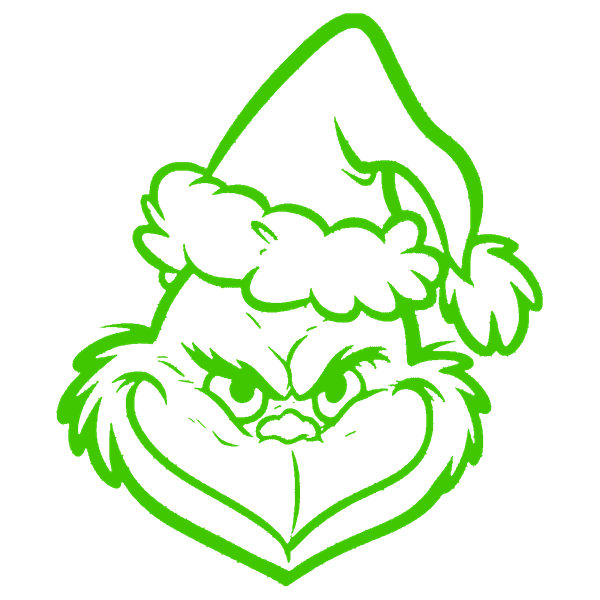
Our free Grinch SVG download features a detailed outline of the Grinch’s face wearing a Santa hat.
The design includes his mischievous eyes, eyebrows, furry cheeks, and distinctive smile, making it a fun addition to Christmas crafts inspired by the classic holiday character.
The corrected files include vector cutting paths rather than embedded PNG images, making them better suited for projects that require an SVG cut file.
What’s Included in the Free Download?
The updated download package includes:
- Green Grinch face SVG files with vector cutting paths
- A black single-color Grinch SVG cutting version
- Transparent PNG previews
- A short instruction file
The two original green SVG files contain essentially the same design, so the corrected green versions look alike.
These are single-color vector designs, not individually layered files for every feature of the face.
You can change the cutting color in compatible design software, but the files aren’t meant to automatically create a fully layered, multicolor vinyl design.
What Can You Make With a Grinch Face SVG?
You can use the free Grinch face SVG for several Christmas craft projects.
Here are some creative ways to use the design.
1. Grinch Christmas Jars
One of my favorite ways to use this SVG is to decorate small glass jars.
Apply a vinyl Grinch face to a painted jar, then fill it with pinecones, faux greenery, or other Christmas decorations.
Our step-by-step Grinch jar tutorial is included below.
2. Grinch Christmas Ornaments
Create a personalized ornament by applying a small vinyl Grinch design to a flat acrylic ornament, wood slice, or other smooth ornament blank.
Choose green or black vinyl to create a simple, high-contrast decoration.
You can also add the year or a short Christmas greeting.
If you enjoy making ornaments with a cutting machine, try our free Nativity SVG ornament tutorial for another Christmas project.
3. Grinch T-Shirts
Make a Christmas shirt using the SVG design and compatible heat-transfer vinyl.
A green Grinch face can look especially fun on a white, black, or red shirt.
For a single-color shirt, cut the design from one piece of heat-transfer vinyl rather than separating it into several color layers.
Remember to mirror your design when required by your heat-transfer material.
4. Grinch Coffee Mugs
Use adhesive vinyl to add the Grinch design to a ceramic mug.
Choose a smooth, clean surface and size the artwork to fit comfortably on the mug.
Apply the decal carefully with transfer tape and follow the vinyl manufacturer’s instructions for curing, washing, and durability.
Treat decorated mugs as hand-wash-only unless your specific materials and application method are rated otherwise.
Keep vinyl away from the drinking rim and any areas that contact food or beverages.
5. Grinch Christmas Signs
Create a small Christmas sign using a wood blank, acrylic sign, or framed background.
Cut the Grinch face from green or black vinyl and apply it to a contrasting surface.
Add a short original holiday phrase or a family name to personalize the finished decoration.
Place the sign on a mantel, entryway table, or Christmas shelf.
How to Make a Grinch Christmas Jar With Cricut
This Grinch Christmas jar craft is a fun way to reuse small glass containers and turn them into holiday decorations.
The original project uses Oui yogurt jars, white chalk-style paint, vinyl decals, and pinecones.
You can make one jar or decorate several to create a matching Christmas display.
Supplies Needed:
- Free Grinch SVG cut file
- Small glass yogurt jars, such as Oui jars
- White matte chalk paint suitable for glass
- Paintbrush
- Protective drop cloth or craft mat
- Green or black permanent adhesive vinyl
- Cutting machine, such as Cricut or a compatible Silhouette
- Compatible cutting mat
- Weeding tool
- Transfer tape
- Scraper or burnishing tool
- Scissors
- Pinecones
- Small rocks or other decorative filler
Optional supplies:
- Additional vinyl for a short message
- A decorative font licensed for your intended use
- Ribbon
- Faux greenery
- Artificial snow
If you’re using pinecones and decorative filler, keep the finished jars away from young children and pets.

Step 1: Clean the Glass Jars
Remove the labels from your yogurt jars. Wash the jars with warm, soapy water to remove any remaining food or adhesive residue. Dry them thoroughly before painting. If the glass has stubborn label residue, use an appropriate adhesive remover, then wash the surface again before painting.
Step 2: Paint the Jars White
Cover your work surface with a drop cloth or protective mat. Apply a thin coat of white matte chalk paint to the outside of each jar, following the manufacturer’s surface-preparation instructions.
Allow the first coat to dry. Apply a second thin coat if necessary to achieve an even white finish.
Let the paint dry and cure according to the product directions before applying vinyl. You can skip this step if you’re using a jar that already has a suitable white finish.
Step 3: Upload the Grinch SVG to Cricut Design Space
Open Cricut Design Space and create a new project.

Select Upload, then choose the corrected Grinch SVG file from your computer.
Once the design appears in your uploaded images, add it to the canvas.

Choose the green or black version depending on your project. Before cutting, confirm the design is a single-color Basic Cut, not a printed image. The corrected SVG is for vector cutting, so it shouldn’t require tracing the entire design from a raster image.

Step 4: Resize the Grinch Face
Measure the flat area of your glass jar where you plan to place the vinyl. Resize the design to fit that space, keeping the width and height proportions locked.
For a small Oui yogurt jar, a design around 1.5 to 2 inches tall may fit, depending on the available surface. However, the Grinch face contains many fine details. If the design becomes too small, the eyes, mouth, and facial lines may be difficult to weed.
Make a test cut before preparing the final decal.
Step 5: Cut the Vinyl
Place your adhesive vinyl onto a compatible cutting mat with the backing against the mat.

Load the mat into your cutting machine.
In Cricut Design Space, choose the material setting that matches your vinyl and follow the machine prompts.
Exact settings depend on your Cricut model and the vinyl you’re using.
After cutting, unload the mat.
Step 6: Weed the Design
Use a weeding tool to remove the unwanted vinyl surrounding the Grinch face.
Carefully remove the smaller pieces around the eyes, eyebrows, mouth, and other facial details.

Work slowly so the thin sections remain attached to the vinyl backing. If the small details are difficult to remove, try making the design larger for your next cut. A bright work light can make detailed weeding easier.
Step 7: Apply Transfer Tape
Cut a piece of transfer tape slightly larger than your finished vinyl design.

Place the tape over the Grinch face and gently burnish it using a scraper tool. Slowly peel away the vinyl backing, making sure the design remains attached to the transfer tape. If any pieces stay on the backing, press the tape down again and burnish that section before lifting it.
Step 8: Attach the Grinch Face to the Jar
Place the vinyl design against the jar to check its positioning. Once you’re happy with the placement, begin pressing the transfer tape onto the glass. Work from the center outward to reduce bubbles and wrinkles.
Use the scraper tool or your fingers to press the design securely against the jar. Slowly remove the transfer tape, leaving the vinyl attached to the glass.
Because yogurt jars are slightly curved, smaller decals are usually easier to position than oversized designs.
If the painted finish is delicate, use gentle pressure and confirm that the paint has cured sufficiently.
Step 9: Add a Christmas Message
If you’d like to personalize your jar, add a short message using another vinyl cutout. You can use a decorative font in Cricut Design Space to create words such as:
- Merry Grinchmas
- Feeling Grinchy
- Christmas Mischief
- Holiday Cheer
- Merry and Mischievous
Choose a phrase that fits the space on your jar. We chose to use the phrase, “It’s because I’m green, isn’t it?”

Cut the lettering from contrasting vinyl and apply it using the same transfer tape method.

For smaller jars, a short phrase or single word is easier to position.
Step 10: Fill and Decorate Your Grinch Jar
After applying the vinyl, add decorative filler to the jar.
Use small stones, faux snow, pinecones, or artificial greenery.
For the original project, we filled the jars with decorative material and topped them with pinecones.
You can also tie a small ribbon around the jar neck for an extra Christmas touch.
Place the completed jars on a mantel, shelf, or holiday centerpiece.


Tips for Cutting Detailed Grinch SVG Designs
The Grinch face includes narrow lines and small interior details that require careful cutting and weeding.
A few simple adjustments can improve your results.
Choose the Right Vinyl
Permanent adhesive vinyl works well for decorative glass jars and smooth signs.
For shirts or fabric projects, use heat-transfer vinyl made for the intended fabric.
Avoid Cutting Too Small
Intricate designs are more difficult to cut and weed at small sizes.
If the thin facial details lift or tear, increase the design size and try again.
Use Good Lighting
A bright light or light pad can help you see the cut lines while removing excess vinyl.
This is especially helpful with dark or glossy materials.
Check the Cut Preview
Before starting the machine, review your design in Cricut Design Space.
Make sure the Grinch face appears as the intended single-color cutting design and that no unwanted background rectangle is included.
Test the Design Before Making Gifts
Try a test cut on inexpensive vinyl before applying the design to a jar, ornament, or shirt.
A test cut can reveal whether the smallest details are practical at your selected size.
How to Use the Grinch SVG With Silhouette Studio
You can also use the Grinch SVG with a compatible version of Silhouette Studio.
Silhouette Studio Designer Edition or higher supports direct SVG imports. The free Basic Edition generally requires a different file format or conversion workflow.
To use the SVG:
- Extract the downloaded ZIP folder.
- Open Silhouette Studio.
- Import one of the corrected Grinch SVG files.
- Resize the artwork to suit your project.
- Open the Send panel.
- Confirm that the correct cutting paths are selected.
- Choose the appropriate material and blade settings.
- Complete a test cut before producing the finished design.
As with Cricut, avoid making intricate sections too small.

Troubleshooting Grinch SVG Files
Why Is My Grinch SVG Showing a Black Background?
Some SVG files contain embedded raster images or unwanted shapes that appear as black areas when imported into cutting software.
We rebuilt the updated Grinch SVG files to remove the unwanted embedded image layers.
If a black area appears after uploading, check that you’ve selected the corrected SVG rather than an older downloaded copy.
Why Won’t My Grinch SVG Upload to Cricut?
First, make sure you’ve extracted the ZIP folder.
Then confirm you’re choosing a file ending in .svg.
If you upload a PNG, the software will treat it as an image rather than a vector cut file.
You can also start a new Cricut Design Space project and import the SVG again.
Why Are My Vinyl Details Tearing?
Small facial features may be too narrow for your current material, blade settings, or design size.
Try increasing the overall size of the design, checking your blade, and testing a different vinyl setting.

Can I Change the SVG Color?
Yes. Because the corrected design contains vector paths, you can change its displayed color in compatible design software.
You can also cut the same file from green, black, white, or another vinyl color.
Changing the displayed color doesn’t automatically turn the design into separate layered pieces.
Are These Grinch SVGs Layered?
No. The files are intended as single-color vector cutting designs.
They don’t include separate layers for the Grinch’s face, hat, eyes, or other details.
If you want a multicolor project, you would need to prepare additional layers separately.
More Grinch Christmas Craft Ideas
Several other creative ways let you enjoy Grinch-themed activities during the holiday season.
Grinch Hand SVG
If you prefer a design featuring the Grinch’s hand, explore our free Grinch Hand SVG files.
These are another option for creating Christmas shirts, signs, and holiday decorations.
Christmas Grinch Quote SVG
Our free Grinch Christmas quote SVG is a separate design that combines a holiday message with a Grinch-themed illustration.
Grinch-Themed Activities for Kids
For a screen-free holiday activity, try our free Dr. Seuss coloring pages.
You can also explore our Dr. Seuss crafts for kids for more character-inspired projects.
Where can I download a free Grinch SVG?
You can download the free Grinch face SVG files from the download section at the bottom of this post. The package includes corrected vector designs and PNG previews.
Do these Grinch SVG files work with Cricut?
The SVGs include vector cutting paths you can import into Cricut Design Space. Because the face has intricate details, test the file at your intended size before cutting the finished project.
Can I use the Grinch SVG with Silhouette Cameo?
Yes, with an edition of Silhouette Studio that supports SVG imports. Silhouette Studio Basic Edition does not normally support direct SVG importing.
Is this a layered Grinch SVG?
No. The corrected SVG is a single-color vector design, not a multicolor layered file. You can cut it from your preferred vinyl color.
Can I use this file to make a Grinch shirt?
Yes, you can use the single-color cutting design with compatible heat-transfer vinyl for a personal craft project. Follow the instructions for your material and remember to mirror the image when required.
What type of vinyl should I use for a Grinch jar?
Permanent adhesive vinyl is a common choice for decorating glass jars. Make sure your paint has cured before applying the decal, and follow the vinyl manufacturer’s application and care instructions.
The Grinch is a protected character, and commercial merchandise may require permission from the rights holder. Downloading a free SVG does not grant those rights.
Download Your Free Grinch SVG Files
Ready to make your own Grinch-inspired Christmas crafts?
Download our free Grinch face SVG files and create festive decorations using your Cricut or compatible Silhouette cutting machine.
The updated download includes single-color vector cut files and transparent PNG previews.
Use the design for Christmas jars, ornaments, handmade cards, holiday signs, or other personal craft projects.
These free Grinch SVG files add a mischievous touch to your Christmas decorations. Choose your favorite vinyl color, prepare your materials, and enjoy making something festive!

Free Grinch SVG File to Make Grinch Crafts
This adorable Grinch Jar is customized with a free Grinch SVG download that we have for free.
Materials
- 2 oui yogurt jars with labels removed
- 1 bottle of white chalk matte paint
- 1 paint brush
- 1 plastic drop cloth
- 12×12 black vinyl sticker sheet (Oracal 651)
- 12×12 green vinyl sticker sheet (Oracal 651)
- blue Cricut mat
- weeding tool
- scraper tool
- 12×12 sheet transfer tape
- Grinched font (https://www.dafont.com/grinched-2-0.font)
- Grinch SVG or PNG file (Download Below)
- Potting soil or rocks
- 2 glitter pinecones (Hobby Lobby)
Tools
- Cricut or compatible Silhouette cutting machine
- Compatible cutting mat
- Weeding tool
- Scraper or burnishing tool
- Scissors
Instructions
- Lay down a plastic cloth for painting. Set the jars on the plastic and apply two coats of white paint for the best coverage, then let them dry. Alternatively, you can use a jar or mug that is already white. Next, place black vinyl on the blue cutting mat and import the resting Grinch face SVG or PNG file into Cricut Design Space. Resize the image to less than two inches in height. Set the Cricut dial to vinyl and cut the design. Once cut, weed the design.
- In Cricut Design Space, use the text tool to select the "Grinched" or "Grinched 2.0" font. Type out your desired Grinch quote or saying and resize it to no taller than two inches in height. Place green vinyl on the blue Cricut mat, set the dial to vinyl, and cut the design. After cutting, weed the design, and use transfer tape to lift the design from the backing and apply it to the jar.
- With the scraper tool, press firmly on the transfer tape to ensure the design adheres to the jar. Slowly peel back the transfer tape, making sure the design sticks securely to the surface.
- Use the transfer tape to lift the design from the backing and apply it to the jar. Firmly scrape with the scraper tool, then carefully peel back the transfer tape, ensuring the design remains on the jar.
