
Homemade Lavender Bath Bombs (Easy DIY Lavender Bath Bomb Recipe)
Learn how to make DIY lavender bath bombs with this easy tutorial! These floral bath treats are a creative craft for teens and adults and make lovely handmade presents for Mother’s Day, Valentine’s Day, birthdays, or a spa gift basket.
With their soft lilac color, round shape, and optional botanical decorations, these creations are a beautiful addition to a handmade collection.
If you enjoy making homemade bath products, explore our DIY bath recipes and scrubs for more ideas.

Homemade Lavender Bath Bombs
These bath treats get their signature bubbles from the combination of baking soda and citric acid. When you place a finished piece in water, the powders react and release bubbles.
You can customize the look with a bath-safe colorant and choose either a version without added aroma or one with a carefully formulated floral fragrance.
Why You’ll Love This:
There are several reasons to try this homemade bath craft.
- Fun hands-on craft: Measuring, mixing, and shaping each piece makes for a creative project for older children (with adult supervision), teenagers, and adults.
- Customizable scent: Choose an appropriate floral aroma or leave the finished pieces unscented.
- Simple bubbling reaction: Baking soda and citric acid create the familiar bubbles in bathwater.
- Easy to package: Wrap the hardened pieces individually or arrange several in a homemade spa basket.
- Easy to personalize: Choose round forms, silicone heart shapes, or another suitable design.
The key to successful results is getting the blend just moist enough to hold its shape without starting the bubbling reaction too soon.
What You’ll Need
This homemade bath recipe generally starts with baking soda and citric acid.
Depending on the formulation, it may also include cornstarch, Epsom salt, a carrier oil, and a small amount of suitable binding liquid.
Core Ingredients
- Baking soda, also called sodium bicarbonate
- Citric acid
- Cornstarch, if included in your formula
- Epsom salt, if included in your formula
- Carrier oil, according to your formula
- A suitable binding liquid, if needed
- Optional bath-safe purple colorant
- Optional lavender fragrance suitable for bath products
- Optional dried lavender buds, used sparingly
Supplies
- Large bowl for mixing
- Smaller bowl for liquids
- Whisk or silicone spatula
- Measuring cups and spoons
- Gloves
- Round bath bomb molds or suitable silicone forms
- Small spray bottle or dropper, if your formulation requires a binding liquid
- Clean tray for setting the finished shapes
- Airtight containers or moisture-resistant wrapping

Choosing a Suitable Scent
Lavender essential oil and fragrance oils are different products and aren’t necessarily interchangeable. Choose a product that the supplier identifies as suitable for bath use.
Follow its maximum usage concentration and any other formulation instructions. You can also make a plain version. The base powders will still produce bubbles.
Avoid assuming that a particular number of essential oil drops is safe for every batch or age group.
How to Make DIY Lavender Bath Bombs
The method below explains how to prepare and shape a conventional bath powder blend.
Use the materials and quantities from the original, tested recipe card.
Step 1: Prepare Your Workspace
Choose a clean, dry work surface. Keep the forms nearby so they’re ready when the blend reaches the correct consistency.
Wear gloves if appropriate and avoid breathing in the fine powders or colorant. This craft works best in a low-humidity environment.
Step 2: Combine the Dry Ingredients
Add the measured powders to a large bowl, starting with the two main components. Add any cornstarch or Epsom salt included in your original formula.
Whisk until all the powders are evenly blended. Break apart any lumps for a smooth, uniform texture.

Step 3: Prepare the Wet Ingredients
In a separate bowl, combine the carrier oil and any optional bath-approved fragrance. Follow the manufacturer’s directions for that aromatic product.
If the original formula includes a binding liquid, keep it separate until you can add it gradually.
Don’t substitute water, witch hazel, and rubbing alcohol in equal amounts without testing your formula. They have different compositions and can affect the texture.

Step 4: Mix the Liquid and Powder Portions
Add the liquids to the powder blend gradually, stirring continuously. Avoid pouring a large amount of liquid into one area. Excess moisture may trigger the bubbling reaction before the pieces are shaped.
Keep stirring until the liquids are thoroughly incorporated into the powder blend.
Step 5: Check the Damp-Sand Texture
Squeeze a small amount of the mixture in your hand. It should hold its shape briefly and resemble lightly damp sand.
If it falls apart immediately, it may need more thorough mixing or a very small amount of the binding liquid specified by your formula. Add moisture cautiously.
If the contents begin bubbling, puffing, or expanding in the bowl, stop adding liquid. The material should not feel wet or sticky.
Step 6: Add a Soft Color
If the process uses a separate coloring step, add a suitable bath-safe pastel violet colorant according to the supplier’s instructions.
Mix thoroughly to distribute the color. Start with a small quantity rather than adding extra coloring all at once.
Excess colorant may leave residue on the bathtub. You can also leave them white for a simple appearance.
Step 7: Prepare the Forms
Make sure the forms are completely clean and moisture-free. If you want botanical decorations, use a very small amount of clean, fully dried lavender buds.
Place a pinch inside each cavity before adding the mixture, if that matches your original design.
Keep in mind that loose flowers can float in bathwater and create cleanup or drain concerns. You can omit them for a simpler design.
Step 8: Fill the Forms
Spoon the mixture into each half of a round two-piece form. Slightly overfill the halves, leaving a small mound above each rim. Bring the halves together and press firmly.
Remove excess material from around the seam. If you’re using silicone forms, pack the material evenly into each cavity instead.

Step 9: Allow Them to Harden
Place the shaped pieces in a low-humidity area. Depending on the formula and form type, some can be released relatively soon and left to harden, while others need to remain in place longer.
Follow the timing established by your original tested formula. Allow the finished pieces to dry completely before wrapping or storing them.
An overnight setting period is common, but the actual time can vary with temperature, humidity, and moisture content.
Step 10: Remove and Package the Finished Bath Bombs
Once the pieces are firm, carefully release them from the forms. Avoid forcing them out if they begin to crack or crumble.
Allow them to finish hardening on a clean tray if necessary. Once fully hardened, they’re ready to package or store in an airtight container.

What Creates the Fizz?
These bath treats bubble because their two main powders react when dissolved in water.
The reaction produces carbon dioxide gas, which creates the bubbles you see as the product dissolves. The floral scent isn’t responsible for the bubbles.
Cornstarch, salts, and oils can affect the texture and how the product breaks apart in water, but the acid-and-base reaction is the main source of bubbles.
This is why moisture control is so important when making homemade bath bombs.
Decorating Your Bath Creations With Dried Flowers
A few dried buds add a pretty botanical touch. A small amount placed in the bottom of a form creates a botanical decoration on the outside of each finished piece.
However, dried plant material can be messy. When one dissolves, the buds may float in the water or collect near the drain.
For a cleaner bathing experience, skip the botanical decorations.
Use only clean, fully dried botanical materials intended for suitable bath-product use, and avoid freshly picked flowers in an untested formulation.
Why Fresh Flowers Aren’t Recommended
I wouldn’t recommend substituting fresh flowers directly into this formula. Fresh plant material contains moisture and can introduce spoilage concerns.
That moisture may also interfere with how the finished shape hardens or bubbles. For a botanical appearance, choose suitable dried buds or leave the finished piece undecorated.
Lavender Essential Oil vs. Infused Oil
These two oils aren’t the same. The concentrated extract is an aromatic substance.
An infused oil is usually a carrier oil that has absorbed compounds from plant material. The two products differ in composition, concentration, and their potential effect on the formula.
For this project, use the product specified in your tested formulation and follow supplier safety guidance. Don’t assume the two can replace each other in equal amounts.
If you’re looking for a separate botanical bath oil, that would require a different formulation designed to disperse appropriately in bathwater. This project shouldn’t be presented as a bath oil.

Why Are My Finished Pieces Crumbling?
The finished pieces sometimes break apart when removed from their forms.
Here are some common reasons.
The Mixture Crumbles Too Easily
The blend should hold together when squeezed. If it falls apart immediately, there may not be enough binding moisture.
Add the specified liquid in very small amounts, mixing thoroughly between additions.
The Form Wasn’t Filled Properly
Round two-piece molds generally work best when both halves are filled slightly above the rim. When pressed together, the extra material helps them join.
It Was Removed Too Early
The shapes can crack if they’re still too soft. Allow more time to firm up if necessary, following the original directions.
The Humidity Is Too High
Moisture in the surrounding air can affect the texture. Try working in a cool, low-humidity environment.
Why Aren’t They Bubbling?
The finished piece may produce fewer bubbles if the powders react before it reaches the tub. This can happen when too much water or another liquid is added during preparation.
High humidity and poor storage can also affect the bubbling action over time. Other possibilities include inaccurate measurements or untested amounts of oils and powdered materials.
For the best results, preserve the measured ratio of the two main powders and avoid unnecessary substitutions.
What Happens If You Leave Out Citric Acid?
This acid is one of the two main components responsible for the reaction in conventional bath products. Removing it changes the formula significantly.
Some alternative bath formulations use other acidic compounds, but these are not necessarily direct substitutions.
Baking soda and cream of tartar are sometimes mentioned as an alternative pairing, but the results depend on a properly tested formulation.
I would not remove the citric acid from this formula without developing a new, tested version. A citric-acid-free product is also not automatically better for sensitive skin.
Is Shea Butter Suitable for This Recipe?
Some formulas use shea butter instead of, or in addition to, other oils.
However, shea butter may change firmness, setting characteristics, and how the finished product dissolves.
If your original formula uses a different carrier oil, don’t automatically replace it with an equal amount of shea butter.
Instead, use a separately tested shea butter formulation.
Can a Floral Bath Help With Sleep?
This floral aroma is commonly associated with relaxation, and some people enjoy using aromatic products as part of an evening bath routine.
However, a fragrant bath additive shouldn’t be presented as a treatment for insomnia or as something guaranteed to improve sleep. The strength of the aroma depends on the formula, and individual responses to smells vary.
If you enjoy floral aromas, an appropriately formulated product may add a pleasant note to your soak. You can also choose a version without added aroma if you prefer.
Are These Suitable for Sensitive Skin?
Not necessarily. Even substances commonly described as natural can cause irritation or allergic reactions. Essential oils, aromatic additives, colorants, and other bath ingredients may be unsuitable for some people.
For sensitive skin, a simpler product without added aroma or colorant may reduce exposure to potential irritants, but that still doesn’t guarantee compatibility.
Avoid these products on broken or irritated skin.
If you have eczema, allergies to aromatic additives, or other skin sensitivities, consider avoiding these products unless a healthcare professional has advised otherwise.
How to Store Your Handmade Bath Treats
Protecting finished pieces from moisture is one of the best ways to preserve their appearance and bubbling effect.
Let Them Harden Completely
Never package a piece that is still damp or soft. Allow the finished product to harden fully before wrapping.
Use Airtight Packaging
Store them in clean, moisture-resistant packaging or an airtight glass jar. Keep them separated to prevent chipping.
Avoid Humid Bathrooms
Don’t store uncovered bath products beside a shower or bathtub.
Steam and moisture can begin affecting the powders before you use them.
How Long Will They Last?
Properly stored pieces may retain their bubbling action for weeks or months, depending on the formula and conditions.
However, an exact shelf life hasn’t been established for this specific version. The aroma may fade over time, and humidity can reduce performance.
For handmade presents, I recommend making them relatively close to the date they’ll be given.
Discard any piece that develops an unusual odor, contamination, or unexpected changes in appearance.
Handmade Spa Gift Ideas
These handmade bath treats make a great gift for friends, family, or teachers who enjoy a relaxing bath soak.
Floral Presentation Box
Place two or three completely hardened pieces in a sturdy box with protective paper cushioning.
Use soft lilac ribbon and a simple tag.
Individually Wrapped Bath Treats
Wrap one finished piece in suitable moisture-resistant packaging and attach a handwritten message.
A tag such as “A Little Time to Relax” works well for a homemade spa-themed present.
Mother’s Day Gift Basket
Arrange the bath treats with a soft towel, a small candle, or other bath accessories.
If you’re giving a product with added aroma, make sure the recipient knows the ingredients and has no relevant sensitivities.
What to Include on the Package Label
Include the product name, complete ingredient list, date made, directions for use, and appropriate precautions.
If you plan to sell these products rather than give them as personal presents, additional cosmetic labeling and regulatory requirements may apply.
More Handmade Bath Projects
If you enjoyed this project, explore some of our other DIY bath products.
Our strawberries and cream bath bombs feature pink-and-green layers and a sweet fruit-inspired design.
For another handmade present idea, try our succulent bath bombs made with miniature terra cotta pots.
Our orange creamsicle bath bombs feature a cheerful orange design, while our pumpkin spice bath bombs are a fun fall craft.
You can also explore our complete collection of DIY bath bombs and scrubs or browse our crafts for teens.

Finish Your Handmade Bath Project
These handmade bath treats are a creative way to make a botanical-inspired present with simple decorative details.
The soft floral color, optional dried flowers, and bubbly base make this a pretty project for a craft night or homemade spa basket.
Use carefully selected bath-safe ingredients, follow your tested measurements, and let each piece dry completely before packaging.
Whether you make them as a gift or for personal use, these floral bath treats are a lovely addition to your collection of handmade crafts.
How do you make these bath treats at home?
Combine the main powders with the remaining ingredients in your formula. Add the appropriate oils and binding liquid slowly, mix until the texture resembles damp sand, pack into forms, and allow everything to harden completely.
What makes the mixture fizz?
The acid and base components produce bubbles when dissolved in water.
Can I make them without essential oils?
Yes. The added aroma is optional. The blend will still bubble without essential oils.
Can I use fresh flowers?
Fresh plant material isn’t recommended for an untested formula because its moisture can interfere with consistency and create storage concerns.
Can I add dried buds?
Yes, a small amount of suitable dried buds can be used as decoration. Keep in mind that the buds may float in the bathtub and require cleanup.
Are silicone molds suitable?
Yes. Silicone molds can be convenient, particularly for flat-backed shapes such as hearts, flowers, and stars. Setting times may differ from round two-piece forms.
Why do the finished pieces crumble?
Common causes include a crumbly texture, insufficient packing, and removing the shapes before they have hardened.
Why do they bubble before they’ve set?
Too much liquid or high humidity may start the reaction prematurely.
How long should they set?
Setting times vary by formulation and shape, but overnight, or about 24 hours, is common. Follow the timing established by your tested formula.
How should I store them?
Keep them protected from moisture in suitable packaging or an airtight container, away from humidity.
Are these suitable for sensitive skin?
Not automatically. Added aromas and other additives may irritate sensitive skin. A plain, color-free option avoids some potential irritants but isn’t guaranteed to be suitable.
Can a floral soak help you sleep?
Some people find floral aromas pleasant during an evening soak, but these products aren’t a proven treatment for sleep problems.
Can children use these?
Children should be supervised, and bath products with added aromatic oils may be inappropriate for younger children or those with skin sensitivities. This project is better suited to teens and adults.
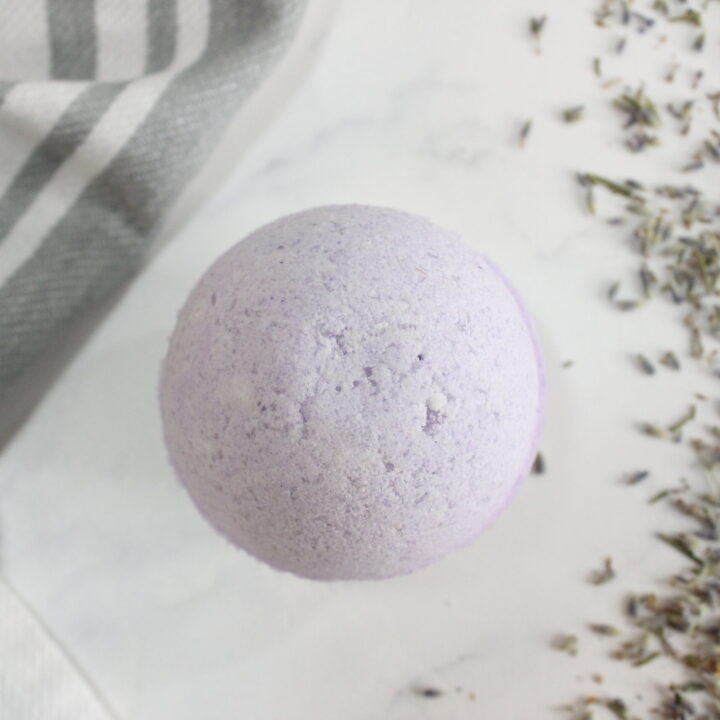
How to Make Lavender Bath Bombs
These soothing lavender bath bombs make beautiful gifts or a relaxing self-care treat! Let me know if you’d like these formatted into a printable instruction card or recipe sheet!
Materials
- ¼ cup corn starch
- ½ cup baking soda
- ¼ cup Epsom salt
- ¼ cup citric acid
- 4 teaspoons lavender infused oil
- 10 drops lavender essential oil
- Purple mica powder
- Large bath bomb mold
Tools
- Large Bath Bomb Mold
- Lavender Flowers
Instructions
- Mix the Dry Ingredients:
In a large mixing bowl, combine the corn starch, baking soda, and Epsom salt. Combine the corn starch, baking soda, and Epsom salt in a large mixing bowl. - Prepare the Scented Oil:
Add your essential oil drops to the lavender-infused oil in a small separate bowl. Stir well to ensure the fragrance is evenly distributed throughout the oil. - Incorporate the Oil into the Dry Mix:
Slowly begin adding your scented infused oil to the dry ingredient mixture. Pour a little at a time, stirring constantly. Mix until the texture resembles damp sand or moon sand—it should hold together when squeezed. - Tip: If the mixture is too dry and won’t clump, add one teaspoon of the infused oil until the consistency improves.
- Add the Citric Acid:
Once your mixture is holding together nicely, gently stir in the citric acid. This ingredient creates the fizzing reaction in the bath, so ensure it’s evenly distributed. - Color Your Bath Bombs:
Add one teaspoon of mica powder to the mixture (or adjust based on your color preference). Mix until the color is uniform throughout the blend. - Fill the Bath Bomb Molds:
Scoop the mixture into each half of your bath bomb mold, packing it tightly. Overfill each half slightly—this helps the two sides adhere better when pressed together. - Form the Bath Bombs:
Firmly press the two halves of the mold together. Give the molds a slight twist until the metal edges touch. This helps seal the shape. - Remove the Mold Carefully:
First, gently remove the top half of the mold. Then, flip the bath bomb over and carefully lift off the other half. Take your time to avoid cracking. - Let Them Dry:
Place your finished bath bombs on a soft towel, tray, or parchment paper. Allow them to dry undisturbed for at least 24 hours, or until they feel completely hard to the touch.
Note: If they feel soft or crumbly after 24 hours, let them sit longer.
Notes
- Essential Oils (Optional):
While not required, adding a few drops of essential oil can enhance the scent and therapeutic benefits of your bath bombs. Lavender essential oil is a popular choice for its calming and soothing properties, but feel free to customize it with oils like eucalyptus, peppermint, or citrus blends, depending on your preference. - Carrier Oils:
You can use any carrier oil in this recipe to help bind the ingredients and moisturize the skin. Common options include sweet almond, fractionated coconut, jojoba, or olive oil. For this batch, I used a lavender-infused oil, which adds an extra layer of fragrance and relaxation. - Lavender Flowers (Optional Add-In):
For a more decorative and spa-like touch, you can mix dried lavender flowers into the bath bomb mixture or sprinkle them into the mold before adding the mixture. While not necessary, they add visual appeal and enhance the aromatic experience. Just keep in mind that they may float in the bath water.
