
Nutcracker Craft with Moving Eyes and Free Template
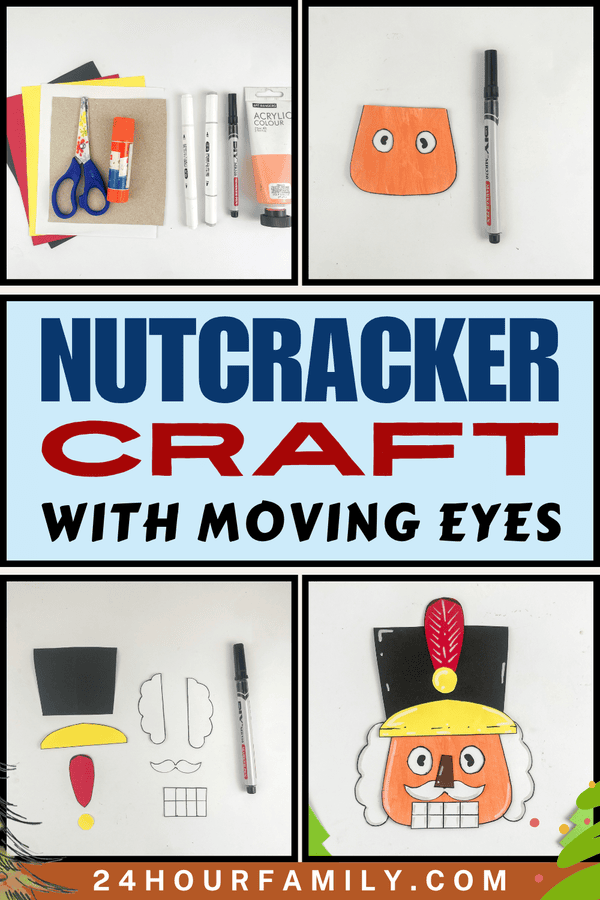
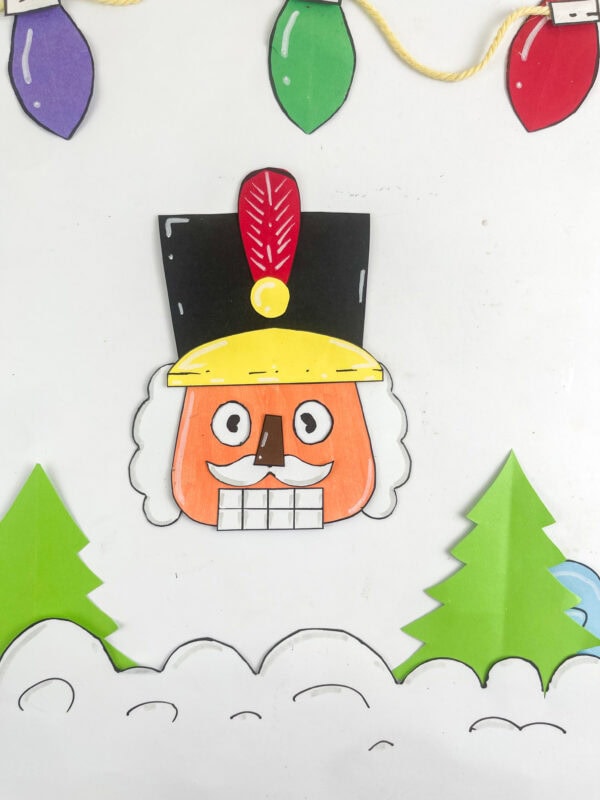
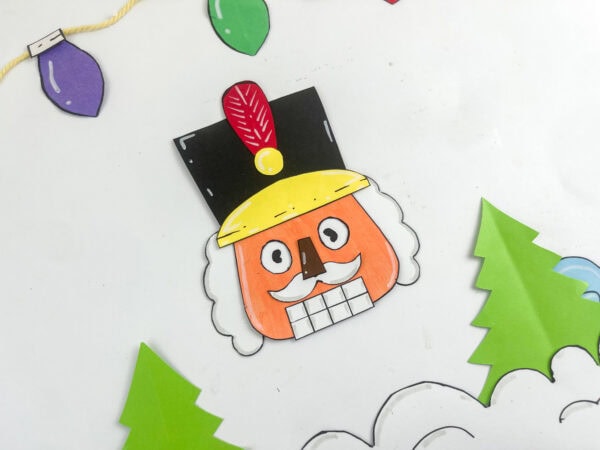
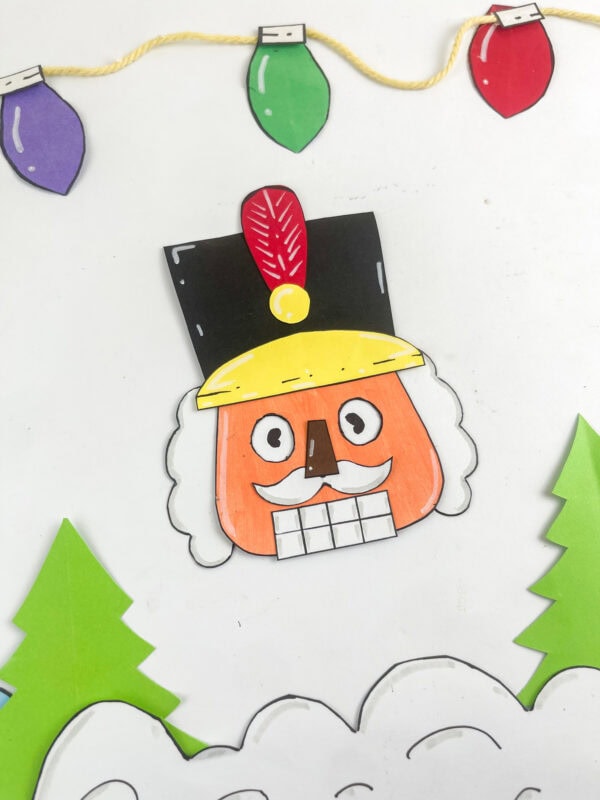
This festive nutcracker craft has a playful surprise: its eyes slide from left to right! Children can shift the hidden panel behind the face to make the soldier look in various directions.
The free printable template makes it easier to form the face, tall hat, white hair, mustache, red feather, gold hat band, and square teeth. Cardboard adds structure to the mechanism, while colorful construction paper gives the finished soldier a classic holiday look.
Nutcracker Craft with Moving Eyes
This interactive nutcracker craft for kids is a fun Christmas choice for a classroom activity, homeschool art project, ballet unit, or creative afternoon at home. Download the pattern and instruction sheet at the bottom of this post.
How the moving eyes work: Two openings in the orange face reveal a loose white panel hidden behind it. The pupils are marked on that panel. A cardboard frame holds it in place without gluing it down, allowing a finger at the back to slide it horizontally.
Printable Nutcracker Craft
The download contains two separate one-page A4 PDFs:
- A black-and-white soldier shape pattern
- A written materials and instructions page
The template includes outlines for the main head shape, curved hat band, two sections of hair, mustache, tall hat feather, round medallion, and rectangular teeth.
The openings, cardboard support frame, and loose white slider are prepared during assembly. These parts form the mechanism, so read the complete instructions before gluing anything together.
This post may contain affiliate links. As an Amazon Associate and a participant in other affiliate programs, I earn a commission on qualifying purchases. Read our disclosure policy here.
Crayola Construction Paper Bulk Pack (480 Sheets) – 10 Assorted Colors, 9×12, Classroom Arts & Crafts Supplies for Kids, Art Paper for School Projects Paper Crafts for Kids: 25 Cut-Out Activities for Kids Ages 4-88 Rolls Colored Masking Tape Rainbow Colors Painters Tape Colorful Craft Art Paper Tape for Kids Labeling Arts Crafts DIY Decorative Coding Decoration Teaching Supplies, 0.6 Inch x 16 Yard, 8 ColorsARTISTRO 24 Acrylic Paint Markers for Rock, Fabric, Wood, Glass, Craft, Decoration – Dual-Tip Paint Pens – Stocking Stuffers, Christmas Gift Idea for Teens, Grandkids, Kids – Art Supplies900 PCS Pom Poms, Multicolor Bulk Pom Poms Arts and Crafts, Soft and Fluffy Craft Pom Poms, Assorted Sizes Pompoms, for Arts and Craft Making DecorationsElmer’s Disappearing Purple School Glue Sticks, Washable, 6 Grams, 12 Count – Poster, Vision Board, Back to School, #1 Teacher Brand




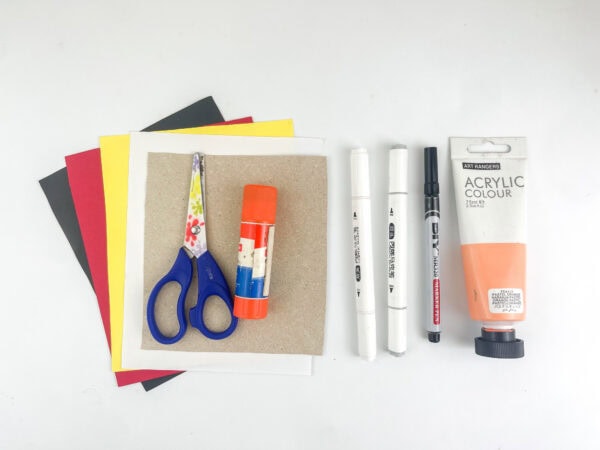
Supplies Needed
Gather each supply before beginning:
- Printed pattern
- White printer paper
- Lightweight recycled cardboard, such as a cereal box
- Black construction paper
- White construction paper
- Red construction paper
- Yellow or gold construction paper
- Peach acrylic paint
- Paintbrush
- Pencil
- Black marker
- White paint marker or white gel pen, optional
- Scissors
- Glue stick or craft glue
- Crayon, optional for decorating
An adult may also need a hole punch, craft knife, or small sharp scissors to prepare the interior openings in the cardboard. Keep sharp tools away from children and work only on a protected cutting surface.
You can replace the peach paint with a peach or tan sheet of construction material. The painted cardboard face, however, adds extra stability and helps the slider hold its shape.
How to Assemble a Nutcracker Craft with Moving Eyes
1. Print and cut out the template pieces
Download and print the template on regular white paper. Print at actual size or 100 percent to match the photographed example.
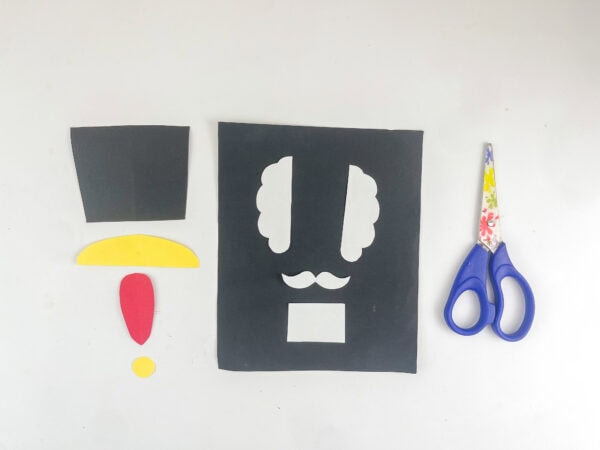
Cut out each outline. These pieces become tracing patterns for the cardboard and colored sheets.
2. Prepare the nutcracker’s face
Trace the main head shape onto lightweight cardboard and trim it out. Paint the front with peach acrylic paint and allow it to dry completely.
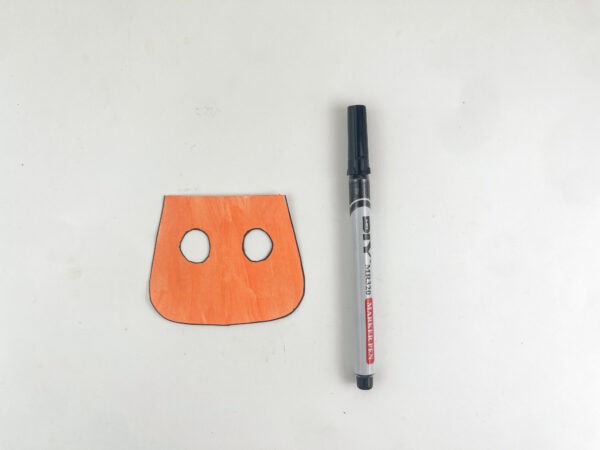
Outline the outer edge of the face with a marker. This detail gives the layered pieces a polished appearance and helps the facial features stand out.
3. Cut two openings
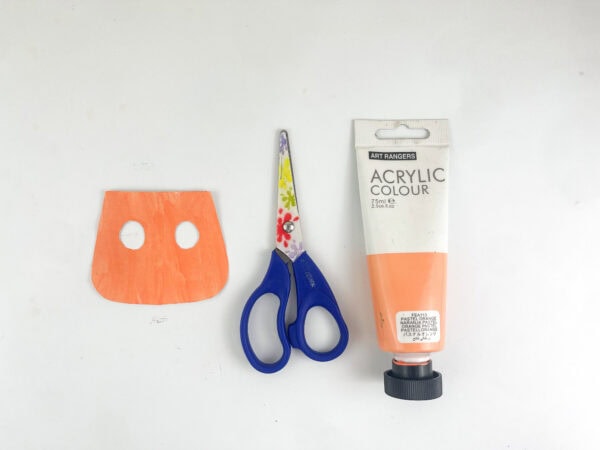
Lightly mark two evenly spaced circles in the upper half of the face. Cut out each circle to form an opening.
This is the most difficult cutting step. An adult should carefully poke a starter hole before trimming with small scissors or another appropriate tool.
Keep the openings above the middle of the face so there is room below them for the nose, mustache, and teeth.
4. Create the sliding panel
Trace the face shape onto white construction paper. Trim this piece slightly smaller than the cardboard face so it can slide freely behind the openings.
Place it behind the face and check that white material appears through both spaces. Do not glue this panel to the face.
With the slider centered, mark one pupil through each opening. Keep the pupils small enough to remain visible as the piece travels left and right.
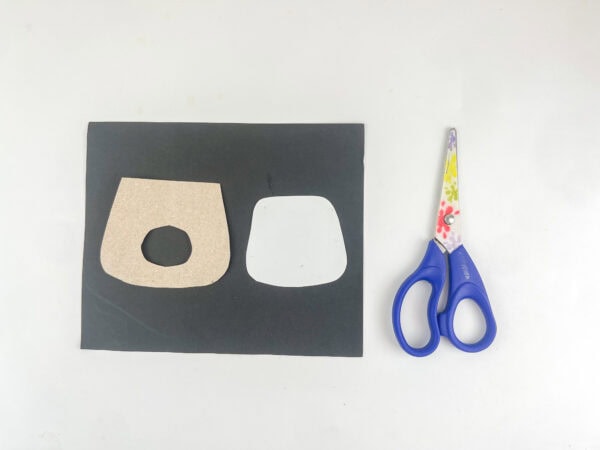
5. Make the cardboard pocket
Trace the face onto a second piece of lightweight cardboard. Sketch one large oval or rounded opening in the center, wide enough for a fingertip to reach the movable white panel. Remove the center to form a sturdy cardboard frame.
Place the loose slider behind the face. Position the cardboard frame behind it.
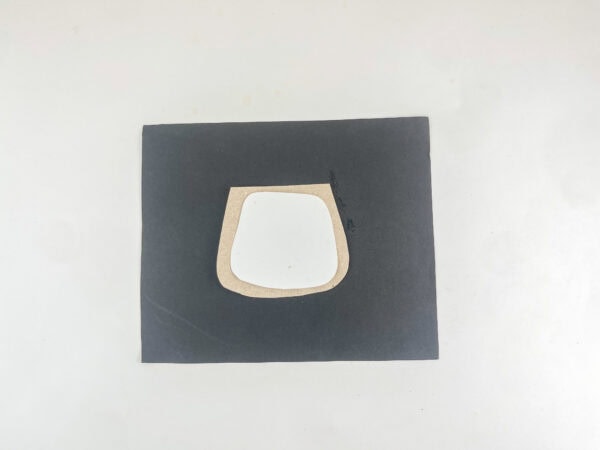
Glue the frame to the back of the face around its outer edges only. Leave enough room inside the pocket for the slider to travel. Do not put adhesive across the openings or along its path.
Test the mechanism before the glue dries. Reach through the large opening in the frame and gently pull or push the white panel horizontally. Both pupils should travel together.
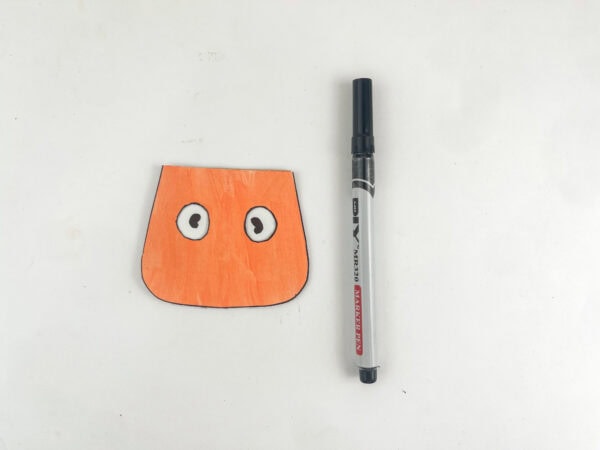
6. Trace the decorative pieces
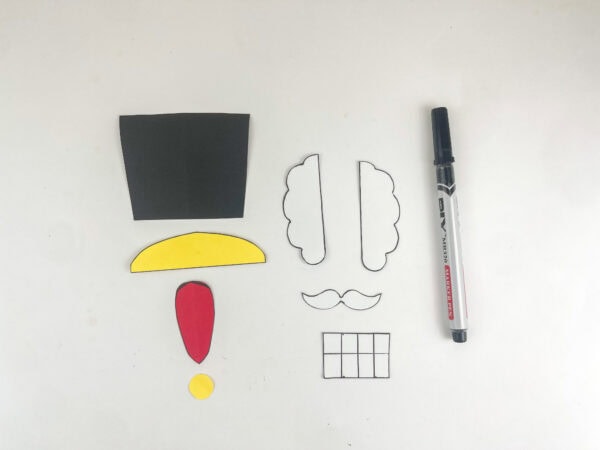
Follow the remaining shapes to prepare the decorative details:
- Trace the tall hat onto dark construction material.
- Trace the curved hat band and small round medallion onto yellow or gold paper.
- Trace the long hat feather onto a red sheet.
- Trace both hair pieces, the mustache, and the teeth onto white material.
Trim every piece. Outline the edges with a marker if you want the bold illustrated look shown in the photos.
7. Attach the hair
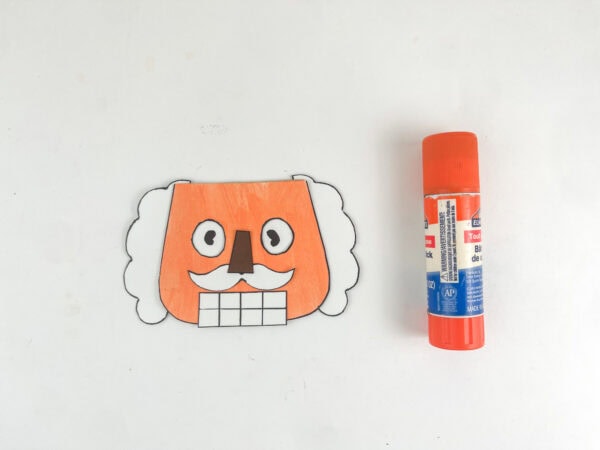
Glue one white hair piece to each edge of the face. Position the straight portions along the head and let the scalloped sections extend outward.
Keep adhesive away from the slider and the opening on the back.
8. Attach the nose, mustache, and teeth
Trim or sketch a simple dark nose and place it between the openings. Glue the white mustache directly below the nose.
Attach the white rectangle beneath the mustache to form the teeth. Mark one horizontal line and several vertical lines with a marker, forming two rows of squares.
9. Assemble the hat
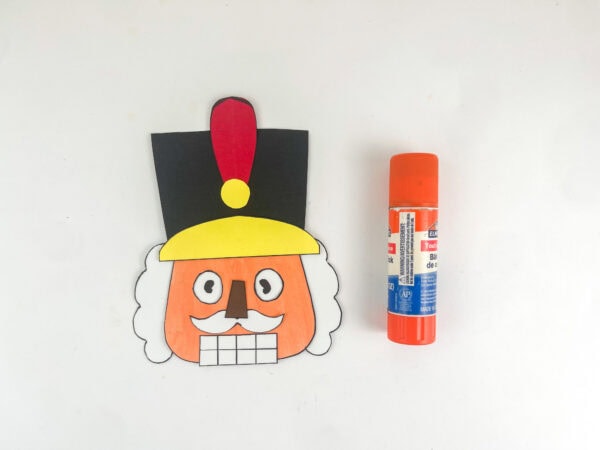
Glue the dark hat to the top of the head. Place the curved yellow band across its lower edge.
Position the feather vertically in the center and glue the small yellow circle over its base. The circle resembles a gold button holding the feather in place.
10. Add the finishing details
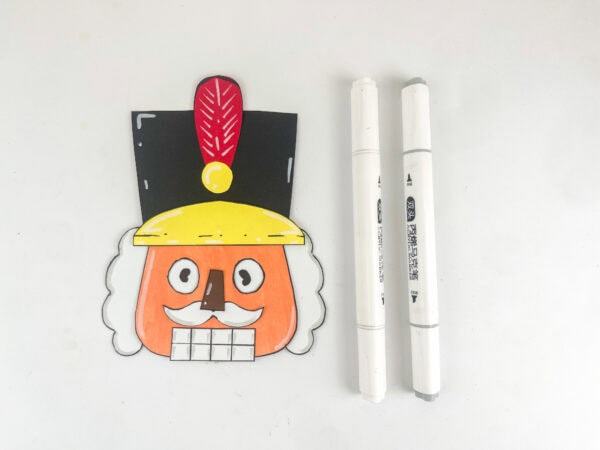
With a white paint marker or gel pen, place a few highlight lines on the hat. Include thin white accents on the feather and yellow band if desired.
Outline any edges that need more definition and let the entire project dry flat. The completed piece makes super cute Christmas decor for a classroom or holiday display.
11. Make the eyes move
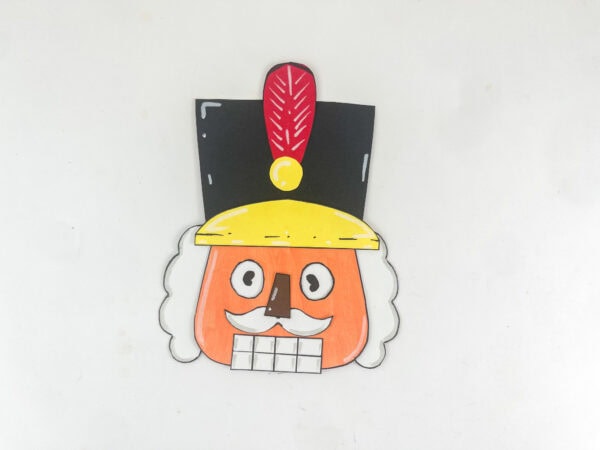
Turn the nutcracker craft over and place a fingertip through the opening in the cardboard frame. Gently slide the loose panel left, right, or back to the center.
The pupils shift behind the two openings, making the soldier appear to look around the room. This simple mechanism brings an element of play to the completed project.
The Most Important Moving-Eye Tip
Keep the white panel with the pupils loose. Glue only the outside edges of the cardboard frame to the back of the face.
If adhesive reaches the slider, it will not work properly. Test it before attaching the hair, mustache, and hat so you can correct the pocket while the glue is still soft.
The space should be loose enough for smooth movement but snug enough to keep the panel from falling out. If it slips, place a narrow cardboard strip along the left and right edges of the pocket without blocking its path.
Troubleshooting the Moving Eyes
The slider is stuck
Check whether glue has attached the white panel to the face or cardboard frame. Carefully loosen the edge. You may need a fresh panel if the original is stuck or wrinkled.
The panel falls out
Place a thin strip of cardboard at each open edge of the pocket. Glue the strips to the frame, not the slider. Leave a small gap so the panel can still travel.
One pupil disappears
The pupils may be too far apart, or the slider may be traveling too widely. Reposition them closer together on a fresh panel or place stops to limit the distance.
The face bends
Choose cereal-box cardboard or glue a second cardboard layer behind the face. Avoid corrugated shipping cardboard because it is difficult to trim neatly at this size.
The paper catches inside the pocket
Trim a small amount from the top, bottom, and edges of the white panel. Rounded corners can also help it glide smoothly.
Ways to Personalize the Nutcracker Craft
The traditional palette gives the soldier a familiar look, but every kid can choose a favorite color combination.
Try these creative variations:
- Choose blue, silver, and white for a winter design.
- Apply glitter glue to the hat band and medallion.
- Give the soldier pink, purple, or rainbow hair.
- Try eyebrows with various expressions.
- Add rosy cheeks or freckles to the face.
- Decorate the hat with tiny stars or sequins.
- Replace the paper medallion with a pom-pom.
- Write a name and year on the back.
- Attach ribbon to display it as wall decor.
- Prepare several characters facing different directions.
These options can inspire children to turn the basic design into their own idea. Use small embellishments only with kids old enough to handle them safely.
Nutcracker Craft for Different Ages
Preschool and kindergarten
An adult should prepare the cardboard face, openings, frame, and slider pocket. Younger kids can paint the face, select shades, glue on the large pieces, and test the sliding mechanism.
Early elementary
Children can trace and cut most of the construction-paper pieces. Adults should still handle the interior openings and thick cardboard section.
Older elementary
Older kids can assemble the sliding mechanism with supervision. Challenge them to measure the pupil spacing, position stops, and troubleshoot the range of movement.
Learning Benefits of This Interactive Christmas Craft
This easy paper project offers more than a festive decoration. Children practice:
- Tracing shapes
- Cutting straight and curved lines
- Layering pieces
- Following multistep directions
- Fine motor coordination
- Visual planning
- Symmetry and spacing
- Simple mechanical problem-solving
- Creative choices
The sliding pocket also introduces a basic engineering concept. A hidden movable part changes what is visible through two fixed openings. Kids can experiment with how far the slider travels and where to place the pupils.
Ways to Use the Finished Nutcracker
Display the completed character:
- On a seasonal bulletin board
- Beside a classroom reading corner
- As part of a ballet lesson
- On a child’s bedroom door
- Above a holiday activity table
- With a handmade Christmas card
- As a flat tree decoration with added ribbon
- During a school lesson about movable mechanisms
For a group display, let every child design a unique soldier and arrange them in a row. Position their pupils in alternating directions for a playful bulletin board.
More Christmas Crafts and Printables
- Christmas crafts and printables for kids
- Christmas printables for kids
- Christmas paper plate crafts
- Nutcracker Clara paper plate craft
- Christmas crafts for preschoolers
- Build a Santa printable
- Reindeer paper plate craft
Children will love giving this soldier a personality by making it glance from left to right. Once you understand the hidden slider, the rest comes together with traced shapes, bright shades, and glue.
Download the pattern below to make your own interactive seasonal character. It is a perfect project for kids who enjoy hands-on art.
Get the Free Nutcracker Craft Template
Enter your email below, and we’ll send the printable pattern and instruction sheet directly to your inbox.
You can also share the completed project on Facebook or save the idea for your next seasonal art session.
Is the nutcracker craft template free?
Yes. The black-and-white pattern and written instruction sheet are available through the download area at the bottom of this page under the site’s current printable-use terms.
What makes the eyes move?
A loose white panel with two pupils slides behind the face. They appear through two openings, while a cardboard frame holds the slider in place.
Do I glue the sliding panel down?
No. It must remain loose. Glue only the outer edges of the cardboard frame to form a pocket behind the face.
What type of cardboard works best?
Thin recycled cardboard from a cereal or cracker box is ideal. It is sturdier than regular paper but easier to trim than corrugated shipping cardboard.
Can I use cardstock instead of cardboard?
Heavy cardstock can work, but the mechanism may bend more easily. Glue two pieces together if you do not have lightweight cardboard.
What age is this nutcracker craft for?
The complete project is best for elementary-age kids with adult assistance. Preschoolers and kindergarteners can decorate and assemble precut pieces.
Can children cut the openings themselves?
An adult should prepare the interior openings and cardboard window, especially if the craft requires a craft knife. Children can trim the larger exterior shapes with child-safe scissors.
Does the printable include colored pieces?
No. The download contains dark outlines. Trace the shapes onto colored construction material or decorate the printed pieces before assembly.
Is the template US Letter size?
The supplied PDFs are A4 size. Most US printers can print them using “fit” or “shrink oversized pages” on Letter settings. Check that no outlines are clipped before cutting.
Can the completed piece be laminated?
Laminating the loose parts may make the mechanism too thick. For extra durability, reinforce the face and frame with cardstock or thin cardboard instead.
Nutcracker Craft with Moving Eyes
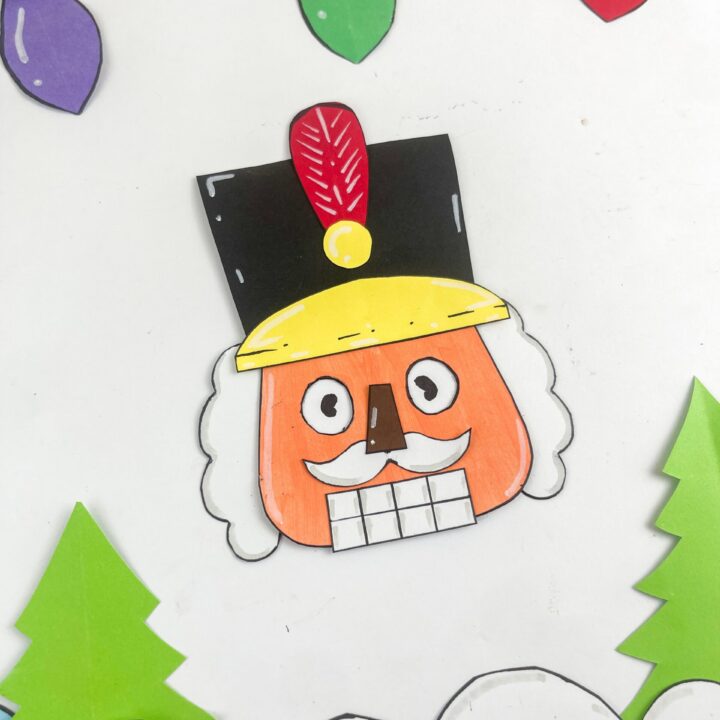
Make an interactive paper nutcracker with eyes that slide from side to side. The free printable template includes the head, hat, hair, mustache, feather, medallion, and teeth.
Materials
- Printable nutcracker template
- White printer paper
- Lightweight recycled cardboard
- Black, white, red, and yellow construction paper
- Peach acrylic paint
- Black marker
- White paint marker or gel pen, optional
- Glue stick or craft glue
Tools
- Printer
- Pencil
- Paintbrush
- Scissors
- Craft knife, adult use only and optional
Instructions
- Print and cut out the nutcracker template pieces.
- Trace the main face onto thin cardboard, cut it out, and paint it peach.
- Cut two round eye openings in the upper half of the face.
- Trace the face onto white paper and trim it slightly smaller to make the loose eye panel.
- Place the panel behind the face and draw one pupil through each opening.
- Cut a second cardboard face with one large center window to create the back frame.
- Place the loose eye panel between the face and frame. Glue only the outside edges of the frame.
- Test the eye panel through the opening at the back and make sure it slides freely.
- Trace and cut the hat, band, feather, medallion, hair, mustache, and teeth from colored paper.
- Glue the decorative pieces to the face without blocking the slider.
- Add marker outlines and white highlights, then let the craft dry.
- Reach through the back opening and slide the white panel to move the pupils.
Notes
- Do not glue the white eye panel.
- Adults should cut the eye holes and cardboard window.
- Thin cereal-box cardboard is easier to use than corrugated cardboard.
- Test the eye mechanism before attaching the decorative pieces.
Recommended Products
As an Amazon Associate and member of other affiliate programs, I earn from qualifying purchases.
