
Easy Owl Fruit Tray Charcuterie Board for Kids and Parties
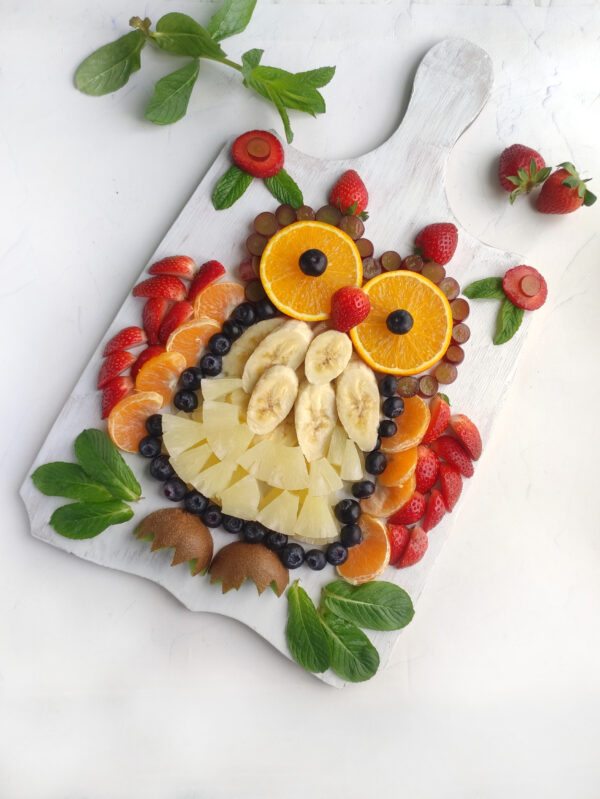
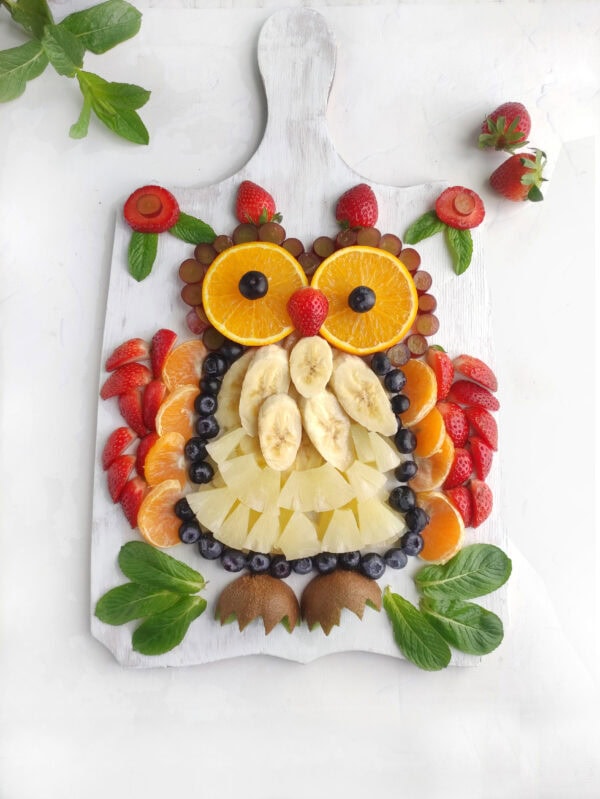
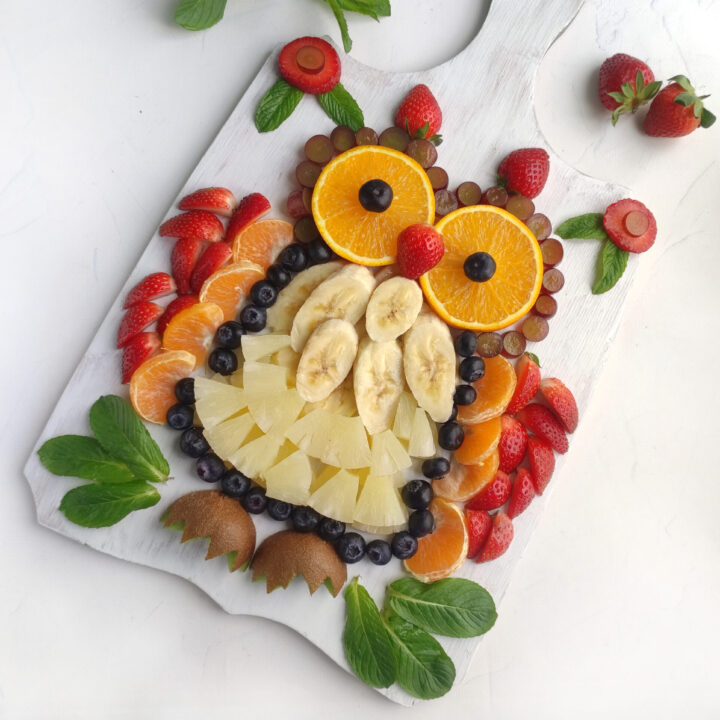
This owl fruit tray charcuterie board turns simple ingredients into a playful party centerpiece that kids can actually eat. With citrus-slice eyes, blueberry pupils, strawberry sides, and a bright fruit-filled body, it looks impressive without requiring complicated prep.
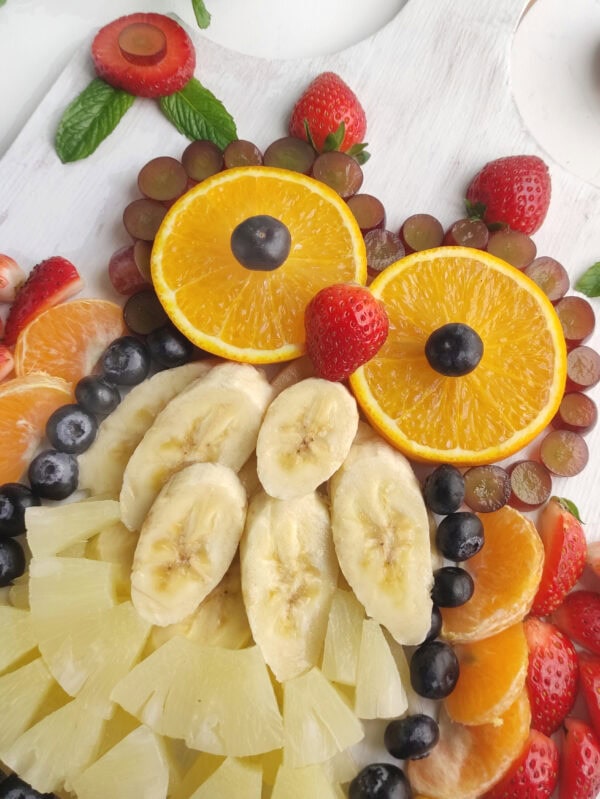
The shape looks impressive, but it’s really made from simple produce layered together. Citrus rounds become the eyes, blueberries make the pupils, pineapple and banana form the body, and strawberries and tangerines create the sides.
This creative idea is especially cute for a woodland-themed party, a baby shower, a classroom celebration, a summer get-together, or an afternoon snack with kids.
Check out our list of Charcuterie Board Ideas for Every Season!
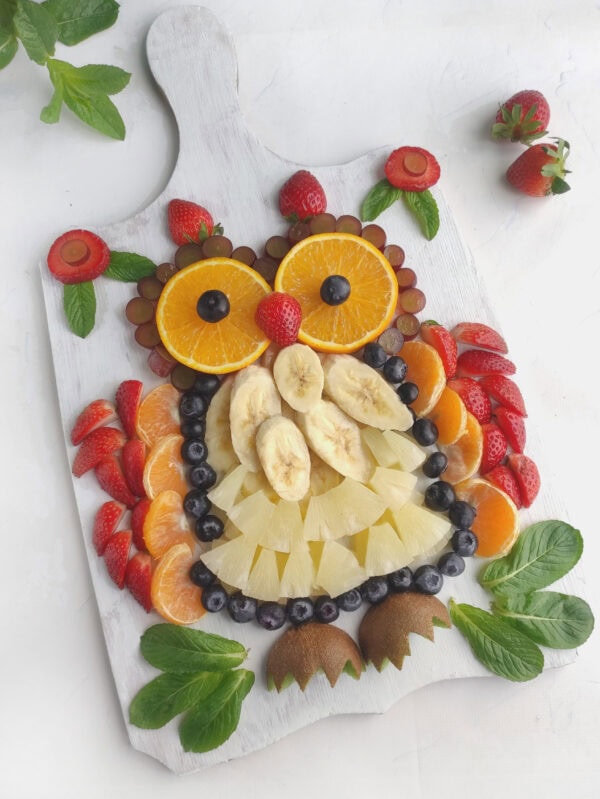
Owl Fruit Tray Charcuterie Board
You don’t need anything unusual for this fruit owl recipe. The most important thing is to choose produce with contrasting colors and shapes so that each feature stands out.
Fresh Fruit and Serving Ideas
This colorful owl platter comes together with a simple assortment of fresh fruit. Select pieces that are firm enough to hold their shape while you build the owl’s eyes, wings, face, and other details.
For the fruit arrangement, gather:
- Tangerine
- Medium orange
- A bunch of red or pink grapes
- Banana
- Canned pineapple rings, thoroughly drained
- Kiwi
- Strawberries
- Approximately ⅓ cup of blueberries
- A few fresh mint leaves for garnish, if desired
For dipping or serving alongside the owl, try:
- Vanilla yogurt
- Honey
- Your favorite creamy fruit dip
- Scoops of vanilla ice cream
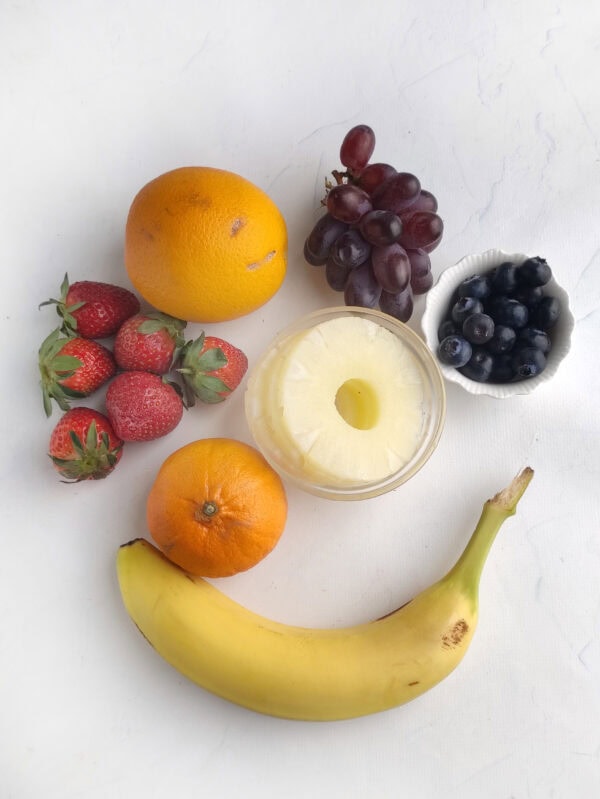
For the neatest presentation, use ripe fruit that still feels firm. Very soft bananas, berries, or kiwi may release extra juice or shift out of place—especially when the owl fruit tray is prepared in advance.
How to Make an Owl Fruit Tray Charcuterie Board
The easiest way to assemble this charcuterie board is to work from the center outward. Build the eyes and body first, then add the sides, feet, and decorative pieces around them.
1. Make the Owl’s Eyes
Cut two round slices from the citrus and place them near the top center of your serving plate.
Place one blueberry in the center of each slice to create a pupil.

The large circles immediately establish the face, so starting with the owl’s eyes makes it easier to keep the rest of the display symmetrical.
2. Build the Owl’s Body
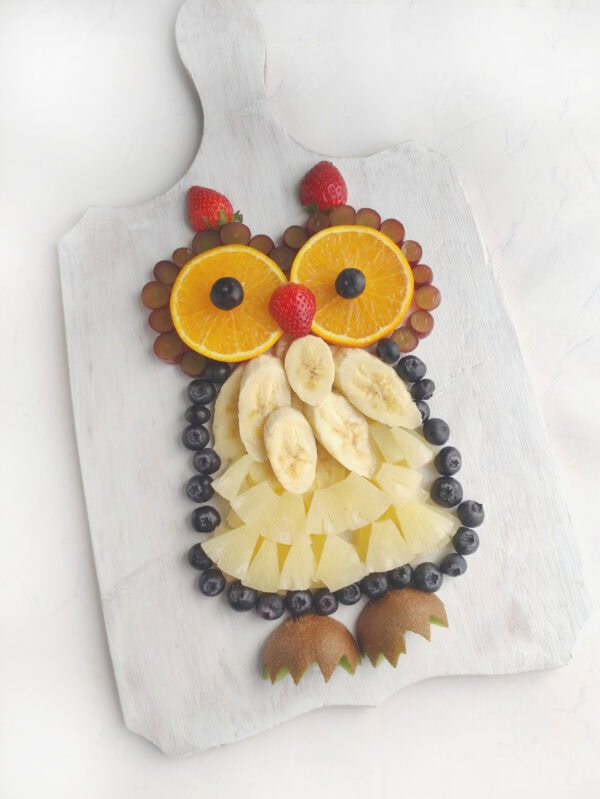
Cut the pineapple rings into smaller sections, then peel and slice the banana.
Arrange the pieces beneath the eyes to create a rounded chest and belly.
Alternate the yellow and pale sections rather than placing each type in a single solid area. This adds texture to the body and gives the arrangement a feathered appearance.
3. Add the Face Details
Cut a strawberry in half, then place a small piece beneath the eyes to form the beak.
Slice several grapes and position them around the eyes.
You can also add a few blueberries near the body for another layer of color and definition.
4. Create the Sides
Peel the tangerine and separate it into segments.
Quarter several strawberries.
Place the tangerine pieces and strawberry quarters along both sides of the body. Try to mirror the placement, so each wing looks balanced.

You don’t need the two sides to be identical. The finished creation will still look adorable even when one side has a little more personality than the other.
5. Make the Kiwi Feet
Slice the kiwi into rounds.
Using a small paring knife, carefully cut a few small grooves into the edge to suggest toes or claws.
Cut the decorated rounds in half and place them underneath the body.
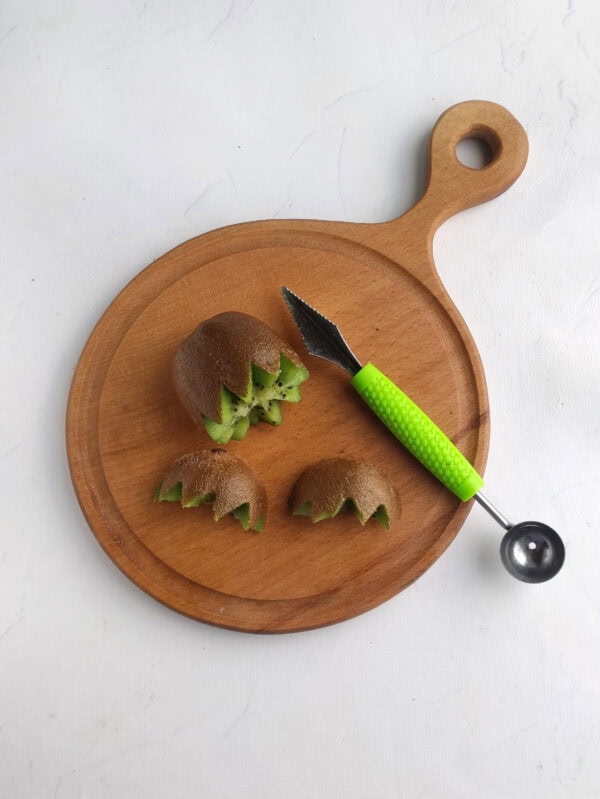
If you’re making this with younger kids, an adult should handle this part because it requires more detailed knife work.
6. Finish the Fruit Board
Use strawberry pieces near the top of the eyes to create each pointed ear.
Fill any empty areas with extra berries, grapes, or mint leaves.
The extras don’t need to form part of the character. A few scattered pieces around the outside add a finishing touch, making the presentation look fuller without hiding the recognizable shape.
How to Keep the Fruit Looking Fresh
If you’re serving this colorful creation at a gathering, prepare it as close to serving time as possible.
Bananas are the most likely to brown. A light coating of lemon juice can slow the process, although it may add a slightly tart flavor.
You can also wait to cut and add the bananas until shortly before your guests arrive.
Keep the finished tray refrigerated until you’re ready to put it on the table.
Easy Fruit Substitutions
You don’t have to use the exact same produce to create this playful snack board.
The easiest substitutions have a similar color, size, or shape.
Try:
- Mango instead of pineapple
- Raspberries instead of strawberries
- Green grapes instead of kiwi accents
- Apple or pear slices instead of banana
- Clementines instead of tangerines
- Blackberries instead of blueberries
When swapping produce, think about the feature you’re creating.
Round pieces work especially well for the eyes, while smaller sections are easier to layer along the sides and body. Use your family’s preference as a guide when choosing substitutions.
Can Kids Help Make This Fruit Board?
Yes. This is a fun food activity for kids because most of the enjoyment comes from arranging the pieces rather than cooking.
Younger children can:
- Place blueberries on the eyes
- Arrange tangerine segments
- Add strawberries along the sides
- Fill empty spaces with grapes
- Add mint leaves around the finished character
Adults should handle any detailed knife work, including slicing produce and carving the kiwi feet.
Giving kids responsibility for one section can also make the activity easier. One child can work on a side while another builds the body or adds a berry accent.
What to Serve With This Fruit Platter
The arrangement works perfectly on its own, but a simple dip can make it feel more like a party snack.
Try vanilla yogurt, a honey-yogurt mixture, cream cheese fruit dip, or vanilla ice cream. For a sweeter treat, you could offer a little whipped cream or chocolate on the side, while cinnamon can add extra flavor to a yogurt-based option.
For a larger spread, place crackers and cubes of mild cheese on a separate plate nearby. Hummus is another savory option for guests who want more variety.
Keeping those extras separate preserves the design instead of crowding the centerpiece.
When to Serve This Fruit Creation
Because the presentation is playful rather than tied to one specific holiday, you can use this cute idea for almost any occasion.
It would work especially well for:
- Woodland-themed birthday parties
- A baby shower
- Preschool or homeschool activities
- Summer parties
- Brunch
- After-school snacks
- Fall gatherings
- Animal-themed celebrations
It can also be a memorable way to serve fruit to kids who prefer a playful presentation over a traditional bowl.
Tips for Making the Owl Shape Easier
The biggest challenge with a design like this is keeping the character recognizable while adding enough food for every guest.
Start with the face before adding extra pieces.
The large eyes, blueberry centers, strawberry-center detail, and symmetrical sides make the design immediately recognizable.
Once those features are in place, fill out the body and surrounding space.
One useful tip is to remove a few decorative pieces if the shape starts to get lost, rather than continuing to add more.
A slightly simpler presentation usually looks better than an overcrowded one.
More Creative Charcuterie Board Ideas
If you enjoy making themed snack boards, you can also try:
- Movie Night Charcuterie Board
- Grinch-Themed Charcuterie Board
- Summer Charcuterie Board
- Red, White, and Blue Charcuterie Tray
- Flower Veggie Tray Charcuterie Board
- Butterfly Charcuterie Board
Each one uses the same basic idea: start with a theme, choose foods with the right colors and shapes, and arrange them so the board becomes part of the celebration.
Make This Owl Fruit Tray Charcuterie Board Your Own
The best part about this owl fruit creation is that it doesn’t need to look perfect.
Use the produce your family actually enjoys, adjust the size to fit your serving dish, and let kids help with the decorating.
As long as you have two big eyes, a small center detail, a rounded body, and matching sides, your yummy centerpiece will come together.
Best of all, everyone can enjoy the display piece by piece until there’s nothing left.
Can I Make This Recipe in Advance?
Yes. You can wash and cut most produce several hours in advance and keep everything refrigerated in separate containers. For the freshest presentation, add bananas and other pieces prone to browning shortly before serving.
What Size Serving Dish Works Best?
A large round or rectangular serving plate gives you enough room to create the face, body, sides, and decorative accents without making everything feel crowded. The best size depends on how many guests you plan to feed.
Which Dips Pair Well With This Snack?
Vanilla yogurt and cream cheese mixtures are easy choices, but you can also offer honey, whipped cream, or a lightly sweetened yogurt mixture. Serving the sauce in a small bowl beside the centerpiece keeps the main design neat.
Where Can I Find More Owl Food Inspiration?
Pinterest can be useful for finding and saving ideas for woodland parties, animal snacks, and themed displays. Search phrases such as “ideas and inspiration for owl snacks” or “save ideas about owl party food” to discover Pinterest’s best ideas and inspiration for adding your own flair.
Can I Make a Savory Version?
Yes. Use the same basic layout with vegetables, crackers, cheese, and hummus instead of sweet ingredients. The eyes and central facial feature are the most important parts, so keep those clear while experimenting with savory combinations.
How to Make an Owl Charcuterie tray
Summer is the perfect time for garden parties, playdates, and sunny breakfasts on the porch—and nothing says festive quite like a whimsical fruit platter shaped like an owl! This creative food art idea is as delicious as it is charming and will surely delight kids and impress your guests.
This platter makes healthy eating fun, and you can also spark your child’s imagination by saying, “Look, an owl flew in for the party!” Encourage kids to turn the owl’s feathers into fun mini sandwiches or fruit bites.
Ingredients
- 1 tangerine
- 1 orange
- 1 bunch of pink grapes
- 1 banana
- 5 rings of canned pineapple
- 1/3 kiwi
- 6–8 strawberries
- 1/3 cup blueberries
- Optional for garnish: fresh mint, extra berries, yogurt drops, honey, or a scoop of creamy vanilla ice cream
Instructions
- Make the Owl’s Feet. Start by slicing the kiwi. To create detailed claws or “paws,” use a carving or paring knife to cut small grooves along the edge of the kiwi. Then cut the kiwi slices in half. Set them aside to use as the owl’s feet.
- Slice the Fruit. Cut the pineapple rings into small sections.
Peel and slice the banana. Peel the orange and cut two whole slices for the owl’s eyes. Use blueberries as the pupils by placing one on each orange slice. Slice the strawberries and tangerine segments into pieces for the wings. - Assemble the Owl Face and Body. Place the orange circles near the top for eyes on a large white serving board or tray. Add one blueberry in the center of each as pupils. Under the eyes, layer pineapple pieces and banana slices to form the owl’s round belly and chest. Place half a strawberry underneath the eyes to act as the owl’s beak.
- Add Details. Trim the edges of the eyes with pink grape slices to give them a pop of color. Add a ring of blueberries around the body for extra flair. Use strawberry halves to make the owl’s ears at the top. Place the kiwi “feet” you made earlier at the bottom.
- Create the Wings. Peel the tangerine and separate it into slices.
Quarter the strawberries. Arrange the tangerine and strawberry pieces on both sides of the owl’s body to create wings, mirroring the placement on each side for balance. - Garnish and Serve. For a playful background, add extra decorations around the owl—fresh mint leaves, small berries, or yogurt drops. For dipping, serve the platter with mint yogurt, honey drizzle, or a scoop of vanilla ice cream.
Notes
- Don’t worry about perfection—this is meant to be playful and fun!
- Kids can help with slicing soft fruits or assembling the shapes.
- For even more variety, swap ingredients: use melon or mango instead of pineapple, raspberries instead of strawberries, or pears in place of bananas.
- This fruity owl is a perfect centerpiece for summer entertaining—and a great way to encourage healthy snacking with a side of creativity. Enjoy the season with fresh flavors and fun food art!
- Use firm, ripe fruits that hold their shape and have bright colors.
Nutrition Information:
Yield: 12 Serving Size: 1Amount Per Serving: Calories: 159Total Fat: 1gSaturated Fat: 1gTrans Fat: 0gUnsaturated Fat: 1gCholesterol: 3mgSodium: 17mgCarbohydrates: 37gFiber: 5gSugar: 30gProtein: 3g

This is so cute!
This is beyond cute! This will be a feature at this week’s Handmade Monday – congrats!