
Hosanna Palm Leaf Craft for Palm Sunday
This Hosanna palm leaf craft gives children a hands-on way to learn about Jesus’ triumphal entry into Jerusalem. Using the free printable palm template, kids can create a colorful paper frond displaying the word “Hosanna” and attach it to a folded stand.
The completed project stands upright, making it a meaningful decoration for a Sunday school classroom, Christian school, homeschool room, or family Easter display.
Children can make this Bible craft while listening to the story and learning why the people welcomed Jesus with branches and joyful praise.
Hosanna Palm Leaf Craft for Palm Sunday
Palm Sunday remembers Jesus entering Jerusalem shortly before His crucifixion and resurrection. He entered the city riding a donkey, just as Zechariah 9:9 had foretold.
The people greeted Him by placing their cloaks along the road. John 12:13 also mentions that people brought leaves from palm trees as they gathered to greet Him.
They proclaimed with joy:
“Hosanna! Blessed is he who comes in the name of the Lord!” — John 12:13
This joyful moment is commonly known as the triumphal arrival. You can read the full story in:
- Matthew 21:1–11
- Mark 11:1–11
- Luke 19:28–40
- John 12:12–19
This paper palm gives children a visual reminder of the crowd welcoming their promised King.
What Does Hosanna Mean?
The word comes from a Hebrew expression meaning “save, please” or “save us.” It began as a plea for help and also became an expression of praise and salvation.
When the people shouted it during the entry into Jerusalem, they were recognizing the promised King and calling upon Him to save.
Ask children to say the word together as they make their projects:
Hosanna! Jesus is our King!

Free Palm Leaf Template
The free template makes it easier to create the pieces without drawing them freehand.
The one-page sheet includes:
- One large palm leaf pattern
- Seven individual letters spelling HOSANNA
- One circular pattern for the folded stand
The file is formatted on A4 paper. If you are using US Letter paper, select Fit, Fit to Printable Area, or a similar setting in your printer menu so none of the pattern is cut off.
Use the printed pieces as tracing guides rather than attaching the printer paper directly. This creates a brighter and sturdier finished paper craft.
Supplies You’ll Need:
- Free printable template
- Dark green construction paper
- Light green construction paper
- Yellow construction paper
- Orange construction paper
- Black construction paper
- Scissors
- Glue stick
- Pencil
- Green marker
- Brown or black marker
You can use only one color for the letters if you prefer. Alternating orange, yellow, and light green creates the colorful version shown in the photos.
Cardstock can be substituted for construction paper when you want a firmer shape or a more durable classroom display.

How to Make This Hosanna Palm Leaf Craft
Step 1: Prepare and cut out the template
Print the free template and cut out the frond, the individual HOSANNA letters, and the circular stand pattern.
Adults may want to prepare the small letter templates ahead of time when making this craft for kids with preschoolers.

Step 2: Trace the palm shape
Place the pattern on dark green construction paper and trace around it with a pencil.
Carefully cut around the outline. The curved openings provide good scissor practice, but younger children may need help navigating these narrower spaces.
Step 3: Add details
Use a green marker to outline the edge. Draw a darker line through its center to form the main vein, and add several smaller veins extending toward the sides.
These simple details give the paper palm more definition and a natural frond appearance.

Step 4: Create the letters
Trace the individual letter patterns onto yellow, orange, and light green construction paper.
Cut out all seven letters and arrange them in the correct order:
H-O-S-A-N-N-A

Before gluing, use a brown or black marker to outline the letters. The darker edges help the word stand out against the green background.
This step also provides a simple spelling and letter-recognition exercise for younger children.

Step 5: Glue the letters in place
Turn the piece horizontally so the stem points to the right. Arrange the letters across the center.
Check the spacing before gluing. Once everything is positioned correctly, attach each letter with a small amount of glue.

Step 6: Make the paper stand
Trace the large circle from the template onto black construction paper and cut it out.
Bend the circle exactly in half. Crease it firmly so the two rounded sides form a tent-like base.
This circular base is what allows the completed project to stand upright instead of lying flat.

Step 7: Attach the palm to the stand
Apply a small amount of adhesive to the front portion of the black stand. Center the leaf over the base and press it firmly in place.
The bottom of the black semicircle should remain visible beneath it and rest flat on the table.

Allow the glue to dry before moving or displaying your finished craft.

A Simple Palm Sunday Story for Kids
While children work, explain the Bible story in age-appropriate language:
Jesus and His disciples were traveling to Jerusalem. He traveled into the city on a young donkey as many people came together to greet Him.
The people placed their cloaks and branches on the road, waved a palm branch, and praised Him with a joyful shout of “Hosanna!”
They welcomed Him like a king. This easy Palm Sunday explanation reminds children that He is the promised King and Savior.
You can then ask:
- What animal did He ride into Jerusalem?
- What did the people wave?
- What word did the crowd shout?
- What does “Hosanna” mean?
- Why were the people excited?
- How can we praise Him today?
For preschoolers, keep the discussion brief and repeat the central message:
Jesus is our King, and we can praise Him.

Palm Sunday Bible Verse
John 12:13 is an especially helpful verse to pair with this simple Palm Sunday project because it specifically mentions both the branches and the crowd’s words of praise.
Write the reference John 12:13 on the back or attach it to a small card beside the display.
For older children, have them add a short excerpt from the verse to the reverse side:
“Hosanna! Blessed is he who comes in the name of the Lord!”
You could also use Matthew 21:9, which records the crowd shouting, “Hosanna to the Son of David!” A related Psalm can also be included in a longer Bible lesson or lesson plan.

Ways to Use This Palm Sunday Craft
This project can be adapted for several Christian learning settings.
Sunday school crafts
Make the project after reading Matthew 21:1–11 or John 12:12–19. Display the finished pieces together on a table or classroom shelf.
Children’s ministry
Prepare the templates before class so children can complete the construction-paper steps during the story.
Christian school
Combine the project with reading comprehension, Bible sequencing, spelling, and fine-motor practice.
Homeschool Bible lesson
Use the project to begin a Holy Week study. Add it to a notebook or place it in the family’s Easter display.
Family devotion
Read about the triumphal entry together, complete the project, and discuss ways your family can praise God. It can provide 10 minutes of quality time while reinforcing the meaning behind the celebration.
Palm Sunday table decoration
Because the design includes a freestanding base, several finished pieces can be used as table decorations at church or at home.

Palm Sunday Activity Ideas
Extend the study with one of these simple Easter activities:
Reenact the triumphal entrance
Choose one child to pretend to ride into Jerusalem while the others wave paper fronds and cheer for the arriving King.
Create a road to Jerusalem
Place a strip of brown paper on the floor to make a pretend road. Children can lay paper “cloaks” and greenery along the path as you retell the story.
Sing a praise song
Play an age-appropriate song containing the word “Hosanna.” Let children hold their finished projects while they sing.
Because this particular design is attached to a stand, remind children to hold it gently. If you want a branch specifically to wave, trace and cut an additional piece without attaching the black base.
Practice the word
Mix up a second set of paper letters and ask children to place them in the correct order. Younger students can match each letter to the word on the finished design.
Begin a Holy Week timeline
Use this celebration as the first event on a child-friendly timeline. Continue with the Last Supper, prayer in the garden, the cross, the tomb, and Easter Sunday.

Skills Children Practice
This Christian paper project supports several early learning skills:
- Fine-motor development
- Scissor control
- Hand-eye coordination
- Tracing
- Letter recognition
- Spelling
- Following sequential directions
- Bible-story comprehension
- Creative expression
The smaller letters require more precise cutting than the large green shape. For preschool classes, an adult can cut the letters in advance or allow children to write the word directly on the paper.
Tips for Making This Craft with a Group
A little preparation will make the activity easier in a Christian classroom or ministry setting:
- Prepare one template for each child or several reusable tracing patterns.
- Cut out the paper letters before class for younger children.
- Precut the black circles if class time is limited.
- Place each child’s supplies in a separate tray or bag.
- Write each child’s name on the back before assembly.
- Use glue sticks to reduce drying time and mess.
- Display a completed example where children can see it.
- Read the story while children work on the simpler gluing steps.
- Allow the projects to dry before sending them home.
Craft Variations
Children can personalize their Palm Sunday projects in several ways:
- Use different shades of green for the leaf.
- Decorate the surface with crayons, dot markers, or tissue-paper pieces.
- Add John 12:13 to the back.
- Add gold paper letters to emphasize that Christ is King.
- Replace the cutout letters with letter stickers.
- Let older children hand-letter the word.
- Attach the piece to a craft stick instead of the stand to create a palm waver.
- Make several leaves and arrange them around a paper cross for a Holy Week bulletin board.
- Pair the project with Palm Sunday coloring pages, a simple headband, or other Easter crafts.
More Christian Easter Crafts for Kids
Continue learning about Holy Week and Easter with these faith-based activities:
- Cross Suncatcher Craft – A colorful cross craft that makes a meaningful addition to Easter or Sunday school lessons.
- Palm Sunday Donkey Craft – A simple hands-on activity that helps kids learn about Jesus entering Jerusalem on Palm Sunday.
- Moses Bible Paper Bag Craft – A creative paper bag project that brings the story of Moses to life for young learners.
- Bible Crafts and Printables – A collection of faith-based crafts and printable activities for exploring different Bible stories with kids.
- Christian Easter Activity Pack Printable – A printable Easter pack filled with activities that help children focus on the Christian meaning of the holiday.
These crafts and printables help children connect the events of Holy Week with the hope and joy of Jesus’ resurrection.
Download the free Palm Sunday template below. This one-page PDF includes the printable palm, seven HOSANNA letters, and circular base needed to make the freestanding design.
What age is this Palm Sunday craft for?
The project works best for kids’ groups approximately ages 4–10. Preschoolers will need help cutting the detailed openings and small letters. Older elementary children can trace and assemble the entire design independently.
Can I print the template directly on green paper?
You can print the page on green cardstock, but the main shape, circle, and letters appear together on the same page. For the multicolored version shown here, use regular paper and trace the pieces onto the appropriate construction-paper colors.
Why is there a black circle in the template?
The circle creates the freestanding base. Trace it onto black construction paper, cut it out, and fold it in half. The creased circle supports the design so the finished project can stand on a table.
Can children wave this palm leaf?
The original design is intended as a freestanding display. To make a palm branch craft for waving, omit the folded base and reinforce the paper with cardstock or a jumbo craft stick.
Which Scripture Passages Describe Palm Sunday?
You can find this event described in each of the four Gospels: Matthew 21:1–11, Mark 11:1–11, Luke 19:28–40, and John 12:12–19.
The digital download can be paired with other printable crafts, printable Bible-themed crafts, or a Holy Week bundle for a more interactive study.
Gather several colors of construction paper and use the step-by-step instructions to create a meaningful display as you celebrate Palm Sunday.
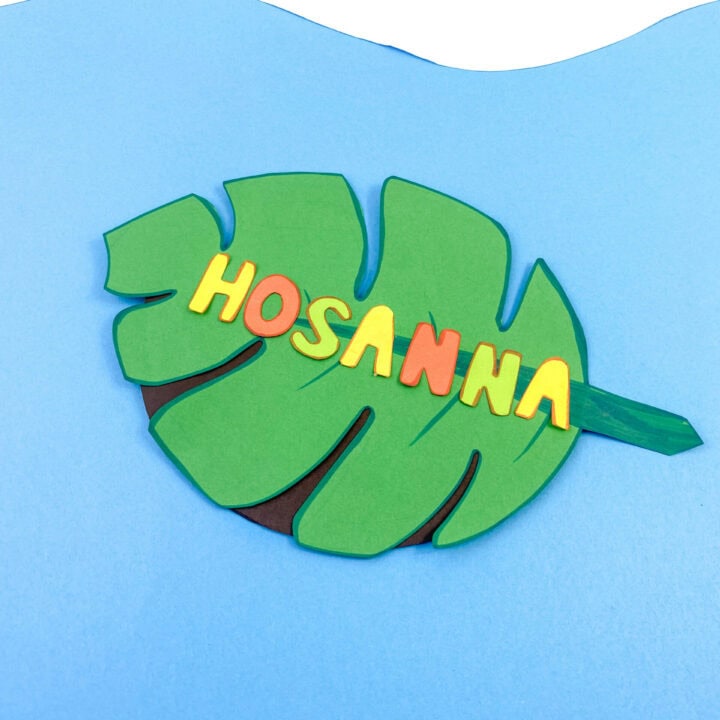
Hosanna Palm Leaf Craft
Make a freestanding paper palm leaf displaying the word “Hosanna” while teaching children about Jesus’ triumphal entry into Jerusalem.
Materials
- Free palm leaf template
- Dark green construction paper
- Light green construction paper
- Yellow construction paper
- Orange construction paper
- Black construction paper
- Glue stick
Tools
- Printer
- Pencil
- Scissors
- Green marker
- Brown or black marker
Instructions
- Print and cut out the palm leaf, letters, and circle from the template.
- Trace the leaf onto dark green construction paper and cut it out.
- Outline the leaf and add veins with a green marker.
- Trace the HOSANNA letters onto colored paper and cut them out.
- Outline the letters and glue them across the palm leaf.
- Trace the circle onto black paper, cut it out, and fold it in half.
- Glue the palm leaf to the folded circle so the craft stands upright.
- Allow the glue to dry before displaying the craft.
Notes
The printable is formatted for A4 paper. Select “Fit” when printing on US Letter paper. Adults may want to precut the letters for preschoolers.
