
Moving Nativity Paper Plate Craft With Free Template
This moving Nativity paper plate craft lets children interactively retell Jesus’ birth story. Mary and Joseph stand inside a layered paper plate stable, while Baby Jesus is attached to a popsicle stick that slides into the manger from below.
The free printable template makes the characters easier to trace and assemble. Try this religious Christmas craft during a Sunday school lesson, children’s church activity, homeschool study, elementary class, or family crafting session. This kids’ Nativity craft offers a hands-on way to celebrate the Christmas season.
Get the free template using the download option near the end of this post.

How Does a Moving Nativity Craft Work?
A moving Nativity craft includes an interactive piece that children can slide, turn, or reposition. In this project, Baby Jesus is attached to a wooden craft stick.
The stick moves through a channel between the layered paper plates, allowing children to raise the figure into the manger scene.

The simple motion makes the finished craft useful for storytelling instead of limiting it to a flat Christmas decoration. Kids can use the moving figure while retelling the story of Jesus and His birth.
This pop-up paper plate Nativity is also a simple DIY idea to help children focus on the true meaning of Christmas.
Find more faith-centered activities in our collection of Nativity crafts for kids and Christmas crafts and printables.
This post may contain affiliate links. As an Amazon Associate and a participant in other affiliate programs, I earn a commission on qualifying purchases. Read our disclosure policy here.
Melissa & Doug Classic Wooden Christmas Nativity Set with 4-Piece Stable and 11 Wooden Figures Fisher-Price Little People Toddler Toy Nativity Set with Music Lights & 18 Pieces for Christmas Pretend Play Kids Ages 1+ Years50 Sheets of Heavyweight White Cardstock Ideal for Business Cards, Art Projects, Invitations, and Stationery Printing | 80 lb Weight | 8.5 x 11 inches | Thick Cover Stock (216 gsm) |LOVESTOWN Kids Safety Scissors, 4 PCS Blunt Tip Scissor Preschool Training for Toddler & Children, Anti-Pinch Design, Child Hand Eye Coordination Development, Playdough Tools Scrapbooking SuppliesAmazon Basics Purple Washable School Glue Sticks, Dries Clear, 0.21 oz Stick, 4-PackPinkunn Metal Nativity Sets for Christmas Decorations Black Metal Nativity Scene with Wooden Base for Christmas Xmas Home Indoor Office Kitchen Table Shelf Mantel Tabletop Decor(Classic)


Supplies for the Paper Plate Nativity
- Free printable template
- Three sturdy white paper plates
- One jumbo popsicle stick
- Construction paper in green, pink, light green, white, yellow, and skin-tone colors
- Thin cardboard or cardstock, optional
- Black, blue, yellow, and brown paint
- White paint, optional, for stars
- Paintbrushes
- Pencil
- Washable markers
- Black marker
- Child-safe scissors
- Glue stick or washable craft glue
- Double-sided tape
- Contact paper or laminating sheets, optional
These simple supplies are easy to prepare for a classroom or home activity. Use uncoated paper plates because paint and glue adhere more easily. Cardstock or thin cardboard can reinforce the moving character when children use the paper plate Nativity repeatedly.
How to Use the Free Nativity Craft Template
Print the PDF template at 100 percent or Actual Size. Cut out the pattern pieces for Mary, Joseph, the baby, and the star. Use the template to trace and cut each piece from the suggested construction-paper colors, then assemble the characters.
You can also print the figures directly on cardstock, color them, and cut them out. To make it last longer, laminate or cover the moving figure with clear contact paper before attaching the popsicle stick. The craft comes with a template to make it easy to prepare the main pieces.
For other print-and-cut scenes, try the printable 3D Nativity or Nativity scene printable craft.
How to Make a Moving Nativity Paper Plate Craft
Step 1: Paint the Background Plate
Start by painting the first paper plate right side up. Paint two black mountain shapes near the center, then use blue paint to make the night sky above the mountains.
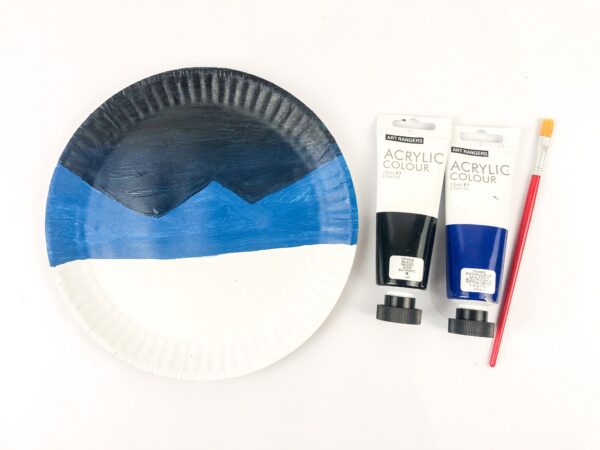
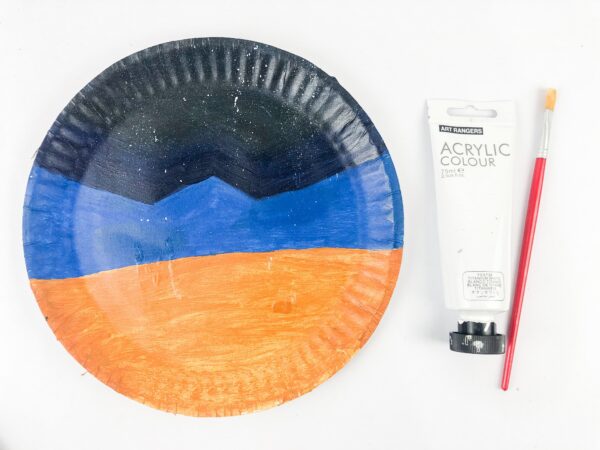
Paint the lower portion with a warm sandy color made by mixing yellow with a small amount of brown paint. Use white paint to add small stars for a starry-night effect. Let it dry completely.
Step 2: Prepare the Foreground Plate
Paint the second paper plate with the same sandy yellow-brown mixture. This plate forms the foreground and creates a channel that guides the moving piece.
Set it aside to dry. Keep the paint layer thin so the paper plate does not curl.
Step 3: Cut the Stable Frame
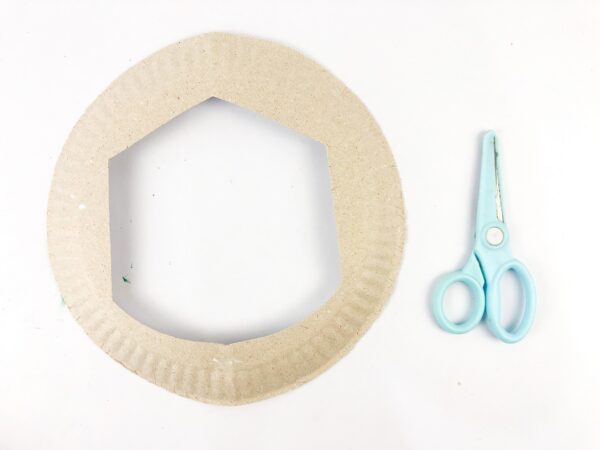
Use the third paper plate to create the front frame. Draw a simple arch shape or stable opening in the middle of the paper plate, leaving a wide border around the edge.
An adult should carefully cut out the center for younger children. Paint the frame so its sky, mountains, and ground line up with the background when the paper plates are stacked.
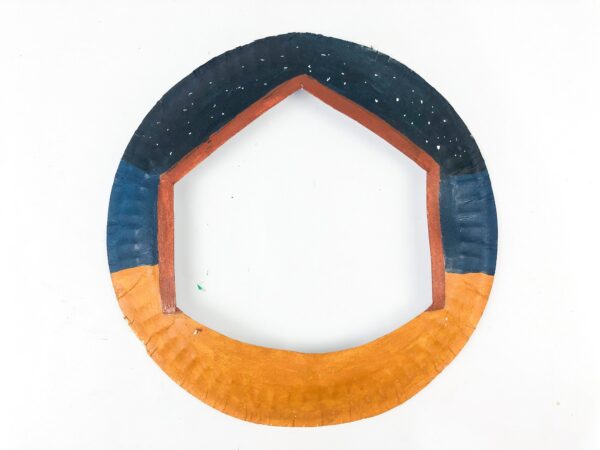
Let the frame dry, then place the plate on the background to check the alignment.
Step 4: Make Mary and Joseph
Cut out the printable patterns for Mary and Joseph. Transfer each shape to construction paper, carefully cut along the outlines, and assemble the figures with glue.
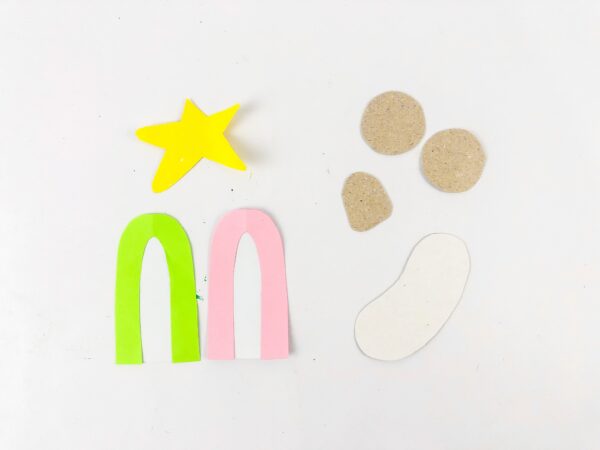
Use markers to draw the faces and add a few clothing details. Glue the completed figures to the background so they appear inside the paper plate Nativity scene.
Step 5: Make Baby Jesus
Use the Nativity template to trace and assemble Baby Jesus. Add a face with a fine-tip black marker and wrap the figure with the printable or paper swaddling pieces.
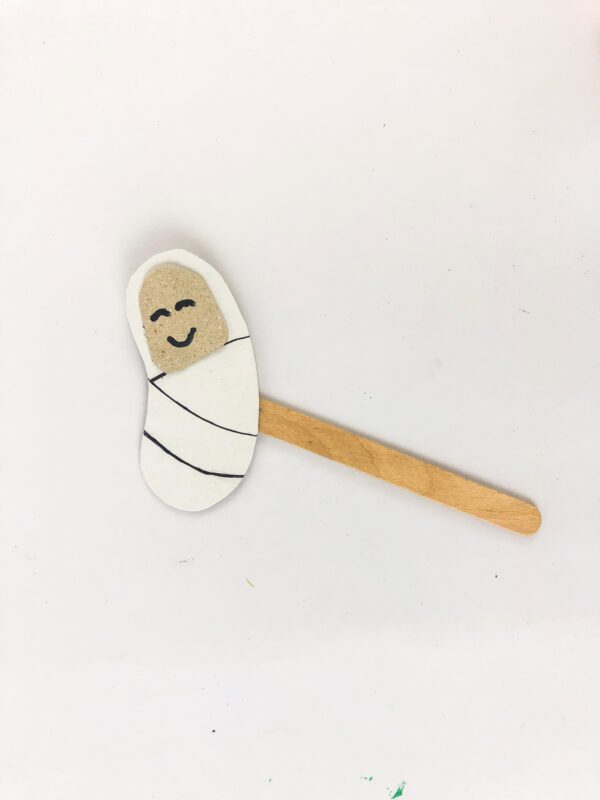
Reinforce the back with cardstock or thin cardboard if needed. Glue or tape the figure securely to the top of a jumbo craft stick. Make sure the stick-to-back connection is strong enough for repeated movement.
Step 6: Add the Star
Cut the star from yellow construction paper or color the printable star. Glue it near the top of the stable frame.
Children can add small painted or drawn stars to the night sky. Avoid thick decorations near the bottom channel because they may interfere with the moving stick.
Step 7: Layer the Paper Plates
Place the painted foreground plate over the background. Add the stable-frame plate on top and align all three layers.
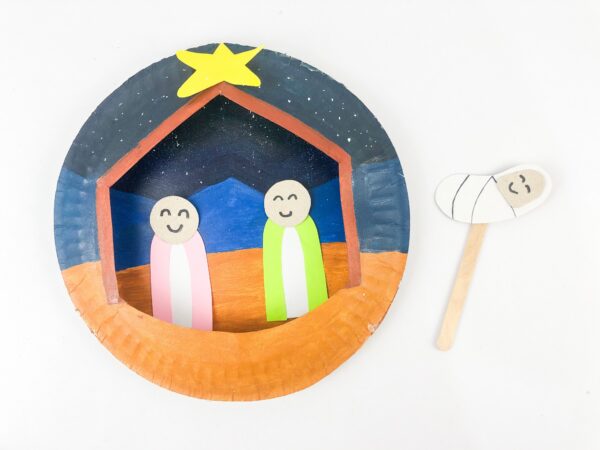
Use glue or double-sided tape around the outer edges to hold the plates together. Do not seal the center or the bottom of the plate where the craft stick enters.
Leave a space for a narrow vertical channel between the plates. Test the popsicle stick before pressing the paper plates together completely.
Step 8: Add the Moving Figure
Insert the popsicle stick through the opening at the bottom. Slide the popsicle stick up so the figure appears in the manger area, then move it down to hide it behind the foreground.
If the stick catches, gently widen the channel or remove excess glue and tape. Once the movement works smoothly, finish securing the plate edges.
How the Moving Mechanism Works
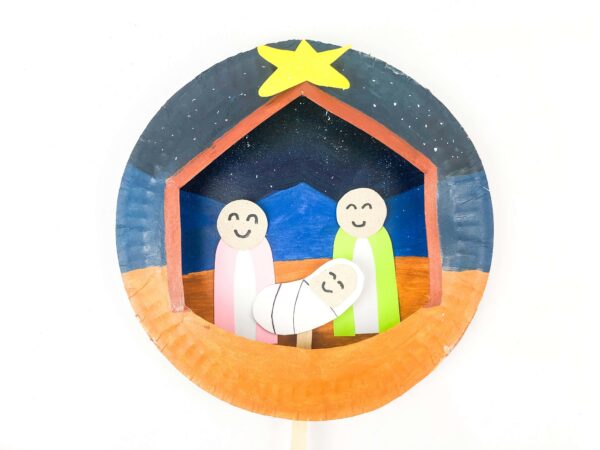
The middle paper plate creates space between the background and front stable frame. The popsicle stick travels through that space while the attached figure remains visible through the stable opening.
The channel should be wide enough for the stick to slide but narrow enough to keep it upright. Tape placed too close to the center can block the path. Testing the movement before sealing all three paper plates together is the easiest way to prevent problems.
This moving paper plate design turns a simple paper plate craft into an interactive Nativity scene craft children can use during storytelling.
Moving Nativity Craft for Preschoolers
This easy paper plate project can be adapted for preschoolers. Little ones can help paint, glue, and decorate after an adult prepares the more difficult pieces.
- Cut the stable opening before the activity.
- Prepare the smaller character pieces ahead of time.
- Attach the moving figure to the stick before the activity begins.
- Use a glue stick when possible to keep assembly messier.
- Limit paint to two or three colors.
- Draw light placement marks for the main characters.
- Have an adult create and test the moving channel.
Toddlers can decorate a prepared plate and help move the finished figure under direct supervision, but loose pieces and sticks are not appropriate for unsupervised play. Older kids can complete more of the tracing, cutting, and assembly independently.
Sunday School and Classroom Tips
This project works best when divided into two sessions. Children can paint the plates during the first session. After the paint dries, they can assemble the figures and moving mechanism during the next class.
Before the activity:
- Print enough templates for the group.
- Cut stable openings for younger children.
- Label every set of plates with the child’s name.
- Sort paper pieces by character and color.
- Prepare paint in small washable containers.
- Make one completed sample that demonstrates the movement.
- Keep extra plates available in case one tears or curls.
For several kids, have one adult help at the plate-assembly station. This person can ensure the channel stays open before children leave with their crafts. Making this craft in stations can also make preparation easier for larger groups.
Teaching the Nativity Story
Read or retell Luke 2:1-20 while children work. Explain that they traveled to Bethlehem and that Jesus was laid in a manger after He was born. The shepherds learned about His birth from angels and went to see Him.
Children can move the figure into the scene as they reach the part about Jesus in a manger. Use prompts like these to review the story:
- Which town did Mary and Joseph journey to?
- Where did Mary lay Jesus after giving birth?
- What message did the angels share with the shepherds?
- Where did the shepherds go after the angels’ message?
- Why do Christians celebrate Christmas?
This Christmas Nativity activity can help children connect a hands-on project with the Christmas story. Moving the figure also builds fine motor skills as children retell the Bible account.
Pair the lesson with Nativity coloring pages, Advent Scripture cards, or the Nativity Christmas story pop-up card.
Ways to Personalize the Nativity Scene
- Add paper animals near the manger.
- Glue raffia or shredded yellow paper inside the stable as hay.
- Decorate the sky with fingerprints or star stickers.
- Add shepherds, angels, or wise men around the scene.
- Write Luke 2:11 on the back of the plate.
- Add the child’s name and year for a Christmas keepsake.
- Use tissue paper, felt, or patterned scrapbook paper for the clothing.
- Attach a ribbon loop for display, keeping the moving channel clear.
Children can also use white paint to add stars or dots across the dark blue sky. Avoid loose glitter when making this craft with young children. Glitter glue or metallic markers provide sparkle with less mess.
How to Fix Common Problems
The stick will not move: Check for glue or tape blocking the center channel. Separate the plates slightly and widen the path.
The moving figure turns sideways: Use a jumbo popsicle stick and reinforce the figure with cardstock. Make the channel slightly narrower.
The plates curl after painting: Apply thin layers of paint and allow each paper plate to dry flat before assembly.
The plate layers separate: Use double-sided tape around the outer rim, keeping adhesive away from the moving channel.
The stable opening tears: Reinforce the back of the cut edge with clear tape or begin with a sturdier paper plate.
The background doesn’t line up: Stack the dry plates and lightly mark the horizon with a pencil before painting the stable frame.
More Nativity Crafts for Kids
- Baby Jesus Toilet Paper Roll Craft
- Candy Nativity Craft
- Nativity Toilet Paper Roll Craft
- Nativity Diorama Printable Craft
- Nativity Matching Puzzle Game
- Angel Paper Plate Craft

Download the Free Moving Nativity Template
This fun Christmas craft combines painting, paper construction, movement, and Bible storytelling. Download the free template, gather your craft supplies, and make a paper plate Nativity that children can use to retell the Christmas story.
The finished project also makes a meaningful alternative to flat Nativity ornaments and is a great activity for home, Sunday school, a classroom Christmas unit, or a holiday playdate.
How do you make a Nativity paper plate craft?
Paint three paper plates for the background, foreground, and stable frame. Add paper figures, attach the moving character to a popsicle stick, and layer the plates while leaving an open channel at the bottom for the stick.
How does the Nativity figure move?
Baby Jesus is attached to a stick that slides between the layered paper plates. Children can move the figure upward into the manger and downward behind the foreground.
How can I get the Nativity craft template?
Use the download form or button near the bottom of the post to get the free printable pattern for the characters and star.
Which ages can make this craft?
It works best for preschool and elementary-age children. Adults should cut the stable opening and assemble the moving channel for younger children, while older kids can complete more steps independently.
Can I make the craft without paint?
Yes. Cover the plates with blue, black, brown, and yellow construction paper or color them with crayons and markers. Paper reduces drying time and may prevent curling.
Can I use only two paper plates?
You can simplify the project with two paper plates for a background and front frame, but the third plate creates a more stable foreground and a smoother channel for the moving piece.

Moving Nativity Paper Plate Craft
Layer three painted paper plates and use the free printable template to create a Nativity scene with Baby Jesus moving on a craft stick.
Materials
- Free printable Nativity template
- Three sturdy white paper plates
- One jumbo wooden craft stick
- Construction paper in assorted colors
- Thin cardboard or cardstock, optional
- Black, blue, yellow, and brown washable paint
- Pencil
- Washable markers
- Glue or double-sided tape
Tools
- Printer
- Paintbrushes
- Child-safe scissors
Instructions
- Paint mountains, a blue night sky, and sandy ground on the first paper plate. Let it dry.
- Paint the second plate with a yellow-brown sandy color for the foreground and let it dry.
- Draw and cut a stable-shaped opening from the center of the third plate.
- Paint the stable frame so the scene aligns with the background plate.
- Print the template at 100 percent or Actual Size.
- Trace, cut, and assemble Mary, Joseph, Baby Jesus, and the star.
- Glue Mary and Joseph to the background plate and attach the star to the stable frame.
- Reinforce Baby Jesus with cardstock if desired, then attach the figure to the top of the jumbo craft stick.
- Layer the foreground plate over the background and add the stable frame on top.
- Glue or tape around the outer edges while leaving a vertical channel and bottom opening for the craft stick.
- Slide Baby Jesus into the channel and test the movement before sealing the remaining plate edges.
Notes
- An adult should cut the stable opening for young children.
- Apply thin paint layers and dry the plates flat to reduce curling.
- Keep glue and tape away from the center channel.
- Use cardstock or contact paper to strengthen the moving figure.
- Substitute construction paper, crayons, or markers when paint is not practical.
