
Candy Nativity Craft: Easy Edible Christmas Activity
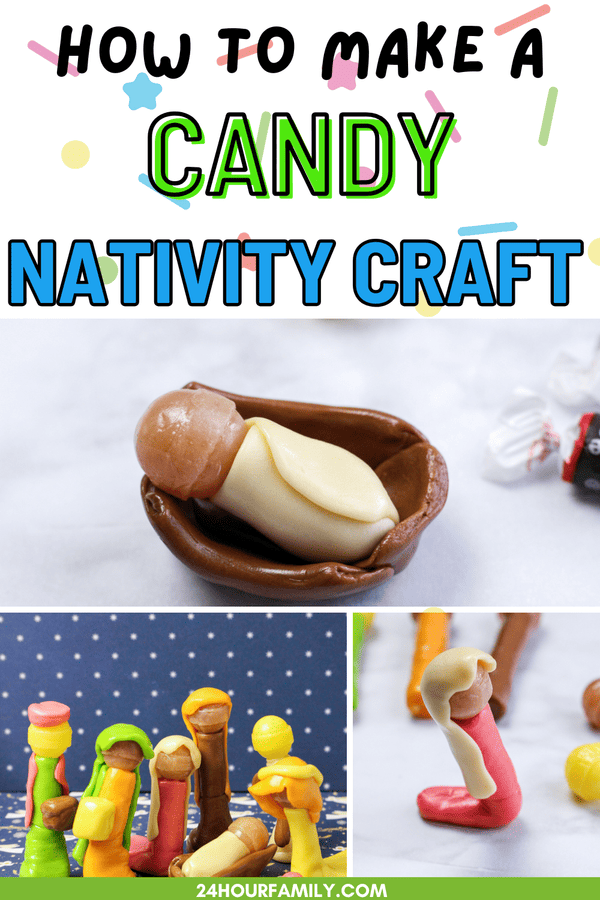
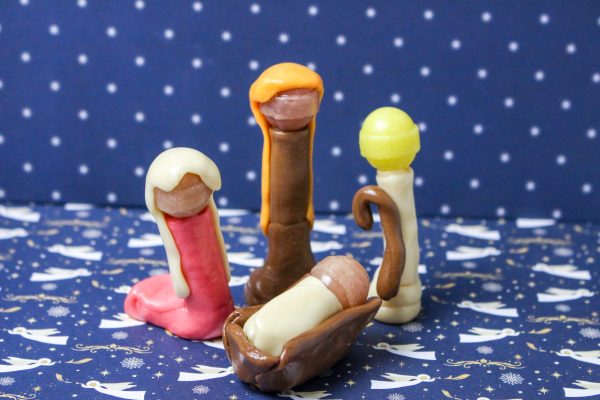
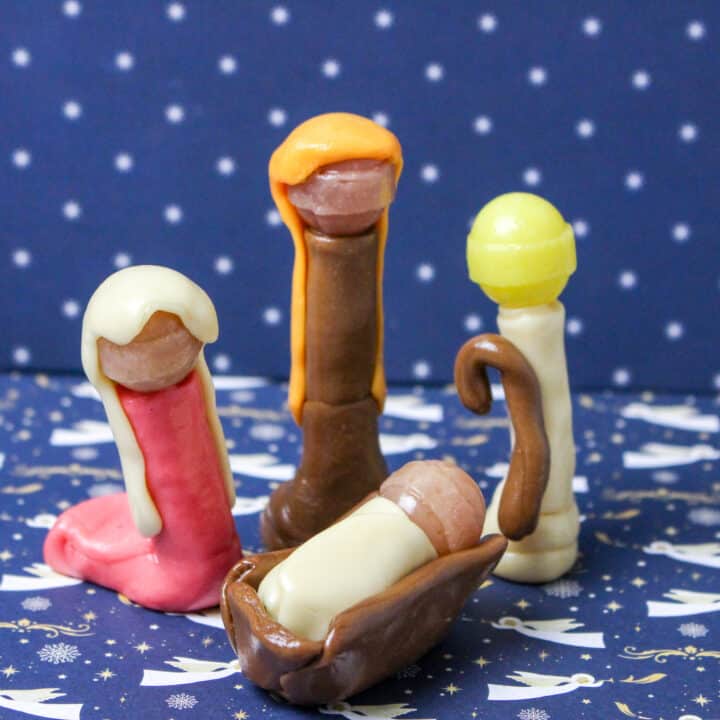
Create a sweet Christmas scene with this candy Nativity craft made from Tootsie Roll Midgees and Dum Dums. Children can shape the soft treats into Mary, Joseph, Baby Jesus, shepherds, wise men, and a small manger while learning about Jesus’ birth.
This hands-on Christmas activity works well for a supervised family project, Sunday school lesson, homeschool Bible study, or children’s church event. The soft pieces are simple to shape, giving each finished scene its own unique look.
Can You Make a Nativity Scene From Candy?
Absolutely. You can shape soft, individually wrapped sweets around lollipop sticks to create simple figures. Midgees form the bodies, clothing, head coverings, manger, and shepherd’s staff. Dum Dums provide structure for the taller people.
Treat this project as an edible activity or temporary display. Because the pieces are unwrapped, warmed in children’s hands, shaped, and exposed to the work surface, do not store the finished scene as a yearly Christmas decoration.
Find more faith-centered activities in our collection of Nativity crafts for kids and Christmas crafts and printables.
Candy Nativity Supplies
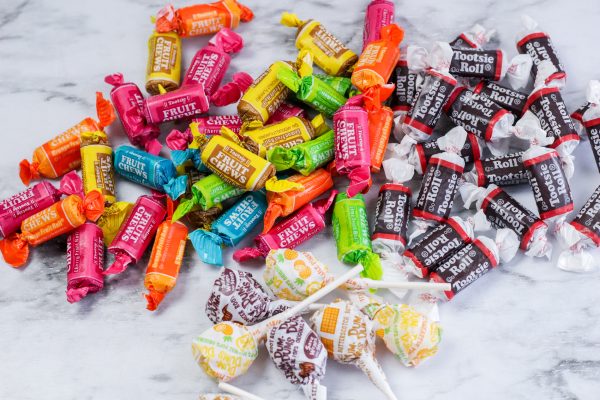
- Regular Tootsie Roll Midgees
- Fruit-flavored Midgees in several colors
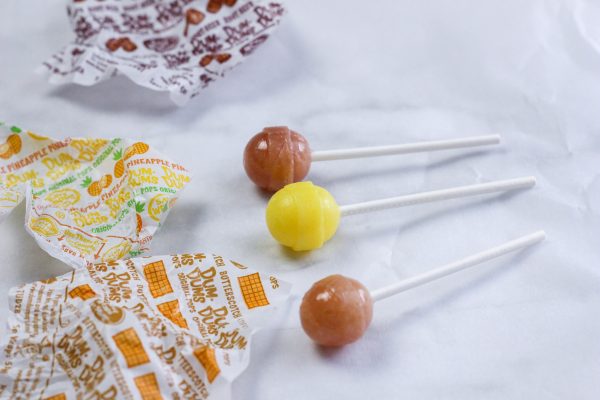
- Dum Dums in brown, tan, yellow, or other preferred wrapper colors
- A clean glossy plate, tray, silicone mat, or parchment-lined surface
- Food-safe scissors for an adult to shorten lollipop sticks, optional
- Disposable food-safe gloves, optional
The exact number of pieces depends on how many figures you create. Plan on two or three Midgees for each tall figure, one or two for a smaller figure, and four regular Midgees for the small bed.
Food Allergy and Choking Warning
Read every product label before serving or using sweets with a group. Ingredients and manufacturing statements can change. Check for milk, soy, wheat, peanuts, tree nuts, and other allergens relevant to your children or classroom. Hard candy and lollipops can be choking hazards. This activity is not suitable for babies or toddlers, and all children require direct adult supervision. Adults should cut lollipop sticks and handle any sharp tools.
How to Soften the Pieces for Shaping
Unwrap only the pieces you need. Hold one Midgee between clean hands briefly, until it becomes flexible. Roll or flatten it on a clean food-safe surface.
Do not microwave the sweets in the wrapper. Excessive heat can make them sticky, hot, or difficult to handle. If the pieces are very firm, place the unopened treats in a warm room for a few minutes before opening them.
How to Make a Candy Nativity Scene
Step 1: Choose the Figures
Decide how large you want the scene. A simple set can include Mary, Joseph, Baby Jesus, and a small bed. A larger scene might also include shepherds, wise men, angels, or animals.
Arrange the wrapped pieces on the plate before beginning so you can estimate how many each figure will require.
Step 2: Make the Tall Figures
Open two or three Midgees for each tall person. Soften the pieces in clean hands, then press them around a Dum Dum stick.
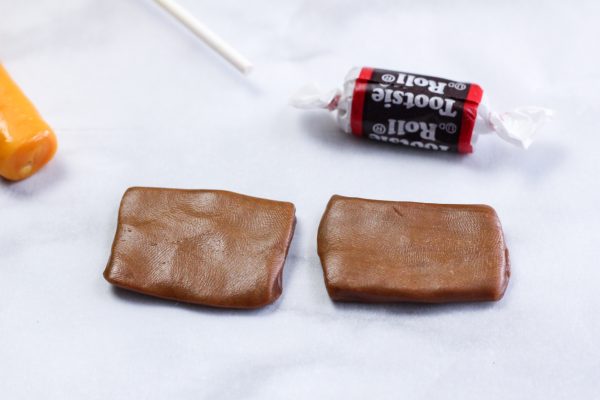
Leave about one-quarter inch extending below the bottom of the stick. Flatten this extra portion against the plate to create a small base that helps the figure stand.
Use regular brown Midgees for robes or combine fruit-flavored pieces to create colorful clothing for the people in your display.
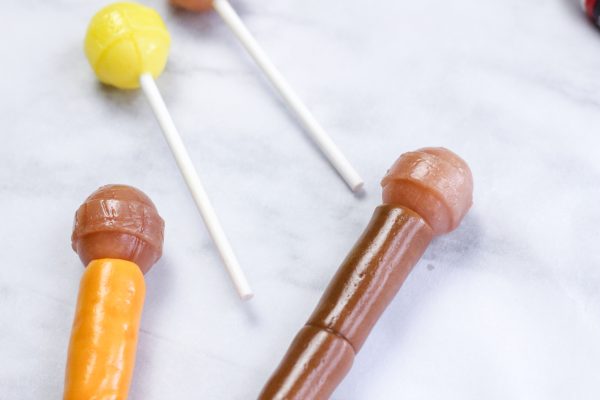
Step 3: Create Shorter Figures
Have an adult shorten the lollipop stick before adding the soft pieces. Check for sharp or splintered edges and discard any damaged stick.
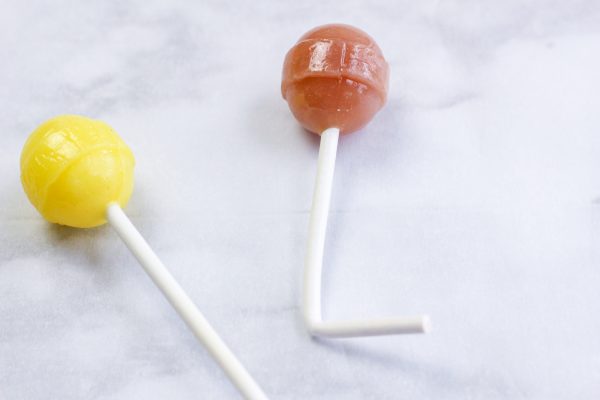
Press one or two softened Midgees around the shorter stick. Add a flattened base at the bottom, as you did for the taller figures.
Use the shorter size for kneeling figures, children, or other characters in the scene.
Step 4: Add Robes and Head Coverings
Flatten small pieces into thin shapes. Place them around the figures as cloaks, robes, belts, or head coverings.
Roll tiny pieces between your fingers to create simple facial details or accessories. Avoid making the figures too heavy on one side because they may tip over.
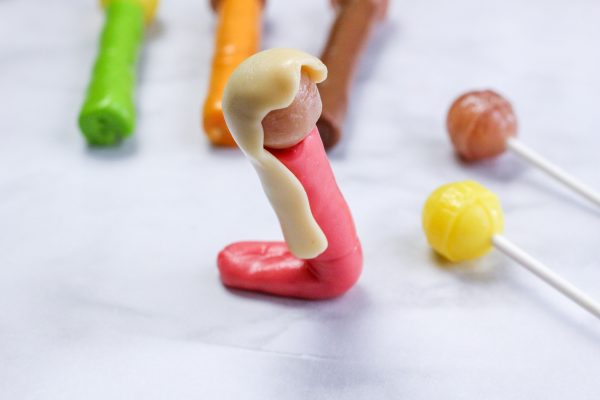
Step 5: Make Baby Jesus
Shape a small piece of light-colored candy into an oval for Baby Jesus. Add a thin, flattened piece of another color around the lower part to represent swaddling cloths.
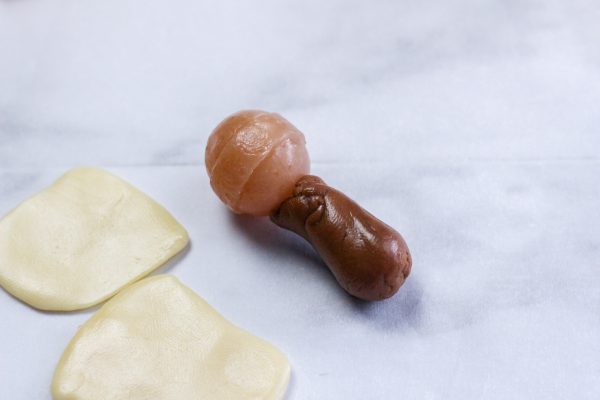
Keep this small figure compact enough to fit inside the little bed. You do not need a lollipop stick for this part.
Step 6: Build the Small Bed
Use four regular Midgees to form the manger:
- Flatten one Midgee into a rectangle for the bottom.
- Flatten two Midgees into long strips for the sides.
- Cut the fourth Midgee in half.
- Flatten the halves and use them to close the two short ends.
- Press the pieces together to form a small open box or trough.
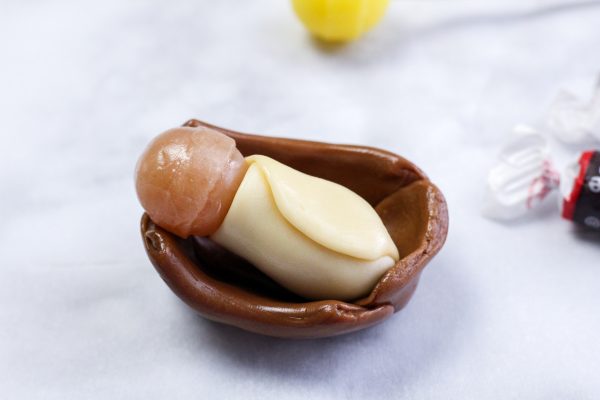
Place the small figure inside the finished piece.
Step 7: Make a Shepherd’s Staff
Use approximately half of a regular Midgee. Using your palm, gently roll it across a clean surface to make a thin, elongated strand.
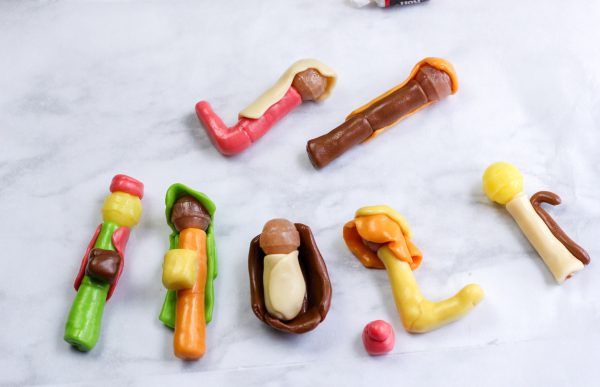
Bend one end into a curved hook to form the staff’s top. Gently press the straight end against the plate or into the figure’s robe.
Step 8: Arrange the Christmas Scene
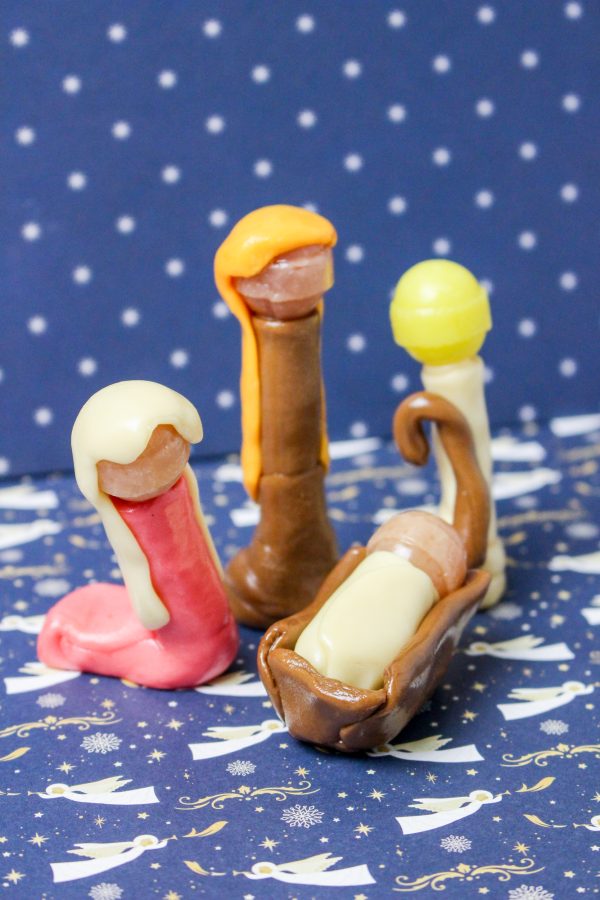
Place the small bed in the center of a clean glossy plate or tray. Arrange the main figures nearby, then add other characters.
Gently press each base against the surface. If a figure tips, widen the base with another small piece of softened candy or remove a heavy decoration.
Which Treats Work Best for a Christmas Craft?
Tootsie Roll Midgees work well because they soften with the warmth of clean hands and hold their shape after molding. Regular brown pieces resemble wood, robes, hair, and other details. Fruit-flavored pieces add color for clothing and accessories.
Dum Dums are useful as the hidden structure inside taller figures. If you want to experiment with substitutions, choose sweets that can be shaped without melting quickly. Soft caramels, fruit chews, gumdrops, licorice, or modeling chocolate may work, but texture and allergy information will differ.
Avoid treats that crumble easily or contain loose nuts when working with groups. A small marshmallow can work for simple heads or animals but may require a toothpick, which isn’t recommended for young children.
Is This Candy Nativity Edible?
It can be edible if you prepare it with clean hands, sanitized food-safe surfaces, fresh ingredients, and no non-food materials. If you plan to eat the project, do not use glue, markers, paint, plastic decorations, glitter, or a plate intended only for crafting.
Eat the pieces shortly after making them and discard anything that has been handled excessively, dropped, shared, or left uncovered for an extended period. Do not save an unwrapped edible display from year to year.
For a display-only version, label the project “Do Not Eat” and discard it after the event. Adults should decide whether eating the finished project is appropriate based on hygiene, allergies, the children’s ages, and the setting.
Teaching the Nativity Story
As children shape each character, read or retell Luke 2:1-20. Explain that Mary and Joseph traveled to Bethlehem, the Savior was born, and He was laid in a feeding trough. Shepherds received the announcement of His birth and went to see Him.
You can ask:
- Why was the newborn placed in a feeding trough?
- Who told the shepherds about His birth?
- How do you think Mary and Joseph felt that night?
- Why is the birth of Christ important to Christians?
- How can we show love and generosity at Christmas?
The wise men appear later in the biblical account, but they are often included in traditional displays. Older children can compare Luke 2 with Matthew 2 and discuss which people appear in each passage.
Pair the lesson with Nativity coloring pages, free Advent Scripture cards, or the Christmas story pop-up card.
Sunday School and Group Tips
- Ask families about food allergies before purchasing supplies in bulk.
- Keep all treats wrapped until the project begins.
- Wash hands and clean tables before distributing food.
- Give each child an individual tray or sheet of parchment paper.
- Pre-sort the pieces into separate bags so children do not reach into shared containers.
- Have adults shorten any lollipop sticks before class.
- Display one completed sample for inspiration, but encourage creative differences.
- Keep the Bible lesson separate from the eating portion so children can concentrate.
- Send the finished scene home in a shallow food-safe container if appropriate.
For groups where edible crafts are not allowed, choose the Baby Jesus toilet paper roll project, moving paper plate craft, or printable 3D Bible scene.
Candy Ideas for Older Kids
Older children can expand the basic scene by creating:
- Three wise men with colorful cloaks and crowns
- Figures holding molded staffs
- Sheep made from light-colored sweets
- An angel with flattened wings
- A star raised behind the central figures
- A stable made from gingerbread pieces
- A Bethlehem backdrop drawn on paper and placed behind the plate
- Small labels identifying each person in the story
For another edible Christmas kids project, make a graham cracker Nativity using half graham crackers for the walls and roof. Attach the cracker pieces with icing, then decorate with a candy cane, sugar sprinkles, coconut, or other edible details.
If the scene includes gingerbread, icing, pretzels, butter, or other foods, check every additional ingredient for allergens and cross-contact warnings.
Troubleshooting the Figures
The pieces are too hard: Let the wrapped treats warm to room temperature, then soften them briefly in clean hands.
The pieces are too sticky: Let them rest for a few minutes and handle them less. A cool room and clean, dry hands make shaping easier.
The figures fall over: Widen the base, shorten the figure, or remove heavy accessories.
The clothing will not stay attached: Press the softened layers together gently and smooth the edges with a fingertip.
The small bed separates: Warm the connecting edges slightly in clean hands, then press them together again.
More Nativity Crafts for Kids
- Baby Jesus in the Manger Craft
- Nativity Toilet Paper Roll Craft
- Nativity Diorama Printable Craft
- Nativity Scene Printable Craft
- Printable Nativity Matching Puzzle
- Advent Scripture Countdown Calendar
Make a Sweet Christmas Display
This edible recipe gives children a creative way to explore the birth story while shaping their own figures. Gather the supplies, prepare a clean work area, and enjoy a supervised project that combines Bible learning with holiday fun.
Afterward, photograph your creation for inspiration, share it with family on Facebook, or save the idea to Pinterest.
How Do You Make a Candy Nativity Craft?
Shape softened Midgees around Dum Dum sticks to form the main characters. Make a small figure and build a rectangular bed from four flattened pieces. Arrange everything on a clean glossy plate.
What Candies Work Best for the Scene?
Soft, moldable varieties work best. Midgees can form bodies, clothing, accessories, and structural pieces, while Dum Dums support the taller figures.
Can Children Eat the Finished Craft?
Only when it has been made with clean hands, food-safe tools and surfaces, fresh ingredients, and no non-food materials. Check allergen labels and supervise children closely. Discard pieces that have been shared, dropped, or left uncovered for too long.
What Age Is This Project For?
It is best for elementary-age kids and older because it uses hard sweets and lollipop sticks. Preschoolers require direct one-on-one adult supervision. It is not appropriate for babies or toddlers.
Can I Save the Finished Scene as a Decoration?
It is not recommended. Unwrapped sweets can collect dust, attract pests, and deteriorate. Photograph the finished project, then eat or discard it according to your food-safety plan.
Can I Build a Gingerbread Nativity Stable?
You can. Use cookie pieces and icing to create a square structure around the figures. Build it first and let the frosting set before arranging everything inside.
Candy Nativity Craft
Shape Tootsie Roll Midgees around Dum Dum sticks to create a candy Nativity scene with figures, a manger, Baby Jesus, and a shepherd's staff.
Materials
- Regular Tootsie Roll Midgees
- Fruit-flavored Tootsie Roll Midgees
- Dum Dums
- Clean glossy plate, food-safe tray, silicone mat, or parchment paper
Tools
- Food-safe scissors for adult use, optional
- Disposable food-safe gloves, optional
Instructions
- Wash hands, sanitize the work surface, and review all candy labels for allergens.
- Decide which Nativity figures you want to make and arrange the wrapped candy on the work surface.
- Soften two or three Midgees in clean hands and wrap them around a Dum Dum stick to make a tall figure.
- Leave about one-quarter inch of candy below the stick and flatten it to create a standing base.
- For shorter figures, have an adult shorten the lollipop stick before wrapping it with candy.
- Flatten small candy pieces to add robes, cloaks, belts, and head coverings.
- Shape a small oval for Baby Jesus and wrap the lower portion with a thin piece of candy.
- Flatten one regular Midgee for the manger bottom and two for the long sides.
- Cut a fourth Midgee in half, flatten the pieces, and use them to close the short ends of the manger.
- Roll half a Midgee into a thin rope and curve one end to form a shepherd's staff.
- Arrange the manger and figures on a clean glossy plate, widening the candy bases when needed.
Notes
- This activity is not suitable for babies or toddlers because candy and lollipop sticks can be choking hazards.
- Adults should shorten the sticks and supervise the entire activity.
- Check every package for current allergen and ingredient information.
- Use only food-safe tools and surfaces if children will eat the finished craft.
- Do not save an unwrapped candy Nativity from year to year.
- Photograph the scene before it is eaten or discarded.
