
Nativity Diorama Printable Craft For Kids (Free To Download)
Bring the Christmas story to life with this nativity diorama printable craft for kids.
Children can cut, fold, and assemble the paper pieces to create a 3D manger scene featuring Mary, Joseph, Baby Jesus, an angel, the Star of Bethlehem, and additional scenery.

Nativity Diorama Printable Craft for Kids
This Christ-centered Christmas craft gives children a creative way to explore the story of Jesus’ birth. Use it during a Christmas Sunday school lesson, a homeschool Bible study, a family Christmas activity, or a classroom unit on Christmas traditions.
The completed Christmas nativity scene can also be displayed beneath the Christmas tree, on a mantel, or beside your family’s other Christmas decorations.
This post may contain affiliate links. As an Amazon Associate and a participant in other affiliate programs, I earn a commission on qualifying purchases. Read our disclosure policy here.
Fisher-Price Little People Toddler Toy Nativity Set with Music Lights & 18 Pieces for Christmas Pretend Play Kids Ages 1+ YearsWillow Tree 6-Piece Nativity Set, Behold The Awe and Wonder of The Christmas Story, Build a Family Holiday Tradition with Classic Nativity Collection, Sculpted Hand-Painted Figures30 Pack 4 Inch Wood Nativity Cutouts Unfinished Wooden Bethlehem Nativity Hanging Ornaments DIY Bethlehem Nativity Craft Gift Tags for Home Party Decoration Craft Project


What Is a Diorama?
A diorama is a small, three-dimensional model that represents a particular place, scene, or event. This paper project recreates the scene with a folded-paper background and individual characters.
Unlike a flat coloring page, this 3D nativity allows children to arrange the characters and scenery in layers. This helps the entire scene appear to have depth while giving kids an opportunity to build something they can display.
As children assemble Joseph, Mary, and Baby Jesus, parents or teachers can use the activity to discuss the events recorded in Luke 2:1–20 and the birth of Jesus.
What Comes in the Printable?
This printable template includes the pieces needed to assemble one three-dimensional Christmas scene.
Children will find:
- Mary
- Joseph
- Baby Jesus
- The manger
- An angel
- The Star of Bethlehem
- Palm trees and background scenery
- A foldable diorama setting
- Cutting, folding, and placement guides

Supplies Needed
Gather these craft supplies before beginning:
- Nativity printable
- White cardstock
- Child-safe scissors
- Glue stick or double-sided tape
- Crayons, markers, or colored pencils, if applicable
- A ruler, optional
- A blunt butter knife or scoring tool, optional
Cardstock is recommended because it gives the finished project enough strength to stand upright. Regular printer paper can work, but the completed 3D scene will be less sturdy.
Adult help may be necessary when preschoolers and younger elementary children cut smaller pieces.
How to Make a Diorama
Before beginning, print the PDF on white cardstock using the “actual size” or 100% setting. Avoid scaling the template unless you intentionally want to make a smaller Christmas diorama.
Step 1: Print the Nativity Scene

Access the digital download and print all of the pages on white cardstock.
If your printer has different quality settings, choose a high-quality color version setting for the clearest results.
Step 2: Cut Out the Diorama
Carefully cut around the outside edges of the background and the individual figures.
Follow the Solid Lines When Cutting. Do not cut across the dotted line markings used for folding.
Younger children may need an adult to cut around the more detailed areas. It is also fine to leave a narrow white border around the characters instead of trying to cut directly against every small line.

Step 3: Fold the Background
Fold the background along the marked fold lines. A ruler can help little hands make straight, even folds.
For a cleaner crease, place a ruler along each fold line and gently run the dull side of a butter knife over the line before folding. This step should be completed by an adult.
Fold the tabs in the direction shown on the easy-to-follow instructions. Before adding glue, temporarily position the pieces to see how the complete background fits together.

Step 4: Assemble the Diorama Base
Apply glue or double-sided tape to the marked tabs. Connect the sides to form a stable, three-dimensional background.

Hold each glued section in place for several seconds. Allow the base to dry before adding the figures.
If the background leans or collapses, reinforce the back with an additional strip of heavy paper.

Step 5: Cut out and add the Nativity Characters
Cut out the Nativity characters and arrange Joseph, Mary, and Baby Jesus in a manger inside the scene. Begin with the Holy Family before adding the smaller decorative pieces.

Set the infant at the center and arrange His parents beside Him. Add the angel, star, and palm trees in the designated areas or arrange them in a way that works with your scene.

Check the complete arrangement before gluing anything permanently.
Step 7: Complete the Scene
Once you are happy with the placement, glue the figures securely inside the 3D nativity scene.

Allow the glue to dry completely and then place the finished project on a table, shelf, mantel, or classroom nativity display.
Children can also write their names and the year discreetly on the back. This turns the paper craft into a Christmas keepsake that families can display again.

Teaching the Nativity Story With the Diorama
This religious craft is more meaningful when it is paired with the biblical account of Jesus’s birth.
Share Luke 2:1–20 as a group while working on the activity or before getting started. Discuss the trip to Bethlehem and Christ’s birth, including how Mary swaddled the newborn and laid Him in a manger when there was no room for them to stay.
A heavenly messenger delivered the wonderful announcement to a person watching over the flock nearby:
Luke 2:11 tells us that a Savior, Christ the Lord, was born in David’s town that day.
They quickly went to see the newborn Jesus with His parents. After seeing Him, they shared what the angel had told them.
The wise men are part of the broader story of Jesus recorded in Matthew 2. However, the Bible does not say they visited Jesus on the same night as the others. If you add the three wise men from another set of printables, this distinction can become part of the lesson.
Questions to Discuss With Children
Use these questions while children assemble their nativity scene craft:
- Why did Mary and Joseph travel there?
- What was Baby Jesus placed in after His birth?
- Who told others about the birth of Jesus?
- What happened next after they heard the news?
- What makes the birth of Jesus meaningful to Christians?
- What emotions might they have experienced that night?
- How does the birth of Jesus help us understand God’s love?
- What are some ways we can spread Christmas cheer to those around us?
For younger children, concentrate on identifying the people in the scene. Older kids can read the Bible passage aloud and retell the events in their own words.
Learning Benefits of This Printable Project
Making this scene craft combines art, reading, sequencing, and hands-on learning.
Children practice:
- Fine motor skills
- Scissor skills
- Folding and gluing
- Hand-eye coordination
- Following directions
- Visual-spatial thinking
- Story sequencing
- Bible-story comprehension
- Creative expression
The project is best suited to kindergarten and elementary-aged children. Little ones can participate with an adult’s help, particularly during cutting and assembly.
Older children can expand the activity by writing a description of the story of Jesus’ birth or adding their own handmade background elements.
Sunday School Christmas Craft
This free Christmas printable works well during a Sunday school lesson about Jesus’ birth. Print the pages before class and organize the supplies at individual workstations.
For younger classes, consider cutting out the detailed figures in advance. Children can still help with coloring, folding, arranging, and gluing the scene.
A simple lesson plan could include:
- Read Luke 2:1–20.
- Talk about the people in the Christmas nativity story.
- Show children a finished model.
- Assemble the craft printable together.
- Review the story using the completed scenes.
- Close with prayer or a Christmas worship song.
Write each child’s name on the back before the class begins so the finished projects do not become mixed up.
Homeschool Christmas Activity
This diorama craft for kids can also be part of a complete homeschool Christmas lesson, providing a fun and interactive way to learn.
Pair it with:
- Reading Luke 2
- Finding the biblical town on a Bible map
- Learning what a manger is
- Comparing homes and buildings from biblical times
- Writing a narration of Jesus’ birth
- Memorizing Luke 2:11
- Singing a Christmas hymn
- Discussing the meaning of Advent
After completing the 3D paper craft, ask children to use their creations to retell the story in the correct sequence and to engage with it through hands-on play.
Creative Ways to Use the Finished Diorama
Christmas decoration
Display the easy nativity on a mantel, bookshelf, entryway table, or beneath the Christmas tree.
Sunday school display
Arrange all the finished projects together to create a Christmas Sunday school display.
Storytelling tool
Children can point to the characters as they retell the story to parents, siblings, or classmates.
Christmas Eve activity
Make this perfect Christ-centered craft for Christmas as a quiet family activity before reading the Christmas story together.
Handmade gift
Children can give the finished Christmas scene to a grandparent, Sunday school teacher, or family friend.
Bible verse display
Add a small paper banner containing Luke 2:11 or another Christmas Bible verse.
GDGZT Kids Nativity Play Set with Light,17 PCS Christmas Religious Toys Small Nativity Set for Kids Toddler, Children Nativity Scene Include Manger Baby Jesus Figures Christian Religious GiftsThe First Christmas: The Bible’s Nativity Story (God’s Big Picture Bible Stories)HARDWIND 25pcs Nativity Set for Kids, Christmas Story Playset Figurine, Little Nativity Toddler Toy, Nativity Scene Set for Children Ages 1 2 3 4 5 6+BibleToys Nativity Set – Christmas Story Manger Scene, 18 Pieces With Birth of Baby Jesus Mini-Storybook (in English & Spanish), Little Animals & Figures Indoor Playset, Children Ages 3 And UpThe Christmas Promise: A True Story from the Bible about God’s Forever King (Illustrated Christian Christmas gift for kids ages 3-6 telling the nativity story) (Tales That Tell the Truth)Peanuts Christmas Nativity Figure Set, 8-inch Collectible Figures, Decorations and Toys, Kids Toys for Ages 3 Up by Just Play


Helpful Tips for Assembling the Diorama
- Choose heavier paper to help the finished project hold its shape.
- Add color before trimming the pieces.
- Trim along the solid lines and crease along the dotted ones.
- Test the placement of every piece before gluing.
- Use a glue stick to avoid soaking the paper.
- Reinforce the back if the box craft needs more support.
- Let the base dry before adding the figures.
- Keep the finished creation away from candles and other open flames.
- Store it in a shallow box to prevent crushing.

More Nativity Crafts for Kids
Continue learning about the Christmas story with these activities:
- Nativity Printable 3D Scene
- Moving Nativity Paper Plate Craft
- Candy Nativity Craft
- Simple LEGO Nativity Scene
- Nativity Crafts and Printables for Kids
Get the Free Christmas Diorama Printable
This free printable offers children a hands-on way to celebrate the season’s true meaning while creating a Christmas decoration they can proudly display.
Print the pieces, color them if applicable, cut around the solid lines, fold the background, and assemble the figures to create your own Christmas manger display.
Is this printable free?
Absolutely. The Christmas craft with printable is available for free through the email form at the bottom of this post. Enter your email address, and the PDF will be delivered to your inbox.
Where is the printable download?
The email form is located at the very bottom of the post. This should be stated clearly near the beginning because one reader has already commented that she could not find the link.
What age is this project for?
The project is best for kindergarten and elementary-aged children. Preschoolers can help color and glue the scene but will probably need adult assistance with cutting and folding.
Should I use paper or cardstock?
Heavier paper is the best choice because it helps the structure stand upright. Regular printer paper can be used, but it may need reinforcement.
Does the printable include a complete nativity set?
The included pieces form a single scene with Mary, Joseph, Baby Jesus, an angel, the star, and background elements.
Is this activity suitable for a church class?
Of course. This project is suitable for Sunday school, children’s church, Christian classrooms, homeschool groups, and family Bible lessons.
Can children color the nativity scene?
The current diorama is provided in color and is ready to cut and assemble.
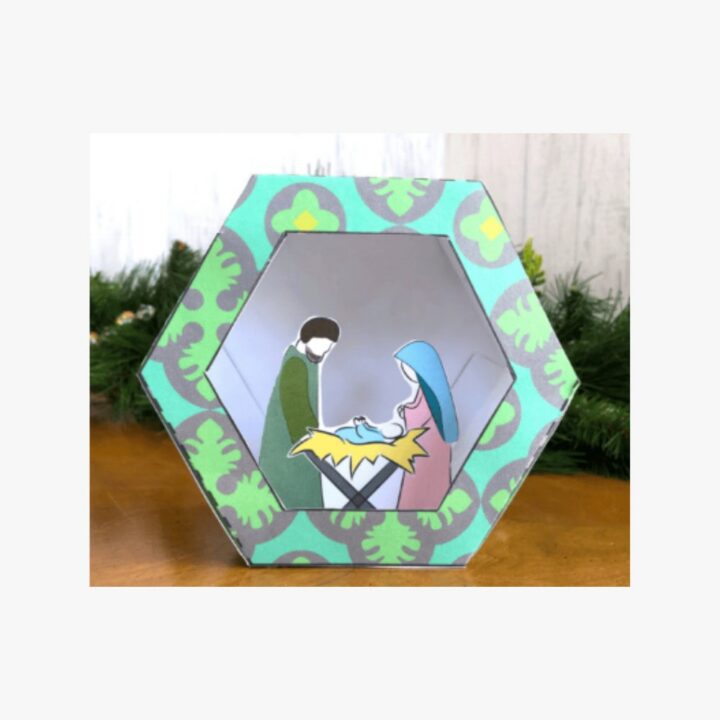
Nativity Diorama Printable Craft
Create a three-dimensional nativity scene featuring Mary, Joseph, Baby Jesus, an angel, the Star of Bethlehem, and beautiful background scenery. This printable Christmas craft is perfect for Sunday school, homeschool, or family Bible time.
Materials
- Nativity diorama printable
- White cardstock
- Crayons, markers, or colored pencils, if using a coloring template
- Glue stick or double-sided tape
Tools
- Printer
- Child-safe scissors
- Ruler, optional
- Blunt scoring tool, optional
Instructions
- Print the nativity diorama PDF on white cardstock at 100% or actual size.
- Color the pieces before cutting if you are using a black-and-white template.
- Cut around the solid outside lines of the background and individual figures. Do not cut the dotted folding lines.
- Fold the background and tabs along the marked lines.
- Apply glue or double-sided tape to the indicated tabs and assemble the three-dimensional base.
- Arrange Mary, Joseph, Baby Jesus, the angel, star, and scenery inside the diorama.
- Test the placement of all the pieces before gluing them permanently.
- Glue the characters and scenery in position.
- Allow the diorama to dry completely before displaying it.
Notes
- Cardstock produces a sturdier diorama than regular printer paper.
- Younger children may need adult assistance with cutting and folding.
- A glue stick works better than liquid school glue because it will not oversaturate the paper.
- Store the finished craft in a shallow box to prevent it from being crushed.
- Keep this paper craft away from candles and open flames.

I can’t find the digital link to download on this post
Scroll to the very bottom of the blog post and enter your email in the opt-in box. The printable will be emailed to you.