
Thanksgiving Crowns Printable: 8 Free PDF Designs
These printable Thanksgiving crowns turn a few simple supplies into a fun and festive craft for kids. Choose a design, decorate the pictures, cut out the front, and add a paper band to fit comfortably around the head.
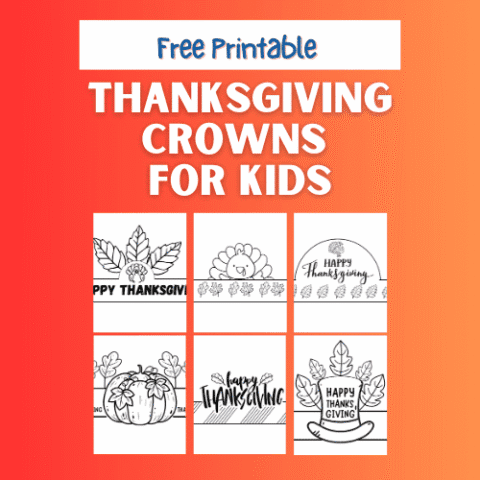
This free printable Thanksgiving collection includes eight styles featuring turkeys, a pumpkin, fall leaves, and seasonal greetings. These adorable headbands are perfect for kids during a family craft afternoon, holiday party, or school celebration.
Find more seasonal projects in our Thanksgiving crafts and printables collection.

Download the Free Thanksgiving Crowns PDF
Use the download link below to save the PDF file. Choose one favorite template or prepare several sheets so children can select their own turkey hat or seasonal headpiece.
Each of the eight pages has one front section with an attached horizontal band. Extension strips aren’t included, so keep extra paper or cardstock nearby to make the headband long enough.
These free printables offer an easy Thanksgiving craft idea for children who enjoy making wearable decorations.
What Designs Are Included?
Page 1: Turkey and greeting. A large turkey sits above a band that says “Happy Thanksgiving.”

Page 2: Turkey with arched lettering. The holiday name curves over the turkey’s feathers, with a plain band below. This turkey hat template makes a cute wearable accessory.

Page 3: Pumpkin and fall leaves. A large pumpkin fills the center, with autumn foliage behind it and a greeting on either side.

Page 4: Hat and leaves. A tall, brimmed pilgrim-style hat with festive lettering is surrounded by seasonal foliage.

Page 5: Smiling turkey and leaf band. A cheerful bird peeks above a narrow strip decorated with repeating leaves. This printable turkey hat makes an adorable accessory.

Page 6: Thanksgiving lettering. Decorative holiday words rise above a striped band.

Page 7: Rounded greeting crown. A rounded center features a small turkey and seasonal message, with leaves across the band.

Page 8: Leaves and turkey. Large leaves rise above a small bird, with a greeting across the band.

The templates are primarily black-and-white line art, similar to coloring pages. Page 7 includes brown-toned lettering. There is no separate full-color set or pumpkin pie version.
Supplies You Will Need:
- Downloaded crown templates
- White printer paper or printer-compatible cardstock
- Crayons, colored pencils, or washable markers
- Scissors
- Tape or glue stick
- Extra paper or cardstock for extension strips
- Pencil and ruler, optional
Construction paper is an optional choice for the back band. You don’t need it to decorate the artwork.
Regular paper is easier for beginning cutters. Cardstock creates a sturdy base for the tall turkey, hat, and leaf illustrations.
This post may contain affiliate links. As an Amazon Associate and a participant in other affiliate programs, I earn a commission on qualifying purchases. Read our disclosure policy here.



Printing Tips
Choose landscape orientation and the paper size loaded in your printer, such as US Letter or A4.
The file uses a nonstandard landscape page size, so select Fit to printable area and check that the entire illustration appears in the preview. Using actual size may crop the artwork on standard sheets.
Test one page before making a classroom pack. Use single-sided copies so children can decorate, trim, and put together their own headpieces independently.
How to Make a Thanksgiving Crown
1. Choose and Color a Design
Let children select their favorite sheet and decorate it while the paper is still flat.
Try brown feathers, orange for the harvest illustrations, or a mix of red, yellow, and green for the foliage. Kids will love experimenting with creative combinations.
If using a marker, place scrap paper underneath to protect the table. Let any wet embellishments dry before cutting.
2. Cut Out the Crown Front
Trim around the outside of the combined illustration and horizontal band. Keep the artwork connected to its base.
The feathers, foliage, and decorative lettering have detailed edges. Adults can help with these sections or leave a small white border to make cutting easier.
Do not separate the individual leaves or bird features.
3. Make a Back Band
Cut a piece of extra paper or cardstock approximately as wide as the horizontal strip. Make it long enough to reach around the back of your child’s head, allowing overlap at both joins.
Attach one end of the extension to the back of the printed front with adhesive. If one strip is too short, connect two with a secure overlap.
Adhesive tape is convenient when children want to wear their Thanksgiving turkey hat right away. If using glue, allow the join to dry before fitting.
4. Check the Fit
Gently wrap the headpiece around the child’s head and overlap the loose ends. It should sit comfortably without squeezing or slipping over the eyes.
Mark the overlap, remove the headband, and secure the final join. Trim excess material if needed.
Use a paper extension rather than elastic for this simple version. No hole punching or elastic measurements are required.
5. Wear and Celebrate
Inspect both joins and any rough edges before wearing. Children can enjoy their creations during Thanksgiving dinner, story time, or family photos.
Remove the headpiece if it becomes uncomfortable or gets in the way.
Make the Craft Easier for Preschoolers
Prepare the artwork and paper extensions before the activity. Young children can focus on decorating and choosing their favorite illustration while an adult handles fitting and assembly.
Use a large crayon and a limited selection of shades to keep setup simple. Skip heavy embellishments that may bend the material or pull the headpiece forward.
Children who prefer not to wear a Thanksgiving hat can glue their finished artwork onto another sheet for display.
Pair this craft for kids with our free printable Thanksgiving activities for drawing, games, and additional inspiration.
Prepare Crowns for a Classroom Group
Check the download’s usage terms before reproducing the file. Once you confirm permission, prepare one template per child and a few extras.
Cut a supply of plain extension strips in advance. Arrange art materials on each table and keep fitting supplies at an adult assembly station.
Write each youngster’s name inside the band before fitting. For mixed cutting skills, offer both uncut sheets and prepared fronts.
Keep one finished example nearby so children can see how the flat artwork becomes a wearable headband.
Add a Thankfulness Activity
Ask children to name one person or thing they appreciate. Write their answer on the back band, or let older children complete the sentence, “I am thankful for…”
This is an optional addition rather than a printed prompt in the original templates.
Continue the conversation with our Thanksgiving thankful tree printable or I Am Thankful For worksheets.
Fix Common Crown Problems
The headband is too small: Add a longer paper extension. Keep enough overlap for secure joins instead of stretching it tightly.
The headpiece slides down: Shorten the back strip slightly and check the fit again before securing it.
The tall illustration flops forward: Use cardstock or reinforce the back with a matching piece of thicker material. Keep additional decorations lightweight.
The ends come apart: Reinforce both sides of the join with adhesive. Allow glued overlaps to dry completely before wearing.
The printed artwork is cut off: Check landscape orientation and select Fit to printable area. Preview the entire sheet before trying again.
More Thanksgiving Crafts for Kids
Make a Build a Turkey printable for a fun and easy cut-and-paste project, or create a turkey paper bag puppet for storytelling.
For a keepsake, try our printable turkey handprint poem. Browse more Thanksgiving crafts and printables to plan activities the whole family can enjoy.
Are the Thanksgiving crowns printable free?
Yes. The file shared with this post is a freebie. You only need paper, printing materials, and basic supplies.
How many crown templates are included?
There are eight pages, each featuring a different front illustration and attached band.
Are extension strips included?
No. Cut your own back strip from extra paper, cardstock, or construction paper, then adjust it to fit the wearer.
Can I print the crowns in black and white?
Yes. Most illustrations are outlined for decorating. Grayscale output will also convert the brown-toned greeting on page 7 to gray.
Do I need to cut around every small detail?
No. Leave a narrow white border around intricate foliage, feathers, or lettering. Younger children may need adult assistance.
How long does the craft take?
Allow about 15–25 minutes for decorating, cutting, and assembly. Pre-cut sheets require less time, while detailed artwork may take longer.
Can I save the crown as a keepsake?
Yes. Write the youngster’s name and year inside. Carefully open the taped-back join and store the finished headpiece flat in a folder once dry.
Printable Thanksgiving Crown
Color a Thanksgiving crown template, cut out the front, and add a paper band for a comfortable fit.
Materials
- 1 printed Thanksgiving crown page
- Extra paper or cardstock for the back band
- Crayons, colored pencils, or washable markers
- Tape or glue stick
Tools
- Printer
- Scissors
- Pencil and ruler, optional
Instructions
- Print one crown page in landscape orientation using Fit to printable area.
- Color the design while the sheet is flat.
- Cut around the crown front and attached band, keeping them together.
- Cut a plain paper extension approximately the width of the printed band.
- Attach the extension behind one end of the crown front.
- Fit loosely around the child’s head, mark the overlap, and remove.
- Secure the final join and check that the crown is comfortable.
Notes
Extension strips are not included in the PDF. Cardstock supports taller designs. Adults can simplify cutting by leaving a white border around detailed edges.

There is no button to print this free printable
Hi, the download button is at the bottom of the blog post – enter your email address and click on the green “Subscribe” button.
😊