
Easy Reindeer Frosting Board for Christmas
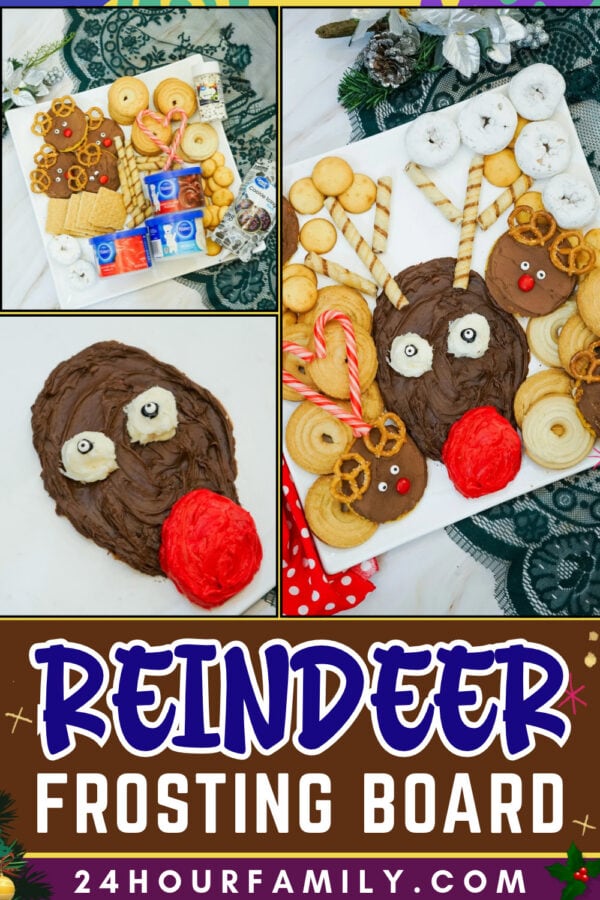
Make a Rudolph-inspired Frosting Charcuterie Board with chocolate icing, wafer antlers, and a bright red nose. Surround the adorable face with assorted dippers so everyone can enjoy a serving of this festive creation.
This no-bake recipe uses ready-made products for a simple shortcut. Shape the face with a spoon or spatula, add facial features, and fill the rest with your favorite snacks.
Serve this holiday platter on Christmas Eve, during family movie nights, or at holiday gatherings. Find more themed platters in our charcuterie board collection.
What Is a Rudolph Dessert Frosting Board?
This Christmas creation features a chocolate spread shaped into Rudolph’s face on a serving platter.
Rolled wafer sticks form the antlers, white icing and candy eyes complete the expression, and a bright red mound becomes the nose.
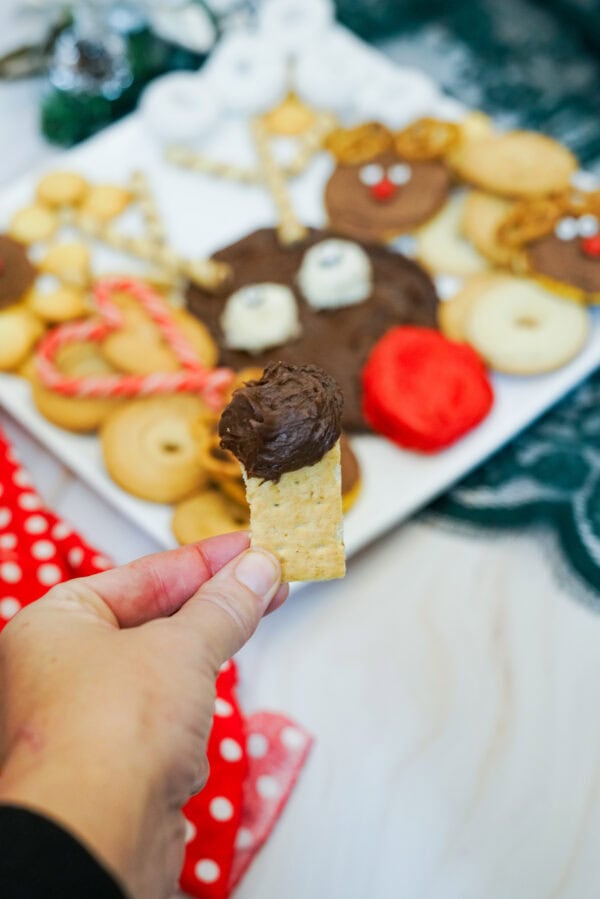
Serve the surrounding snacks with the creamy mixture. Although some call it dessert charcuterie, this version features sugary accompaniments rather than traditional meat and cheese.
For a savory option featuring the same holiday character, try our Rudolph cheeseball.
Ingredients for This Reindeer Frosting Board
For one medium platter, gather:
- About 1½ cups chocolate frosting, divided between the face and optional decorated biscuits
- About 2 tablespoons white vanilla frosting
- About 3 tablespoons red frosting
- 2 edible candy eyes for the large Rudolph face
- 6 rolled wafer sticks, or enough to form two branching antlers
- About 4 cups assorted dippers
For four optional small Rudolph biscuits:
- 4 round cookies
- Chocolate icing reserved from the amount above
- 8 small pretzel twists
- 8 additional candy eyes
- 4 red candy-coated chocolates
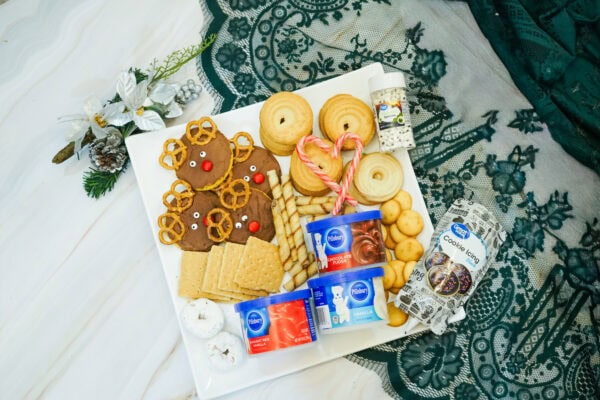
Adjust these measurements based on your platter size and how thickly you spread the chocolate layer.
Choose Spreadable Icing
Choose an icing that stays in place but stays soft enough to spread easily.
Prepared chocolate frosting adds brown color without extra food coloring. Vanilla creates the lighter areas around the eyes, while the red variety gives Rudolph his recognizable nose.
Homemade buttercream is another option, although you may need to follow different storage guidelines.
Skip watery icing that could flow beyond the intended shape. Keep the facial details visible until everyone is ready to serve themselves.
What to Serve with This Festive Platter
Select sturdy dippers that can support a small amount of the chocolate mixture without crumbling.
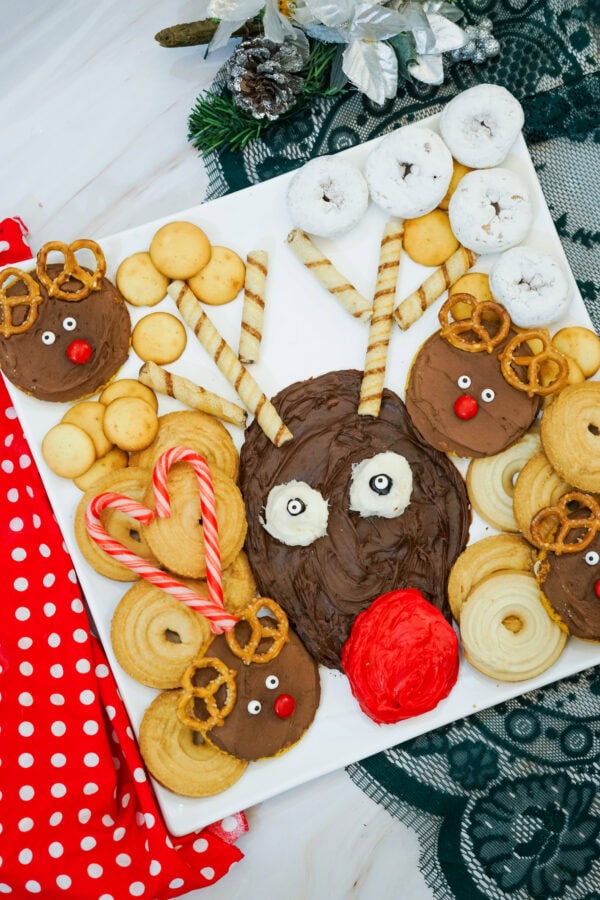
The photographed arrangement features assorted biscuits, rolled wafers, powdered doughnuts, and candy canes.
Other options include:
- Graham crackers
- Vanilla wafers
- Butter biscuits
- Shortbread
- Pretzels
- Chocolate sandwich biscuits
- Brownie bites
- Sugar cookies
- Cubes of firm pound cake
You don’t need to include everything listed. Offering three or four varieties provides plenty of choices while keeping preparation simple.
You can also serve fresh fruit alongside the platter. Wash and thoroughly dry each piece, then offer it in a separate bowl to prevent excess moisture from reaching the crisp dippers.
Equipment You Will Need
- A large, food-safe serving tray
- A spoon or small offset spatula
- Small bowls for the spreads
- A piping bag or zip-top pouch, optional
- Serving plates
- A clean serving spoon or spreader
- Tongs for the dippers
A plain white platter provides a nice contrast against the brown chocolate face and bright red nose.
Pick a serving surface that leaves plenty of room above the head for the antlers and along the edges for the snacks. If your icing needs to stay chilled, make sure the tray fits inside your refrigerator before assembling everything.
For wooden serving boards, placing parchment under the design can make cleanup easier afterward.
How to Make a Rudolph Frosting Board
1. Plan the Layout
Start with a serving platter that’s cleaned and completely dried.
Allow enough room along the upper edge for the antlers and around the sides for the dippers. Placing the face slightly below the middle gives extra space for the branching wafer pieces.
Set the surrounding snacks aside while you assemble the main design.
2. Spread the Chocolate Face
Place the chocolate frosting in the middle of the serving surface.
With a spoon or spatula, gently spread it into a rounded oval. Keep the layer thick enough for guests to scoop onto their individual plates.
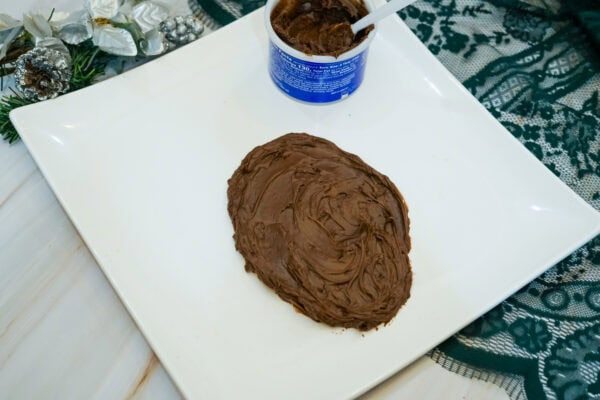
Smooth the outer edges without worrying about making the surface perfectly flat. A few visible swirls can give the chocolate mixture a more appealing texture.
Set aside a small portion if you plan to decorate the smaller Rudolph biscuits.
3. Add the Red Nose
Spoon a rounded portion of red icing near the bottom of the chocolate face.
Carefully form a circle, allowing it to overlap the brown layer just enough to connect the two areas.
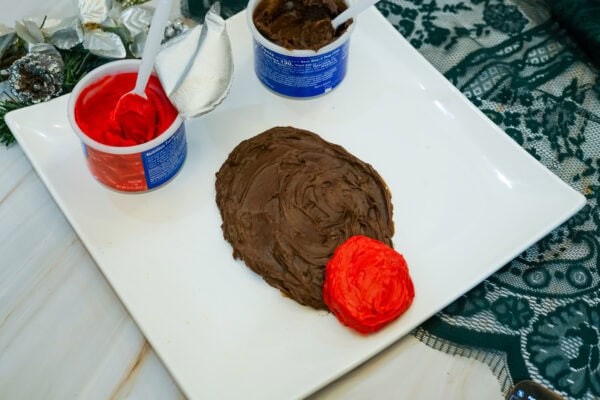
Refine the edges with a clean spoon or piping tool until the nose has a recognizable shape.
4. Make the Eyes
Spoon two small circles of white icing above the red nose.
Gently position one edible candy eye in the middle of each white area.
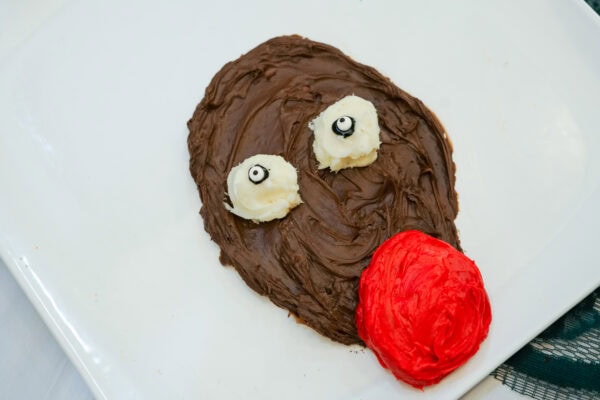
Keep the two eyes slightly apart so the character’s expression remains easy to identify.
5. Arrange the Wafer Antlers
Place a rolled wafer near each upper side of Rudolph’s head, pointing outward.
Use shorter pieces beside the main wafers to form the branching sections.
Rest each piece against the serving surface and gently press its lower end into the chocolate spread. This provides a little support without requiring the antlers to stand upright.
6. Add Small Rudolph Biscuits
Prepare the optional decorated pieces separately, then position them around the larger face.
Follow the instructions in the next section for assembling each one.
7. Fill the Remaining Space
Position the dippers in small clusters around the central design.
Vary their shapes and colors, but keep Rudolph’s eyes, nose, and antlers uncovered.

Put any extras in a separate serving bowl instead of filling every available space on the tray.
8. Add Serving Utensils
Place a clean spreader or spoon beside the chocolate mixture, along with tongs for selecting the dippers.
Everyone can transfer their preferred portions onto individual plates rather than sharing directly from the display.

How to Make the Mini Reindeer Cookies
These smaller Rudolph-inspired goodies complement the central design and provide another fun addition to the holiday presentation.
For each piece:
- Coat the top of a round biscuit with a thin layer of chocolate icing.
- Attach two small pretzel twists near the upper edge to resemble antlers.
- Position a pair of candy eyes underneath the pretzels.
- Finish with one red candy-coated chocolate in the center for the nose.
A little additional icing can help hold the edible features in place.
Prepare four pieces for the suggested arrangement, or make a larger batch to offer separately.
The smaller versions are optional, so the main Rudolph face can still serve as the centerpiece on its own.
Tips for a Recognizable Rudolph Face
Begin with a smaller portion of icing.
Gradually add more as you form the oval, rather than spreading too much at once.
Allow enough room for the antlers.
Test their placement before arranging the surrounding snacks.
Give Rudolph a rounded red nose.
Keeping this feature distinct makes the familiar character easier to recognize.
Avoid covering the eyes.
Position the nearby dippers away from the white patches and candy details.
Arrange similar dippers in clusters.
Grouping matching pieces keeps the display organized and makes refilling easier.
Maintain a flat serving surface.
A level platter prevents the creamy layer and loose edible details from shifting.
Can You Make This Platter Ahead?
You can complete some preparation before your celebration.
Form the chocolate face and apply the red and white details. Use a cover that keeps it away from the design, then follow the manufacturer’s storage instructions.
Position the candy eyes, wafer antlers, and surrounding accompaniments just before serving to keep them crisp and looking their best.
Place the dry dippers in sealed containers until you are ready to assemble the display.
If the mixture requires refrigeration, take it out only long enough to soften slightly for serving, and monitor the total time it remains unrefrigerated.
How to Transport the Platter
Prepare the chocolate face on the same serving tray you’ll display at your destination.
Choose a deep container or protective lid that leaves enough clearance above the design.
Pack the wafer antlers, dippers, and smaller edible details separately, then finish arranging everything once you arrive.
Carry the platter on a stable, level surface. When refrigeration is required, use an appropriate chilled container during transportation.
Serving and Storage
Always check the storage guidance for your selected icing. Homemade buttercream, cream cheese-based mixtures, whipped varieties, and canned products can require different handling.
Refrigerate perishable ingredients at 40°F or below until they are needed. Food requiring temperature control should be discarded after more than two hours without refrigeration, or after one hour when the surrounding temperature exceeds 90°F. See FDA Guidelines here.
Offer individual plates and clean serving utensils so everyone can portion out the chocolate mixture without repeatedly dipping into the shared arrangement.
Keep leftover dry dippers in separate containers. Don’t mix any icing already transferred onto someone’s plate back into the remaining shared portion.
Easy Variations Of This Charcuterie Dessert Board:
Smaller Family Platter
Reduce the chocolate face size and arrange a smaller selection of dippers around it.
Keep unused icing in its original container, and add more to the serving area as needed.
Chocolate Lover’s Board
Choose chocolate sandwich cookies, brownie bites, and chocolate-dipped pretzels.
Balance the richer flavors with a few plain biscuits.
Salty-and-Sweet Platter
Combine pretzels and plain crackers with buttery biscuits for a mixture of salty and sugary flavors.
Homemade Buttercream Version
Prepare your preferred chocolate and vanilla buttercream recipe.
Set aside a portion of the vanilla mixture and color it red with icing-safe food coloring.
Dietary Adaptations
Select spreads, dippers, and edible details that accommodate different dietary needs.
Read the packaging for every product, especially the wafer sticks, pretzels, and candy eyes. Label the platter dairy-free, gluten-free, or allergen-free only when the full ingredient selection and preparation meet those requirements.
Rudolph Platter Troubleshooting
The chocolate layer spreads beyond the intended shape.
Try a thicker mixture and avoid heating it too much. Follow the product directions when adjusting the consistency.
The antlers will not stay in position.
Rest them flat against the tray, gently securing their ends in the chocolate layer. If transporting the display, wait until you reach your destination before adding them.
The candy eyes keep sliding.
Attach them closer to serving time, and make sure the white icing underneath isn’t too thin.
The biscuits lose their crispness.
Store dry dippers away from the creamy mixture until needed, and keep them separate from damp fruit.
The serving arrangement feels overcrowded.
Move some snacks into another bowl, leaving enough open space for the facial features to stand out.
The red nose blends into the chocolate.
Finish shaping the brown oval first, then apply the red icing with a different clean utensil.
More Christmas Party Food and Activities
Pair this festive platter with our Rudolph cheeseball for a savory snack featuring the same familiar character.
For more creative serving ideas, browse our Santa-themed charcuterie board and the collection of creative charcuterie board ideas.
Keep everyone entertained with Pin the Nose on Rudolph, or plan a large gathering with these ugly Christmas sweater party ideas.
You can also browse our Christmas crafts and printables for more family activities throughout the holiday season.
Can I use store-bought icing?
Ready-made chocolate, vanilla, and red varieties work well for this recipe. Choose products thick enough to maintain the shape of Rudolph’s facial features.
Is a frosting board the same as a buttercream board?
A buttercream board specifically uses buttercream, but you can also use other spreadable icing varieties for a frosting board.
Do I need piping tools?
A spoon or small spatula is all you need to form the face, round nose, and white patches around the eyes.
What makes the antlers?
The photographed platter features rolled wafer sticks positioned to resemble a pair of branching antlers.
Can I use pretzels instead?
Pretzel rods paired with shorter pieces offer another way to shape Rudolph’s antlers.
Are the small Rudolph biscuits required?
The smaller decorated biscuits are optional, so you can leave them out without affecting the main design.
Can I add fresh fruit?
Fresh fruit works well as an additional dipper. After washing, dry it completely and serve it separately to prevent moisture from softening the other snacks.
How should guests enjoy this platter?
Transfer some of the creamy spread onto individual plates using a clean serving utensil. Everyone can then choose their preferred dippers with tongs.
Can I prepare it the day before?
You can assemble the main design a day early, as long as you follow the icing’s storage instructions. Arrange the crisp accompaniments and edible details shortly before serving.
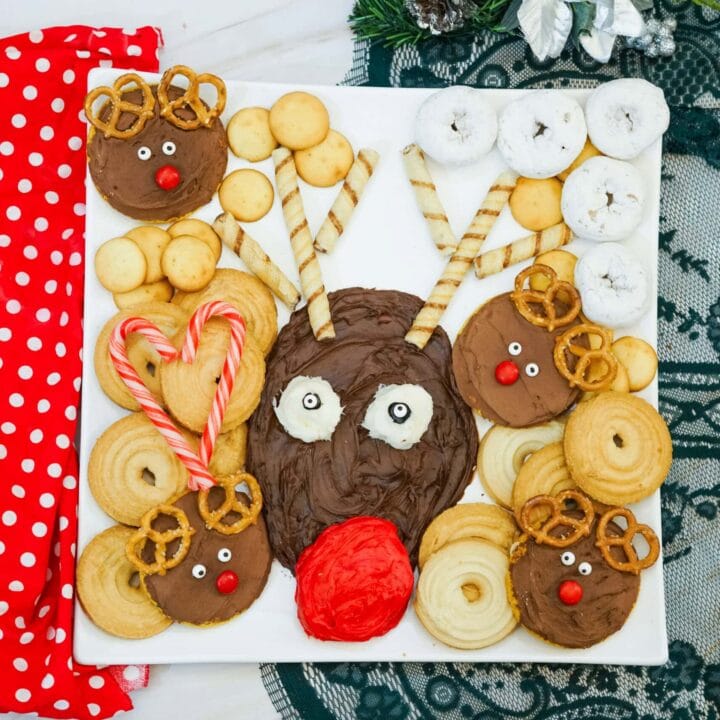
Reindeer Frosting Board
A no-bake Rudolph dessert board with chocolate frosting, wafer-cookie antlers, a red frosting nose, and assorted cookie dippers.
Ingredients
- 1½ cups chocolate frosting, approximately, divided
- 2 tablespoons white vanilla frosting, approximately
- 3 tablespoons red frosting, approximately
- 2 edible candy eyes
- 6 rolled wafer cookies, with some broken into shorter antler branches
- 4 cups assorted cookies and dippers, approximately
- 4 round cookies
- Chocolate frosting reserved from the amount above
- 8 mini pretzel twists
- 8 additional edible candy eyes
- 4 red candy-coated chocolates
Instructions
- Prepare the platter. Set out a clean, dry platter. Leave room above the face for antlers and around the sides for dippers.
- Reserve frosting for the cookies. If making the mini reindeer cookies, set aside enough chocolate frosting to spread over four cookies.
- Shape the face. Spread the remaining chocolate frosting into a rounded oval in the center of the platter.
- Add the nose. Place the red frosting at the lower edge of the face and shape it into a round Rudolph nose.
- Make the eyes. Add two white frosting rounds above the nose. Place one candy eye on each.
- Arrange the antlers. Position two rolled wafer cookies at the upper sides of the head. Add shorter pieces to form branches.
- Decorate the optional cookies. Frost each round cookie with chocolate frosting. Add two pretzel antlers, two candy eyes, and one red candy nose.
- Arrange the dippers. Place the decorated cookies and assorted treats around the frosting face, keeping its features visible.
- Serve. Provide a clean serving spoon or spreader, tongs, and individual plates.
Notes
- Ingredient amounts vary with platter size and frosting thickness.
- Add cookies and wafer antlers close to serving for the best texture.
- Follow the storage directions for your chosen frosting.
- Use the applicable two-hour limit for perishable ingredients outside temperature control, reduced to one hour above 90°F.
- Check ingredient labels for allergens.
- Adapt hard candy and small decorations for the ages of the children being served.
