
Free Grinch Pumpkin Carving Template and Printable Stencil
Bring a little Christmas mischief to your Halloween porch with this free printable Grinch pumpkin carving template.
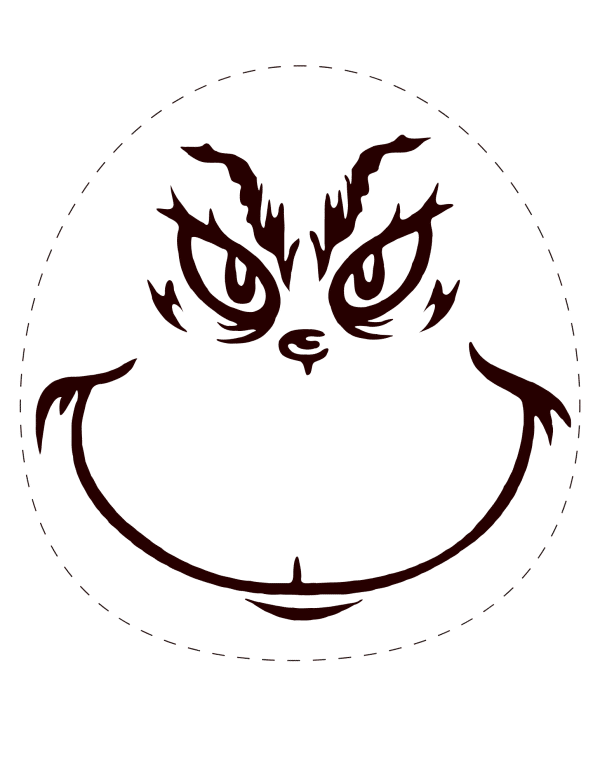
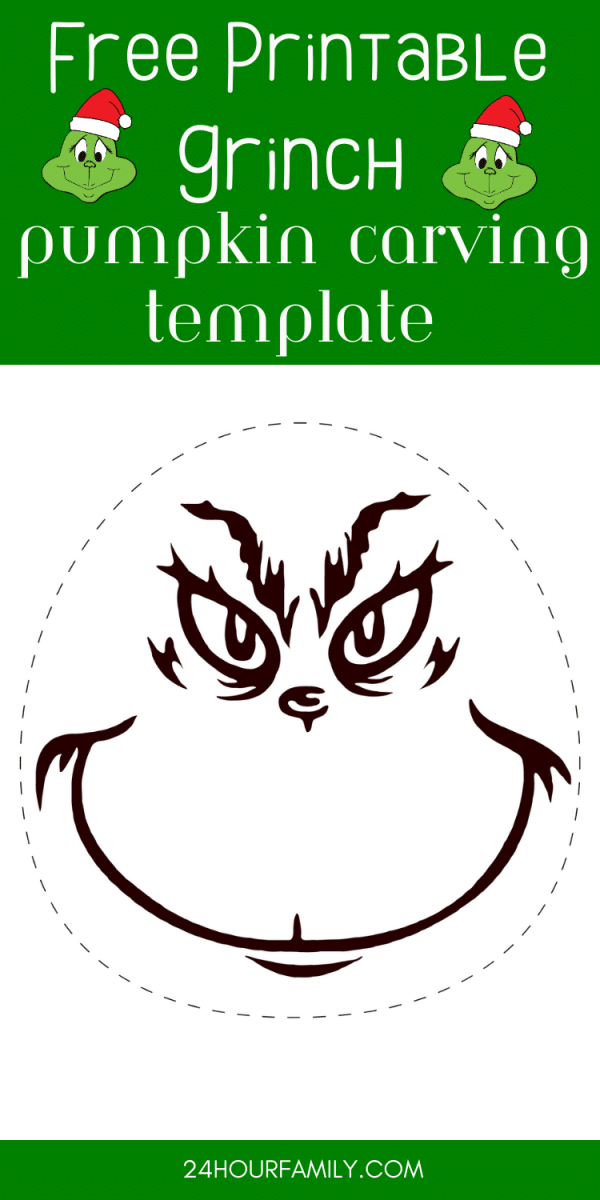
The printable features the character’s unmistakably grumpy expression, complete with narrowed eyes, curved eyebrows, a tiny nose, and his famously sly smile. A dashed oval surrounds the artwork to give you a clear guide for trimming the paper before attaching it to your pumpkin.
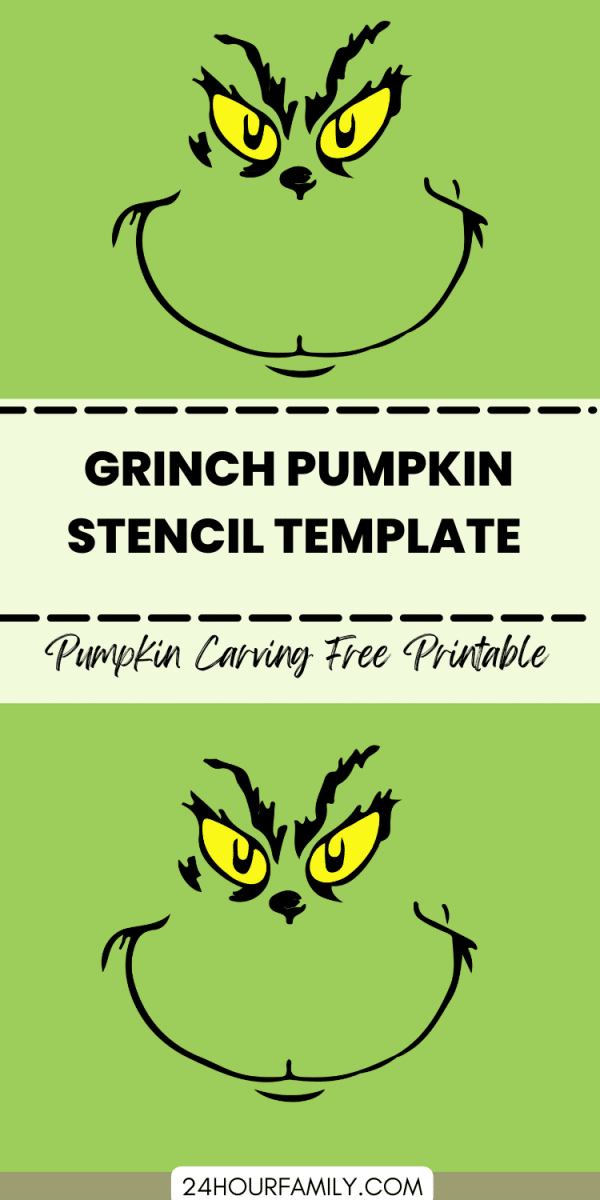
Free Grinch Pumpkin Carving Template
Although the stencil has several detailed areas, you can simplify the artwork as you work or use it for a no-carve version instead. Paint the illustration onto a green pumpkin, trace it with a marker, or transfer only the parts you want to include.
This printable is a fun choice for Halloween, a holiday-themed display, a classroom decorating activity, or a family movie night inspired by a favorite seasonal story.
About the Grinch Pumpkin Stencil:
This printable contains one full-page illustration.
The file includes:
- Large expressive features
- Dramatic eyebrows
- Facial creases and fur details
- A small nose
- A mischievous smile
- A dashed oval trimming guide
- A black-and-white layout that saves printer ink
- A large format that is easy to resize
The illustration fills most of a standard letter-size page, making it suitable for a medium or large pumpkin.
You do not need to reproduce every small line exactly. The most recognizable features are the eyebrows, nose, and smile. Those elements will make the finished project recognizable even when some of the smaller details are omitted.
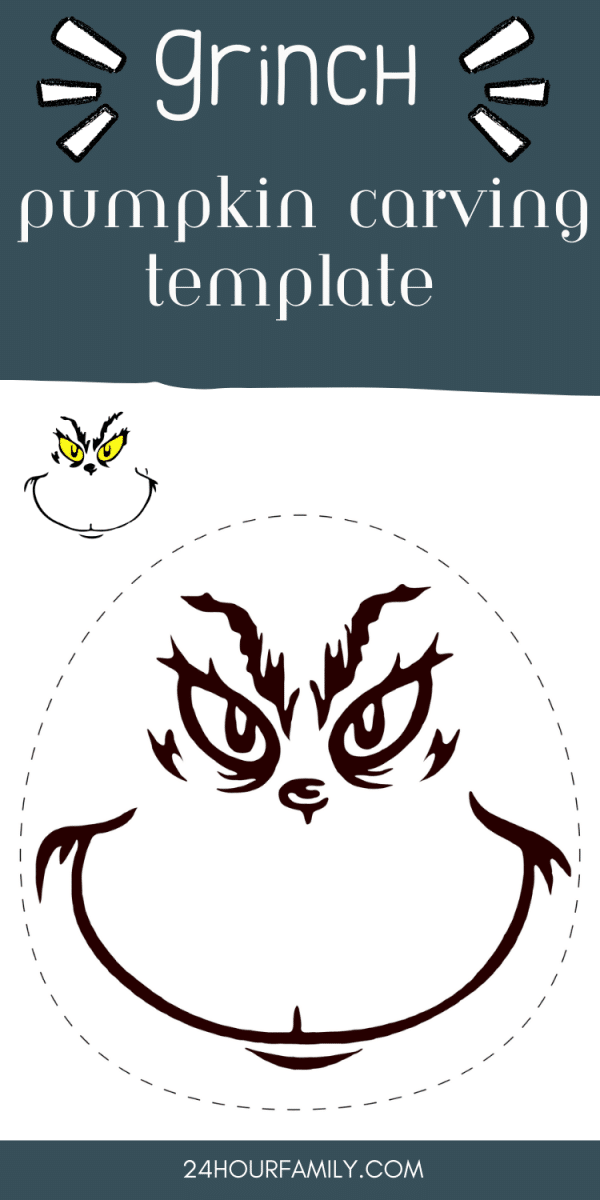
Is This an Easy Pumpkin Carving Template?
I would consider this an intermediate pattern rather than a beginner stencil.
The broad outer sections are fairly manageable, but the thin lines around the upper facial features, eyebrows, cheeks, and smile require patience. A small saw or fine-detail implement will give you more control than a large kitchen knife.
Beginners can still use the file by simplifying it:
- Transfer only the main facial features.
- Leave out some of the narrow fur lines.
- Etch the smaller details instead of removing them completely.
- Enlarge the stencil before printing.
- Use the artwork on a painted or artificial pumpkin.
This lets you preserve the familiar expression without struggling with every intricate line.
Supplies You’ll Need:
Gather your supplies before beginning:
- Free printable stencil
- Medium or large pumpkin
- Printer and white paper
- Scissors
- Painter’s tape or clear adhesive
- Pushpin, awl, toothpick, or poking tool
- Small carving saw
- Small detail implement, optional
- Large spoon or scoop
- Washable marker, optional
- Battery-operated LED light
- Newspaper, disposable tablecloth, or craft mat
- Paper towels
A flexible saw is generally easier to control than a large straight knife, especially around curved facial details.
Adults should handle all sharp utensils and closely supervise children throughout the activity.
How to Choose the Right Pumpkin
The shape and condition of the pumpkin can make a noticeable difference in the finished result.
Choose one with:
- A broad, fairly flat surface
- Firm skin
- No deep cuts or soft spots
- A sturdy stem
- A stable base
- Enough height and width for the illustration
A round or slightly oval shape that closely matches the printable. Avoid heavily ribbed pumpkins because deep grooves can distort the eyebrows and smile.
Place the paper against the pumpkin before beginning. This helps you confirm that the size fits and shows whether it needs to be enlarged or reduced.
Pumpkin-carving guides commonly recommend choosing a firm pumpkin with a stable bottom and a relatively smooth surface, as it is easier to trace and less likely to roll during carving.
How to Resize the Printable Stencil
Pumpkins vary considerably in size, so the stencil may need to be adjusted before printing.
Open your printer settings and look for a scale or custom-size option.
Try:
- 75% to 85% for a smaller pumpkin
- 100% for a medium or large pumpkin
- 110% to 125% for an extra-large pumpkin
Make a draft copy on regular paper and hold it against the pumpkin before committing to the final size.
When enlarging the artwork beyond the size of one sheet, use your printer’s poster or tile setting. This divides it across multiple pages that can be joined together.
Resizing a pattern to match the selected pumpkin is a standard technique recommended in established pumpkin-carving instructions.
How to Use the Grinch Pumpkin Carving Template
1. Prepare the Paper Pattern
Print the file on standard white printer paper.
Trim around the dashed oval so you are not trying to wrap an entire sheet of paper around the curved pumpkin.
Make several small slits from the outer edge of the paper toward the artwork, stopping before reaching the illustration. These small slits help the paper bend and follow the rounded shape more easily.
2. Prepare the Pumpkin
Cover your work surface before starting.
Wash and dry the outside so the stencil and adhesive will stay in place.
Open the bottom or back of the pumpkin and remove the seeds, strings, and pulp. Scrape the inner wall until it is approximately one inch thick.
A thinner wall is easier to pierce and shape, especially when working with detailed areas. Established pumpkin-pattern instructions also recommend thinning the surface and transferring the pattern with closely spaced holes.
3. Position the Stencil
Choose the smoothest side of the pumpkin.
Center the artwork and secure the top of the stencil in place. Smooth the paper downward and fasten it around the outer edge.
Use the small relief slits to help the paper follow the curve. The stencil does not have to sit perfectly flat, but the facial features should remain level and evenly spaced.
Step back and check the placement before transferring the pattern.
4. Transfer the Pattern
Use a pushpin, toothpick, awl, or poking implement to make closely spaced holes along the lines you plan to follow.
Place the holes approximately 1/8 inch apart. Use even closer spacing around sharp curves and smaller details.
Focus on transferring:
- The eyebrows
- The outer outline
- The nose
- The upper smile line
- The lower mouth line
- Any facial creases you plan to include
Remove the paper and connect any difficult-to-see dots with a washable marker.
5. Decide Which Areas to Remove or Etch
Before beginning, decide which parts will be:
- Removed completely
- Lightly etched
- Left untouched
For the strongest result, remove the major openings and etch the thin accent lines.
A practical approach is to:
- Remove the larger openings.
- Etch the eyebrows and facial creases.
- Leave the thinnest fur details intact.
- Use shallow scraping around the cheeks for added texture.
Etching removes only the dark outer skin, allowing light to glow softly through the thinner flesh. This is especially useful for delicate details that might break if removed completely. Better Homes & Gardens similarly distinguishes between etched stencil areas and sections opened all the way through.
6. Begin with the Smallest Details
Start near the center of the illustration and gradually work outward.
Shape the nose and smaller details first. Then move to the eyebrows, larger features, and mouth.
Working from the center outward helps preserve the strength of the pumpkin while you work. This technique is also recommended by experienced stencil creators for preventing the artwork from becoming unstable.
Use a gentle sawing motion rather than forcing the blade through the rind.
Turn the pumpkin as needed instead of holding the saw at an awkward angle.
7. Remove the Pieces Carefully
Do not push loosened sections inward with force.
Gently loosen each piece from both sides and remove it through the front or interior.
If an area does not release easily, inspect the edges and carefully trim any places that are still attached.
Small sections around the facial features and smile can break, so work slowly.
8. Clean and Light the Pumpkin
Wipe away any residue and remaining marker lines.
Place a battery-operated LED light inside and turn off the room lights to check the finished result. The illuminated version may reveal areas that need additional thinning or cleanup.
LED lights are a safer choice around children and do not produce the heat of a traditional flame. Battery-operated lights may also help prevent the pumpkin from drying out as quickly as it would near a candle.
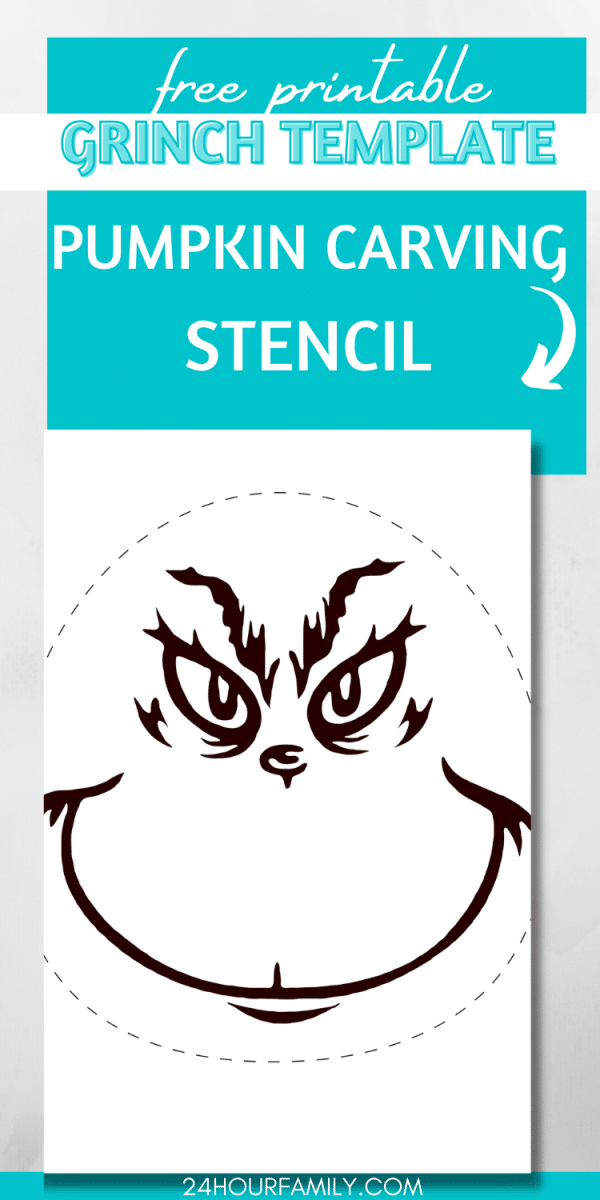
Which Parts Should Be Removed?
The stencil is intended as a visual guide rather than a strict numbered pattern.
The dark facial lines show the features that should be transferred to the pumpkin. However, removing every dark section may leave some areas too fragile.
For a durable result:
- Remove the open spaces needed to form the main features and smile.
- Etch the eyebrows and smaller facial markings.
- Keep narrow bridges between nearby sections.
- Avoid completely separating small pieces of the shell.
- Omit details that become too narrow after resizing.
The goal is to recreate the familiar expression, not every tiny line.
The eyebrows and smile carry most of the recognizable look, so prioritize those features.
How to Keep Detailed Areas from Breaking
Thin sections are the most challenging part of any detailed pattern.
These tips can help:
Use a Small Saw
A narrow saw can navigate curved lines more easily than a large blade.
Work Slowly
Short, gentle movements give you more control and place less pressure on the outer shell.
Leave Wider Bridges
A bridge is a narrow section that connects one part of the artwork to another. Make these sections wider than they appear on the stencil when necessary.
Etch Delicate Lines
Do not remove every eyebrow, crease, or fur detail. Shallow etching creates dimension while keeping the project structurally sound.
Work from the Center Out
Finishing the smallest central details first reduces the chance of pressing against already weakened outer areas.
Support the Inside
Place one hand against the inner wall while working from the outside, keeping your hand well away from the blade. This provides gentle support as the saw moves through the rind.
No-Carve Holiday Idea
This printable also works beautifully as a no-carve project.
A no-carve version is especially helpful for:
- Younger kids
- Classroom projects
- Indoor decorations
- Artificial craft pumpkins
- Families who want the display to last longer
- Anyone who does not want to use sharp utensils
Supplies
- Pumpkin
- Green acrylic or washable craft paint
- Printable
- Transfer paper or pencil
- Black paint marker
- Paintbrushes
- White paint, optional
- Clear craft sealer, optional
Instructions
Paint the pumpkin green and allow it to dry completely to create a cute, funny holiday decoration.
Trim the stencil along the dashed line and attach it to the pumpkin.
Transfer the facial features using graphite transfer paper or by rubbing pencil across the back of the printed lines and tracing from the front.
Remove the paper and outline the illustration with a black paint marker.
Fill in the darkest sections and add white highlights if desired.
This version can remain on display through Halloween and into the holiday season.
Turn It into a Holiday Decoration
This playful project can bridge the gap between Halloween and holiday decorating.
Instead of discarding it immediately after Halloween, place it in a whimsical display with:
- A Santa hat
- Red and green ribbon
- Battery-operated string lights
- Wrapped empty boxes
- Artificial snow
- Red ornaments
- A small tabletop tree
- A sign with a playful seasonal saying
An artificial foam version is a great option when you want to reuse the decoration for several years.
The stencil can also be transferred onto a foam craft version using equipment intended specifically for that material. Follow the manufacturer’s instructions and keep heated or sharp items away from children.
Other Ways to Use the Printable
Coloring Page
Print the free printable and let children color the large illustration green. They can add a red background, a Santa hat, or a snowy holiday scene.
Window Decoration
Color the illustration, trim around the dashed oval, and attach it to a window or classroom door to decorate for the holidays.
Paper Plate Craft
Reduce the page slightly and transfer the facial features to a green paper plate.
Add construction-paper eyebrows and a mischievous smile.
Holiday Party Decoration
Download the file and make several copies on green cardstock to use for:
- Buffet labels
- Gift tags
- Cupcake toppers
- Garland
- Place cards
- Party signs
Felt or Craft-Foam Pattern
Use the larger facial details to create layered felt or craft foam artwork with a textured finish.
Holiday Movie Night Activity
Use the printable as a coloring activity during a family movie night. Children can color their own version while snacks are prepared.
Pumpkin Carving Safety Tips
Pumpkin carving requires close adult supervision.
Keep these precautions in mind:
- Adults should make the main openings.
- Use carving equipment designed for this activity whenever possible.
- Keep knives and saws out of reach of young children.
- Work on a dry, stable surface.
- Wipe up moisture immediately.
- Always move the blade away from your hands and body.
- Do not allow children to reach inside while someone is working.
- Use a battery-operated light instead of an open flame.
- Never leave an illuminated display unattended near flammable decorations.
Children can safely help by choosing the pumpkin, scooping out the pulp with a spoon, holding the stencil in place, and coloring a no-carve version.
Ways to Keep Your Carved Pumpkin Fresh
Finished pumpkins naturally begin to soften, but a few simple steps may extend the display.
- Begin with a fresh, firm pumpkin.
- Wash the outside before starting.
- Remove as much pulp as possible.
- Avoid exposing the finished project to direct sunlight.
- Move it to a cool area when it is not on display.
- Blot excess moisture from the inside.
- Use an LED light rather than a hot candle.
- Bring it indoors during unusually warm weather.
- Discard it when it develops extensive mold, a strong odor, or significant softening.
Heat from traditional candles can dry it out and accelerate deterioration, which is another reason battery-operated lights are a practical option.
More Grinch and Halloween Ideas to Explore
If you enjoyed this Grinch pumpkin carving template, here are more festive printables, crafts, and treats to help you celebrate Halloween and Christmas with even more creative fun.
- Printable Pumpkin Carving Templates – Browse a collection of printable carving patterns featuring a variety of fun and popular characters.
- Printable Mickey Mouse Pumpkin – Add a classic Disney touch to your Halloween decorating with this Mickey Mouse carving stencil.
- The Grinch Handprint Craft – Turn a child’s handprint into a fun Grinch-themed keepsake that’s perfect for the holiday season.
- Grinch Paper Plate Craft – Make an easy Grinch craft using simple supplies for a fun Christmas activity at home or in the classroom.
- Nutter Butter Grinch Eyes Dessert Recipe – Whip up a playful no-bake holiday treat that’s as fun to make as it is to eat.
- Christmas Grinch Charcuterie Board – Put together a festive snack board inspired by everyone’s favorite green holiday character.
- Grinch Gingerbread Cookies Recipe – Bake a batch of adorable Grinch-inspired gingerbread cookies for Christmas parties, cookie exchanges, or family movie nights.
This printable adds a playful, slightly mischievous touch to a traditional Halloween activity.
Use the full artwork for an impressive display, simplify the facial features for an easier version, or turn it into a green no-carve project that can remain on display throughout the holiday season.
Download the PDF below, choose a smooth pumpkin, and decide whether it will glow from the inside or feature a painted finish.
Is the template free?
Yes. The printable featured in this post is available as a free download for personal use.
What size pumpkin should i use?
A medium or large pumpkin with a broad, smooth surface is ideal. The artwork fills most of a letter-size sheet, but it can be reduced or enlarged through your printer settings.
Is this stencil suitable for beginners?
It is best classified as an intermediate pattern because it includes several narrow curves and facial details.
Beginners can simplify it by working with only the eyes, nose, and smile while etching or omitting the thinner lines.
Do I remove all the black areas?
Not necessarily. The artwork shows the details, but removing every dark section may weaken the pumpkin.
Transfer the main shapes, open the larger sections, and etch the thinner lines.
What does the dashed oval mean?
The dashed oval is a trimming guide for the paper. Trim around it before attaching the stencil to the pumpkin.
It is not intended to be transferred onto the pumpkin itself.
Can I use the stencil on an artificial pumpkin?
Yes. The artwork can be transferred to a foam craft pumpkin, although you should use equipment intended for that material.
It can also be painted onto an artificial pumpkin for a completely no-carve version.
Can children use this template?
Children can help transfer the artwork, scoop out the pumpkin, or make a painted version. Adults should handle all sharp equipment.
Can I print the stencil in a different size?
Yes. Adjust the percentage in your printer settings. Make a test copy and hold it against the pumpkin to confirm the size before beginning.
Can the stencil be used as a coloring page?
Yes. The large black-and-white illustration works well as a simple coloring page or holiday party activity.
