
Ocean Triorama Printable: Make a 3D Ocean Habitat
Build an underwater world from a few sheets of paper with this ocean triorama printable.
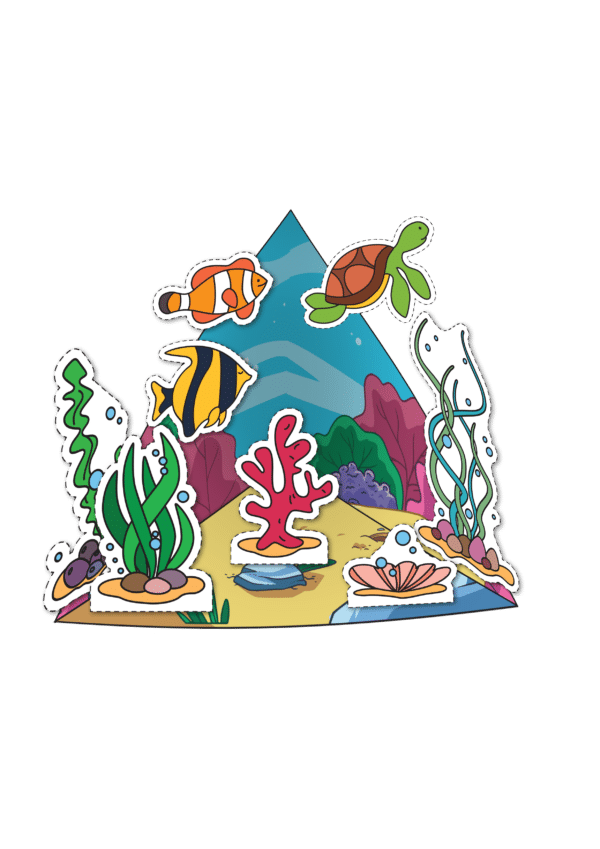
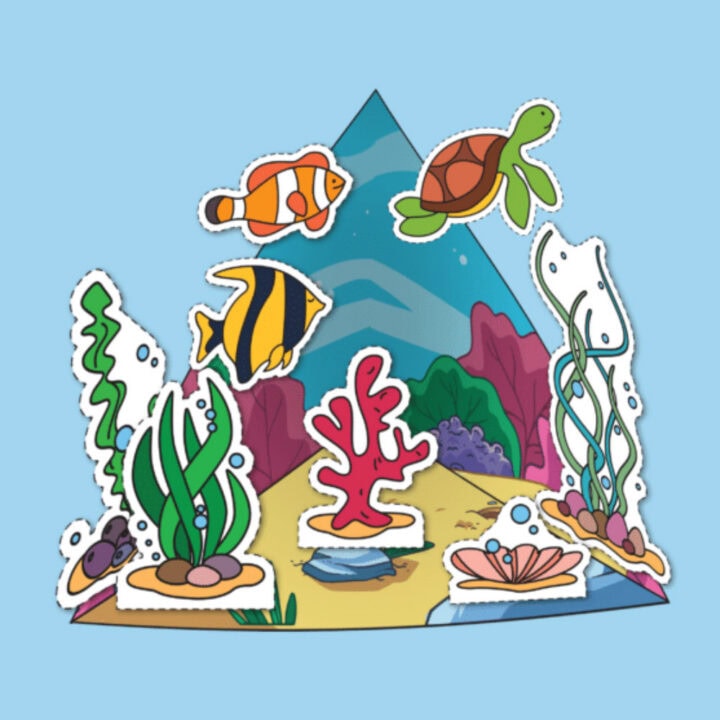
Children can decorate, cut out, assemble, and arrange the templates to make a freestanding display featuring marine life, a turtle, plants, shells, rocks, and other details found on the ocean floor.
Unlike a traditional shoebox display, this project starts with a flat square background that transforms into a three-dimensional triangular scene. That makes it easier to prepare for a classroom, homeschool unit, summer camp, science center, or afternoon activity at home.

The four-page PDF includes both pre-colored and black-and-white versions, allowing children to either build the project right away or decorate the pieces before putting everything together.
What Is an Ocean Triorama?
This three-dimensional paper model represents an aquatic habitat.
The base starts as a square divided diagonally into triangular sections. One diagonal is cut, and the two lower sections are overlapped and secured together. This raises the remaining sections into a standing display with a floor and two upright walls.
A triorama is similar to a diorama, but it does not require a shoebox or cardboard container. It can usually be made with:
- A template
- Scissors
- Adhesive
- Coloring supplies
- A few sheets of heavy paper or printer paper
Once the base is complete, children add ocean creatures and habitat pieces to the walls and floor to give the scene depth.
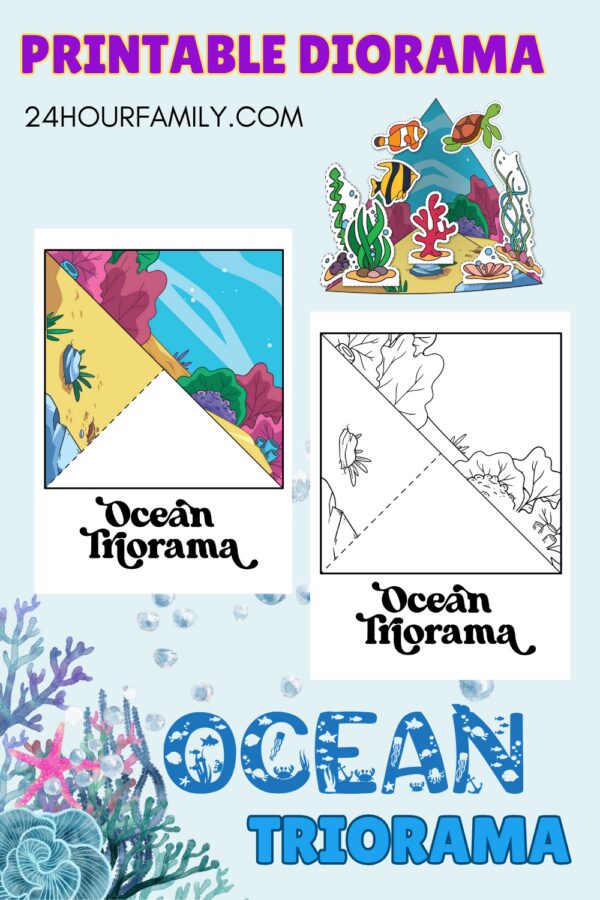
The downloadable PDF contains four pages.
Page 1: Full-Color Ocean Background
The first page features a completed aquatic background with:
- Blue water
- A sandy floor
- Rocks
- Bright reef formations
- Ocean plants
- Small bubbles and habitat details
A dashed diagonal line shows where the page should be cut before the base is built.
Page 2: Full-Color Ocean Pieces
The pre-colored cutout page includes:
- One clownfish
- One yellow-and-blue angelfish
- One green turtle
- One reef piece
- Three plant arrangements
- One open shell
- Bubbles, rocks, and sandy bases
Several plants, the reef piece, and the shell include rectangular support tabs that help them stand on the floor of the triorama.
Page 3: Black-and-White Ocean Background
This page contains the same habitat scene in outline form.
Children can decorate the water, sand, rocks, reef, and greenery before building the background.
Page 4: Black-and-White Ocean Pieces
The final page includes outline versions of the clownfish, turtle, reef piece, shell, plants, and other habitat details.
This version lets children choose realistic or imaginative shades before decorating the pieces.
The complete set therefore includes both a ready-to-build version and one that can be personalized before construction.
Supplies Needed
Gather these materials before beginning:
- Printable template
- White heavy paper or printer paper
- Crayons, markers, or colored pencils
- Child-safe scissors
- Adhesive stick or school adhesive
- Clear tape, optional
- Pencil, optional
- String or clear thread, optional
- Extra construction paper, optional
Heavier paper is recommended for the background because it helps the finished triorama keep its shape. Regular printer paper can still be used, although the base may need extra support with tape or by attaching it to a sturdier sheet.
How to Make the Ocean Triorama Printable
Choose the Full-Color or Black-and-White Version
Download the PDF and decide which version you would like to make.
Use pages 1 and 2 for the pre-colored project. Use pages 3 and 4 when children would like to decorate the entire scene themselves.
You only need two pages for one completed triorama:
- One background page
- One matching page of habitat pieces
Use actual size or 100% scale on standard letter-size paper. Check the preview to make sure the edges are not cropped.
Decorate the Black-and-White Pages
Skip this step when using the pre-colored pages.
Decorate the background and all the individual pieces before cutting or assembling them. Flat pages are much easier for children to work on than a finished three-dimensional model.
Children might use:
- Different shades of blue for the water
- Tan, yellow, or light brown for the sandy floor
- Green for the plants
- Bright shades for the reef
- Gray, brown, or purple for the rocks
- Realistic or imaginative shades for the creatures
The open water area can also be decorated with extra bubbles, sunlight, or additional habitat details.
Cut Out the Background
Cut around the outside square border of the background page.
Try to keep all four edges straight so the finished model stands evenly.
Do not cut along the solid diagonal lines that divide the decorated sections. Those lines help define the walls and floor of the triorama.
Cut Along the Dashed Diagonal Line
Locate the dashed line running from one lower corner toward the center of the square.
Cut only along this dashed line. Stop when you reach the center where the diagonal sections meet.
Do not cut the page completely in half.
This single cut separates the two bottom triangular sections so they can overlap during assembly.
Form the Triorama Base
Bring one of the lower triangular sections over the other.
Continue overlapping them until the remaining decorated sections rise and form a three-dimensional corner. The overlapped section becomes the floor of the triorama, while the other two sections become the upright walls.
Adjust the overlap until:
- The base sits flat
- The walls remain upright
- The background does not lean excessively
- The decorated scene faces inward
Apply adhesive between the overlapping triangles and press them together firmly.
A small piece of clear tape underneath can provide extra support while the adhesive dries.
Cut Out the Habitat Pieces
Cut around the dashed outer lines surrounding each piece.
Children do not need to cut directly against every black outline. Leaving a small white border around the pieces often makes them sturdier and easier to handle.
Younger children may need help with:
- The turtle’s flippers
- The narrow plant strands
- The fins
- The smaller bubbles
- The curved shell
- The spaces around the reef branches
Keep the rectangular tabs attached to the reef, plants, and shell pieces. These tabs help them stand inside the display.
Bend the Standing Tabs
Bend each rectangular tab backward along its horizontal dashed line.
The illustration should remain upright while the tab rests flat on the table, forming an L shape.
Apply adhesive to the underside of the tab and attach it to the floor of the triorama.
Hold each piece briefly until it begins to stay in place.
Arrange the Habitat Before Attaching the Pieces
Place the creatures, plants, reef piece, and shell inside the triorama before securing anything.
Try several arrangements so the pieces do not block one another.
A balanced scene might include:
- Tall plants near one back corner
- The reef closer to the front
- A shell on the sandy floor
- The turtle higher on one wall
- One swimmer near the greenery
- Another in the open water
Positioning taller pieces toward the back and shorter ones near the front creates a stronger sense of depth.
Add the Standing Pieces
Attach the tabs of the reef, greenery, and shell to the sandy floor.
Spread them throughout the display instead of placing everything in one straight line.
Turn some pieces slightly toward the center so they are easier to see from the front.
Add the Creatures
The two swimmers and the turtle do not include standing tabs, giving children several placement options.
They can:
- Attach them directly to the upright background
- Use small bent paper tabs
- Tape them to short strips of clear plastic
- Suspend them from the top with thread
- Secure only part of each piece so it stands slightly away from the background
Placing them at different heights helps the scene look more realistic.
Allow the Triorama to Dry
Set the completed project on a flat surface.
Allow the adhesive to dry completely before moving or displaying it. Liquid school adhesive may take longer than an adhesive stick.
Once everything is dry, gently test the base. Add a small piece of tape underneath if extra support is needed.

How to Make the Pieces Stand Up
Several pieces already include rectangular support tabs.
To use them:
- Cut around the piece while leaving the rectangle attached.
- Bend the rectangle backward along the dashed line.
- Apply adhesive underneath the rectangle.
- Press the tab onto the floor of the triorama.
- Hold the piece upright until it begins to stay in place.
For the two swimmers and the turtle, make a simple stand by cutting a small strip of heavy paper.
Bend the strip into an L shape and attach one side to the back of the piece. Attach the other side to the floor or wall of the triorama.
This method helps the piece project forward instead of lying flat against the background.
Where Should Each Creature Go?
Children can arrange the habitat however they like, but placement can also support a science lesson.
Clownfish
Place the clownfish near reef formations or aquatic greenery.
Children may recognize clownfish by their orange bodies and white bands. In nature, they often live alongside sea anemones, so children could draw or add one beside the clownfish.
Angelfish
Place the striped angelfish in open water or near the reef.
Its bright appearance makes it an eye-catching focal point on one of the upright walls.
Turtle
Position the turtle higher in the water or above the sandy floor.
It can be attached flat against the background or raised slightly with a small paper spacer for added dimension.
Reef and Plants
Attach the reef and greenery to the floor where they can provide shelter and structure within the habitat.
Children can discuss why smaller creatures might hide among the greenery, rocks, and reef formations.
Shell
Place the shell near the front of the sandy floor.
Because it includes a support tab, it can stand open and add another layer to the display.
Full-Color or Black-and-White: Which Version Should You Use?
Choose the pre-colored version when:
- You need a quick classroom activity
- Time for decorating is limited
- You are working with younger children
- The activity is part of a busy ocean lesson
- Children want to focus on cutting and assembling
- You need a finished example before using the outline version
Choose the black-and-white version when:
- Children want to choose their own shades
- The activity is part of an art lesson
- You want a longer independent activity
- Students are studying ocean creature patterns
- Each child should make a different-looking habitat
- You want to include creative storytelling
Both versions include the same background and habitat pieces, so the assembly process stays the same.
Ocean Habitat Learning Activities
A triorama can be more than a cut-and-paste activity. It gives children a hands-on model they can point to, label, describe, and use to explain what they have learned.
Many science lessons connect habitat models with basic needs, adaptations, feeding relationships, and end-of-unit assessments.
Identify Living and Nonliving Things
Ask children to sort the items in the triorama into two groups.
Living things might include:
- Clownfish
- Angelfish
- Turtle
- Reef formations
- Aquatic greenery
Nonliving things might include:
- Water
- Sand
- Rocks
- Shell fragments
- Sunlight
This helps children begin thinking about the different parts of a habitat.
Discuss What Living Things Need
Ask children what the living things in the scene need to survive.
Possible answers include:
- Food
- Water
- Oxygen
- Shelter
- Space
- Protection from predators
- An appropriate water temperature
Children can point to areas of the model that provide food, hiding places, or protection.
Label the Habitat
Add small labels to the completed display.
Possible labels include:
- Clownfish
- Angelfish
- Turtle
- Reef
- Aquatic greenery
- Shell
- Sand
- Rock
- Ocean floor
- Open water
- Habitat
- Shelter
Older children can write one fact beside each label.
Explore Adaptations
An adaptation is a characteristic or behavior that helps a living thing survive.
Children can choose one creature from the triorama and describe an adaptation.
Examples include:
- A swimmer uses fins to move and steer through the water.
- A turtle uses flippers to swim.
- A turtle’s shell provides protection.
- Some patterns and markings help ocean animals blend into their surroundings.
- A streamlined body helps with movement through the water.
Create a Simple Food Chain
The set does not include every organism needed for a complete food chain, but children can add drawings or labels.
A simple example might be:
Plankton or aquatic greenery → small swimmer → larger swimmer
Children can draw arrows showing how energy moves from one organism to another.
Talk About Shelter
Ask where each creature might hide or rest.
Children might place:
- A small swimmer near the reef
- A turtle beside rocks
- A shell near the sandy floor
- A swimmer between tall greenery
This encourages them to think about why the placement of each piece matters.
Writing Prompts
Pair the finished display with a short writing activity.
Possible prompts include:
- My ocean scene shows…
- One creature in my habitat is…
- This living thing needs _____ to survive.
- The turtle is swimming toward…
- The clownfish hides near…
- Reef formations are important because…
- My favorite part of the ocean is…
- If I could explore this habitat, I would…
- One way people can protect the ocean is…
- A day in my ocean world begins when…
Younger children can dictate a sentence. Older students can write a full paragraph or a short story.
Turn the Project Into a Story
The finished triorama can become the setting for imaginative play.
Invite children to choose one creature as the main character and create a story that includes:
- Where it lives
- What it is searching for
- Another creature it meets
- A problem in the habitat
- How the creatures solve the problem
- What happens at the end
Children can move removable pieces around the display while retelling their story.
Ideas for Different Ages
Preschool
Keep the activity simple by using the pre-colored version.
Preschoolers can:
- Name the different creatures
- Practice cutting around larger shapes
- Attach pieces with adult help
- Sort creatures and greenery
- Count the swimmers
- Identify different shades
- Make swimming motions during imaginative play
An adult may need to build the base and cut the smaller pieces.
Kindergarten and First Grade
Children can use either version and complete more of the assembly independently.
They can:
- Name the parts of an ocean habitat
- Compare swimmers and turtles
- Identify living and nonliving things
- Add simple labels
- Write one sentence about the scene
- Describe where each creature lives
Second and Third Grade
Older elementary students can include additional science concepts.
They might:
- Research one featured creature
- Add habitat labels
- Explain an adaptation
- Create a simple food chain
- Identify examples of food and shelter
- Write several facts about ocean life
- Present the model to the class
Fourth and Fifth Grade
The triorama can become the foundation for a more detailed assignment.
Students can:
- Add ocean-zone labels
- Research reef ecosystems
- Include producers, consumers, and decomposers
- Explain predator-and-prey relationships
- Add written facts about ocean conservation
- Compare a reef habitat with another aquatic habitat
- Give a short oral presentation
Tips for Younger Children
Use the Pre-Colored Version First
The ready-to-use pages allow younger children to focus on cutting, bending, and placing the pieces.
Use Heavy Paper for the Background
A sturdier background is easier to shape into a stable model.
Use Bubble Cutting
Children do not need to cut directly against every small outline. Encourage them to leave a small white border around detailed pieces.
Pre-Cut the Dashed Line
An adult can prepare the diagonal cut before handing the background to a child.
Offer Fewer Pieces at Once
Place only three or four cutouts on the table so the child is not overwhelmed.
Use an Adhesive Stick
An adhesive stick is easier to control and less likely to wrinkle the paper than using too much liquid adhesive.
Keep a Finished Example Nearby
Show children the completed example so they can see how the flat background becomes a standing display.
Ways to Personalize the Scene
Children can add materials from home or the classroom to give the habitat more texture.
Try:
- Blue tissue paper for the water
- Sandpaper for the ocean floor
- Small pebbles for rocks
- Yarn for greenery
- Sequins for scales
- Cotton swabs dipped in paint for bubbles
- Cellophane for shimmering water
- Small shells
- Foil for reflective details
- Craft foam for coral reef formations
- Blue glitter adhesive
- Paper straws as supports
- Clear thread for hanging creatures
Avoid using heavy decorations that could cause the paper base to collapse.
Add More Ocean Creatures
The set includes two swimmers and one turtle, but children can draw or make additional creatures.
Ideas include:
- Dolphin
- Shark
- Octopus
- Jellyfish
- Seahorse
- Crab
- Starfish
- Whale
- Stingray
- Eel
- Lobster
- Pufferfish
Draw the creatures on heavy paper, cut them out, and attach them with bent paper tabs or thread.
Make the Swimmers Look Like They Are Moving
There are several ways to give the creatures a floating appearance.
Paper Spacer
Bend a narrow strip of heavy paper into a small rectangle or zigzag. Attach one end to the background and the other to the creature.
Clear Plastic Strip
Cut a strip from clean transparent packaging. Attach one end behind the piece and the other to the triorama.
Hanging Thread
Tape thread to the back of the creature and secure the other end near the top of the background.
Partial Attachment
Apply adhesive only to the head or tail so the rest of the piece stands slightly away from the wall.
These simple additions increase the three-dimensional appearance without changing the basic project.
Classroom Uses for the Triorama
Ocean Science Center
Place templates, scissors, adhesive, and decorating materials at a science or art center.
Add books or fact cards for children to reference while assembling.
End-of-Unit Project
Use the triorama after students complete an ocean or habitat unit.
Ask each child to include:
- At least two creatures
- One greenery piece
- One source of shelter
- Three labels
- One adaptation
- One written ocean fact
Classroom Display
Arrange the completed trioramas together on a shelf or table.
Possible display titles include:
- Dive Into Ocean Learning
- Our Ocean Worlds
- Exploring Ocean Habitats
- Life Beneath the Waves
- An Ocean of Learning
- Under the Sea
- Amazing Ocean Ecosystems
Partner Project
Two children can complete one triorama together.
One child can decorate and build the habitat while the other researches ocean creatures and prepares labels. They can then present the model as a team.
Early-Finisher Activity
Keep copies of the black-and-white version available for students who finish another ocean assignment early.
They can complete the basic display and then add researched creatures, labels, or habitat facts.
How to Display the Finished Triorama
Place the triorama on a flat shelf, desk, or windowsill.
To make it sturdier:
- Use heavy paper for the base
- Reinforce the overlapped floor with tape
- Attach the model to a square of cardboard
- Avoid adding heavy decorations to the walls
- Keep the tallest pieces near the back
- Allow the adhesive to dry completely before moving it
Children can add their name, the project title, or a short description on a strip of paper placed in front of the display.
More Ocean Activities to Discover
If you enjoyed building this Ocean Triorama Printable, here are more ocean-themed crafts and printables that are perfect for exploring sea life, habitats, and creative learning.
- Printable Layers of the Ocean Diorama – Learn about the different ocean zones with a hands-on printable that brings each layer to life.
- Ocean Diorama – Create an underwater scene filled with sea creatures while exploring ocean habitats.
- Ocean-Themed Fingerprint Art Printables – Turn fingerprints into adorable ocean animals with these fun and easy printable pages.
- Fish Outline – A collection of fish templates that are great for coloring, crafts, tracing, and classroom activities.
- Sea Turtle Life Cycle Printable – Help children learn about the life cycle of a sea turtle with an engaging educational printable.
- Paper Plate Ocean Crab Craft – Make a cheerful crab using a paper plate for a fun ocean-themed craft.
- Easy Paintings for Kids – Find simple painting ideas that encourage creativity and make a great addition to art time.
Download the four-page PDF, print either the pre-colored or black-and-white version, and get started.
Children can build the project by decorating the pages if needed, cutting the background along the dashed line, overlapping the lower triangles, and attaching the habitat pieces inside.
What is the difference between a triorama and a diorama?
A diorama is a three-dimensional model or scene, often built inside a box. A triorama is a type of paper diorama made by cutting and overlapping sections of a square sheet.
The triorama creates a standing display without requiring a shoebox.
Which pages should I use?
Use pages 1 and 2 for the pre-colored version or pages 3 and 4 for the black-and-white version.
Each completed triorama requires one background page and one matching page of habitat pieces.
What size paper should I use?
The PDF is designed for standard 8.5-by-11-inch letter-size paper.
Use actual size or 100% scale unless you intentionally want a smaller model.
Should I use regular paper o heavy paper?
Heavy paper creates a sturdier base and stronger standing pieces. Regular printer paper also works, but it may need extra support underneath.
Where do I cut the background?
Cut around the outside square first. Then cut from the lower corner toward the center along the single dashed diagonal line.
Do not cut along every diagonal line.
How do I shape the triorama?
Overlap the two triangular sections created by the diagonal cut. As they overlap, the remaining sections rise to form the upright walls.
Secure the overlapping triangles together to create the floor.
Should I remove the rectangles under the greenery?
No. Leave the rectangular tabs attached.
Bend each rectangle backward along the dashed horizontal line and attach it to the triorama floor.
How do I attach the swimmers and turtle?
The creatures can be attached directly to the background. They can also be mounted with small bent paper spacers or suspended with thread so they appear to be swimming.
Can preschoolers make this activity?
Can preschoolers make this activity?
What age is this activity best for?
The set works especially well for kindergarten through fifth grade.
Younger children can focus on decorating and identifying the different creatures. Older children can add labels, habitat facts, adaptations, feeding relationships, and written explanations.
Can I use the pieces in a shoebox diorama?
Yes. The creatures, reef pieces, greenery, and shell can be cut out and used in a larger shoebox habitat.
Attach them to the back, sides, and floor, or suspend the swimmers from the top with thread.
Is this a reef habitat triorama?
The reef formations, marine life, greenery, and sandy floor can represent a simplified reef habitat.
Children can add more reef details, sea anemones, additional marine life, and labels when learning about reef ecosystems.
Can children add their own creatures?
Yes. They can draw more marine life on heavy paper, cut it out, and add it to the display.
Can this be used for a school science project?
Yes. Add labels, habitat facts, adaptations, food chains, or a short written explanation to turn the activity into a more detailed habitat project.
The finished display creates a compact ocean scene that children can showcase, label, use for storytelling, or include in a science lesson. It offers the depth of a diorama without the preparation or storage space needed for a shoebox.
Printable Ocean Triorama
Create a three-dimensional ocean habitat with printable fish, a sea turtle, coral, seaweed, and shells. Choose the full-color templates or color the black-and-white version.
Materials
- Ocean triorama printable
- White cardstock or printer paper
- Crayons, markers, or colored pencils
- Clear tape, optional
- String or clear thread, optional
Tools
- Child-safe scissors
- Glue stick or school glue
Instructions
- Download the printable and choose the colored or black-and-white version.
- Print one background page and the matching page of ocean pieces.
- Color the black-and-white templates before cutting.
- Cut around the outside square border of the triorama background.
- Cut from the lower corner to the center along the dashed diagonal line.
- Overlap the two separated triangular sections until the remaining sections rise into a three-dimensional corner.
- Glue the overlapping triangles together to form the floor.
- Cut out the fish, sea turtle, coral, seaweed, shell, and other ocean pieces.
- Keep the rectangular tabs attached to the standing habitat pieces.
- Fold each tab backward along the dashed line.
- Arrange all the pieces inside the triorama before gluing.
- Glue the tabbed coral, plants, and shell to the floor.
- Glue the fish and turtle to the walls or attach them with small paper spacers.
- Allow the project to dry completely before displaying it.
Notes
- Cardstock creates the most stable triorama.
- Leave a small white border around detailed cutouts to make them easier for children to cut.
- Younger children may need help with the diagonal cut and the smaller ocean pieces.
- Add labels, animal facts, adaptations, or a food chain for an extended science project.
- Reinforce the underside of the overlapped base with clear tape when needed.
