
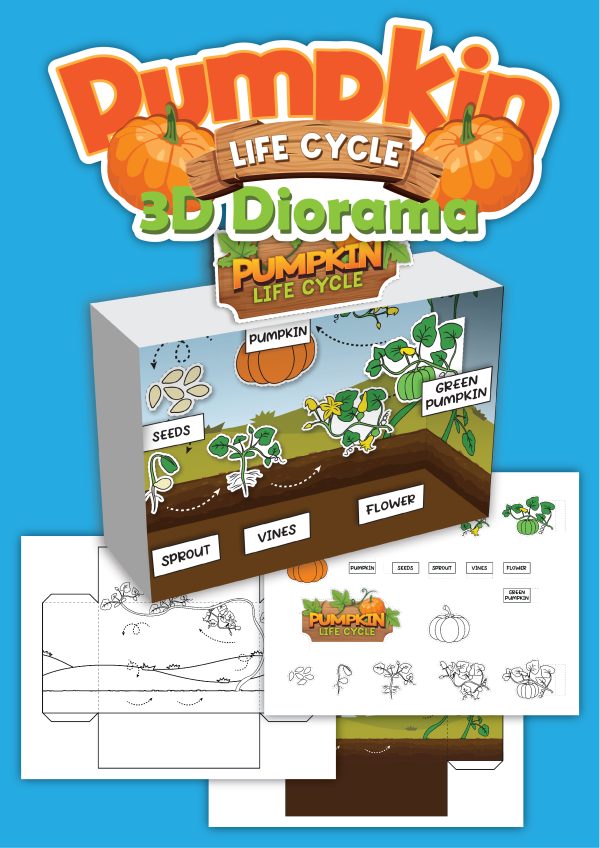
Pumpkin Life Cycle Diorama
The Pumpkin Life Cycle Diorama is a perfect way to learn about the stages of a pumpkin’s growth while creating a fun and engaging craft project. In this blog post, we’ll explore the different stages of the pumpkin life cycle, how long it takes to grow, and how you can create your own pumpkin life cycle diorama.
Whether you are a teacher or a homeschool mom, educational printables and printable dioramas can be used to bring the subject you are studying to life.
3D Butterfly Life Cycle Printable
What is the life cycle of the pumpkin?
Understanding the life cycles of plants can be an exciting journey, and the life cycle of a pumpkin is no exception. It all begins with pumpkin seeds, which are like tiny packages of potential. These seeds are planted in the warm soil of a pumpkin patch or your garden, and under the right conditions, they germinate, sending out roots and shoots.
As the little pumpkins grow, they go through several distinct stages. The pumpkin plant starts to develop vines, leaves, and flowers. The flowers are a crucial part of the pumpkin life cycle and are responsible for pollination. Bees and other pollinators visit the flowers, transferring pollen from the male flowers to the female ones and allowing fertilization.
Once fertilized, the pumpkin starts to grow rapidly. Watching how a small pumpkin transforms into a full-sized one is amazing. The pumpkin continues to develop, changing color and becoming more vibrant as it matures. And just like that, it’s time for pumpkin harvest!
How long do pumpkins take to grow?
Pumpkin time is a thrilling period, but how long does it take for pumpkins to grow? The answer can vary depending on the pumpkin variety, weather conditions, and care provided. On average, the entire pumpkin life cycle from seed to maturity takes about 75 to 120 days.
Pumpkin seeds typically germinate within 5 to 10 days after planting, and the vines and flowers start to develop. The female flowers, recognizable by the small pumpkin shape at the base, require successful pollination to form pumpkins.
Once pollination occurs, it takes about 45 to 55 days for the pumpkin to grow to its full size. Remember that this timeline is an estimate, and observing the changes in your pumpkin plants can be an exciting adventure.
How to make Pumpkin Life Cycle Craft?
Disclosure Policy: This blog post includes affiliate links to products. The free printable templates are intended for personal use only. For any classroom or special education use, please review the terms of use.
Materials:
- Printer (I have this one)
- Pumpkin life cycle diorama template. You can purchase the Printable Here.
- Scissors
- Glue or adhesive or hot glue
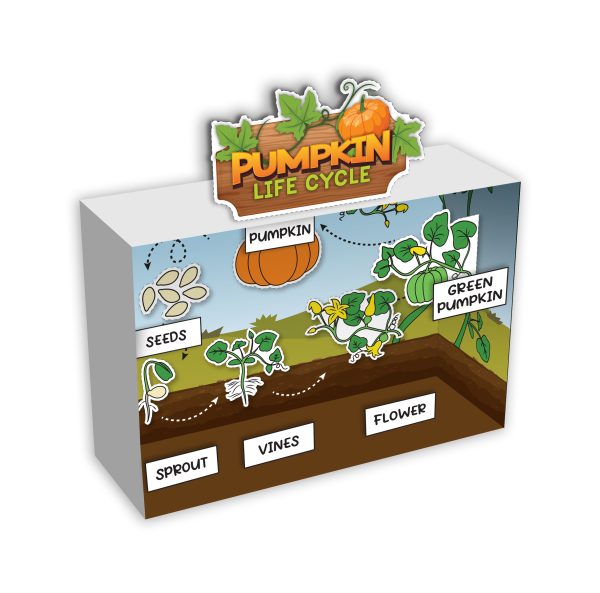
How to Make a 3D Pumpkin Life Cycle ShoeBox Diorama:
Step 1
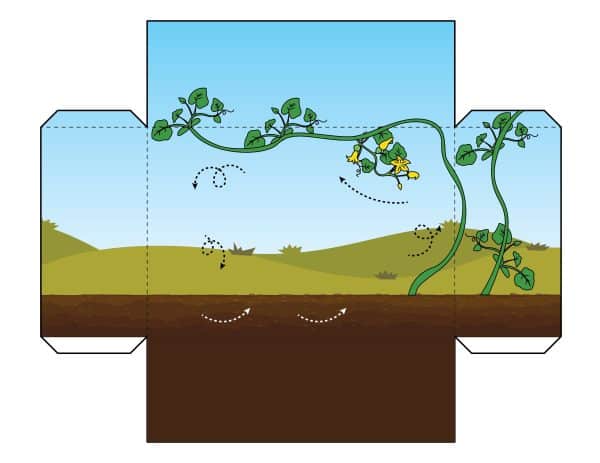
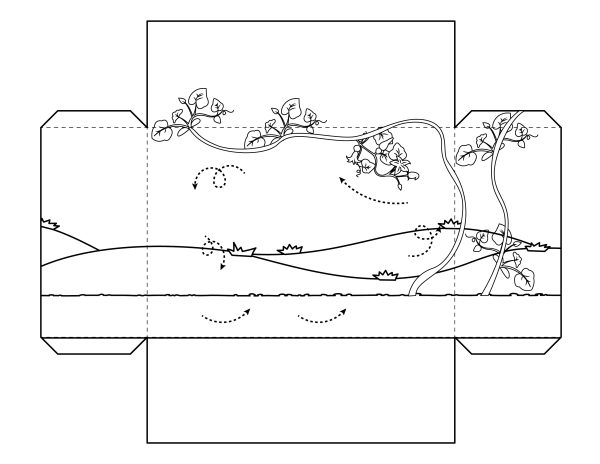
Download the free pumpkin life cycle diorama template. Print the template on a standard sheet of paper. Make sure the printing is clear, and all lines are visible.
Step 2
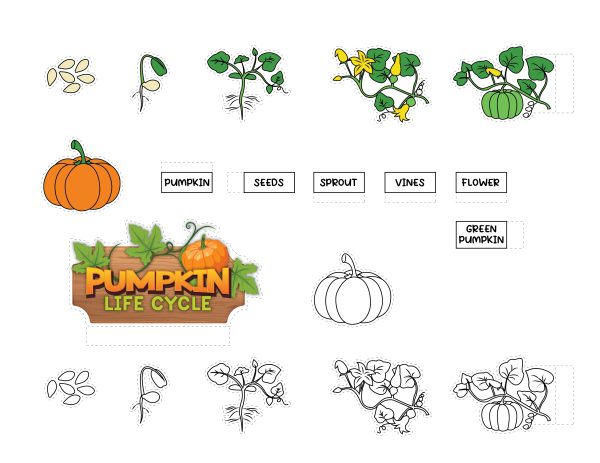
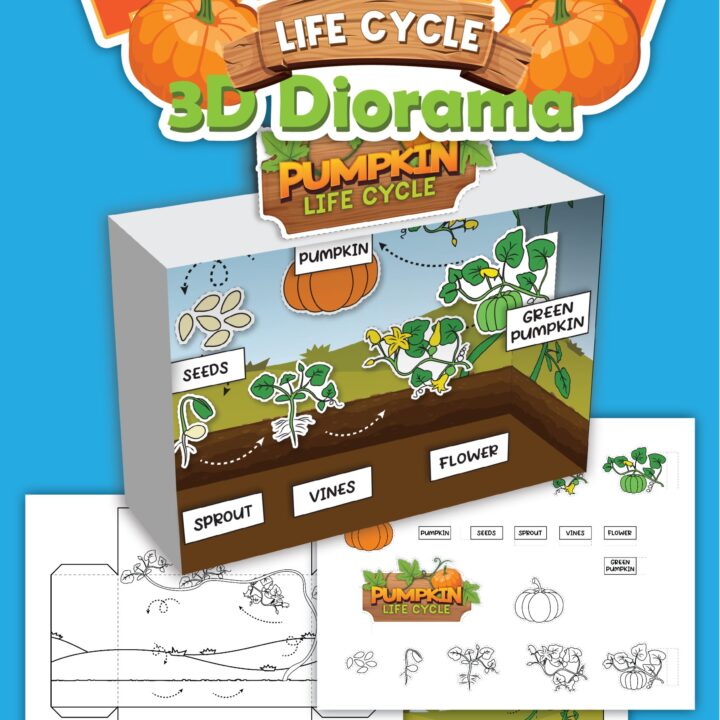
Use your scissors to cut out the images of the pumpkin, seeds, sprouts, vines, flowers, and green pumpkins from the template. Take your time to ensure precise cutting around the edges of each image.
Step 3
After cutting, you’ll notice dotted lines on the template. These lines indicate where you should fold the paper to create a 3D effect for your diorama. Gently fold along these lines, making crisp and neat creases.
Step 4
Begin by assembling the base of the diorama. This might involve folding along the dotted lines to create a standing base or attaching tabs to form a box-like structure.
Step 5
Now, it’s time to attach the sections representing the stages of the pumpkin life cycle to the corresponding areas on the diorama base. This section includes pumpkin seeds, vines, sprouts, and pumpkins in various stages of growth.
Apply glue or adhesive to the designated areas on the template and carefully attach each section to the base. Pay attention to the order and placement of the sections to accurately represent the pumpkin’s growth journey.
Pumpkin Crafts and Printables:
Pumpkin Life Cycle Activity Lapbook
Easy DIY Pumpkin Treat Bags (Free Pumpkin Template)
How to Make Pumpkin Spice Bath Bombs
Pumpkin Printable Craft
Consider taking a field trip to a local farm to supplement your learning. Pumpkin patches are not only a fun way to pick out pumpkins for carving, but they’re also a great resource for observing the stages of the pumpkin life cycle in action. You’ll get a firsthand look at pumpkin plants at various stages of growth, from flowering to harvest.
Exploring the life cycle of a pumpkin through a hands-on craft project like the pumpkin life cycle diorama is a great idea for both kids and adults. By engaging in this creative endeavor, you’ll not only learn about the stage of the pumpkin life cycle but also gain a deeper appreciation for the natural world around us. So, gather your craft supplies, and create a captivating final product that celebrates the wonder of life cycles.
Pumpkin Life Cycle
Looking to dive into the fascinating world of pumpkins? Well, look no further than the Pumpkin Life Cycle Diorama!
Materials
- Printed Pumpkin diorama template
- Pair of scissors
- Adhesive glue or tape
Tools
- Printer
Instructions
- Ready to have some pumpkin fun? First, download the free pumpkin life cycle diorama template
- Grab the scissors and take a careful approach as you cut out the images of the pumpkin, seeds, sprouts, vines, flowers, and green pumpkins from the template. Precision is key here, so take your time and ensure you're cutting right along the edges of each image.
- Once you've finished cutting out all the images, it's time to move on to the next step! Take a look at the template, and you'll notice some dotted lines. These little guides are there to help you create a 3D effect for your diorama. Now, fold the paper along these lines to ensure neat creases.
- Depending on the design, this might involve folding along the dotted lines to create a sturdy standing base or attaching tabs to form a box-like structure. Take your time with this step to ensure everything is secure and ready for the next phase of our diorama adventure!
- Grab the sections representing the pumpkin's growth stages—seeds, vines, sprouts, and pumpkins in different stages. Apply some glue to the right spots on the template, then carefully attach each section to the base. Keep an eye on the order and placement to show the pumpkin's growth journey accurately.